")
Tale of the Tape for NFL Week 2
Throughout the 2014 regular season, former defensive back Matt Bowen will bring you an X's and O's look at the pro game. Here are his five key plays from the Week 2 Sunday NFL schedule.
Brandon Marshall Wins Another Red-Zone Matchup
The veteran wide receiver caught three touchdown passes from quarterback Jay Cutler during the Chicago Bears' 28-20 comeback win over the San Francisco 49ers because of the matchups created by Marc Trestman's game plan inside of the red zone.
TOP NEWS
.jpg?w=2560 "Super Bowl Football")
NFL made $14.5B in revenue for 2025 season
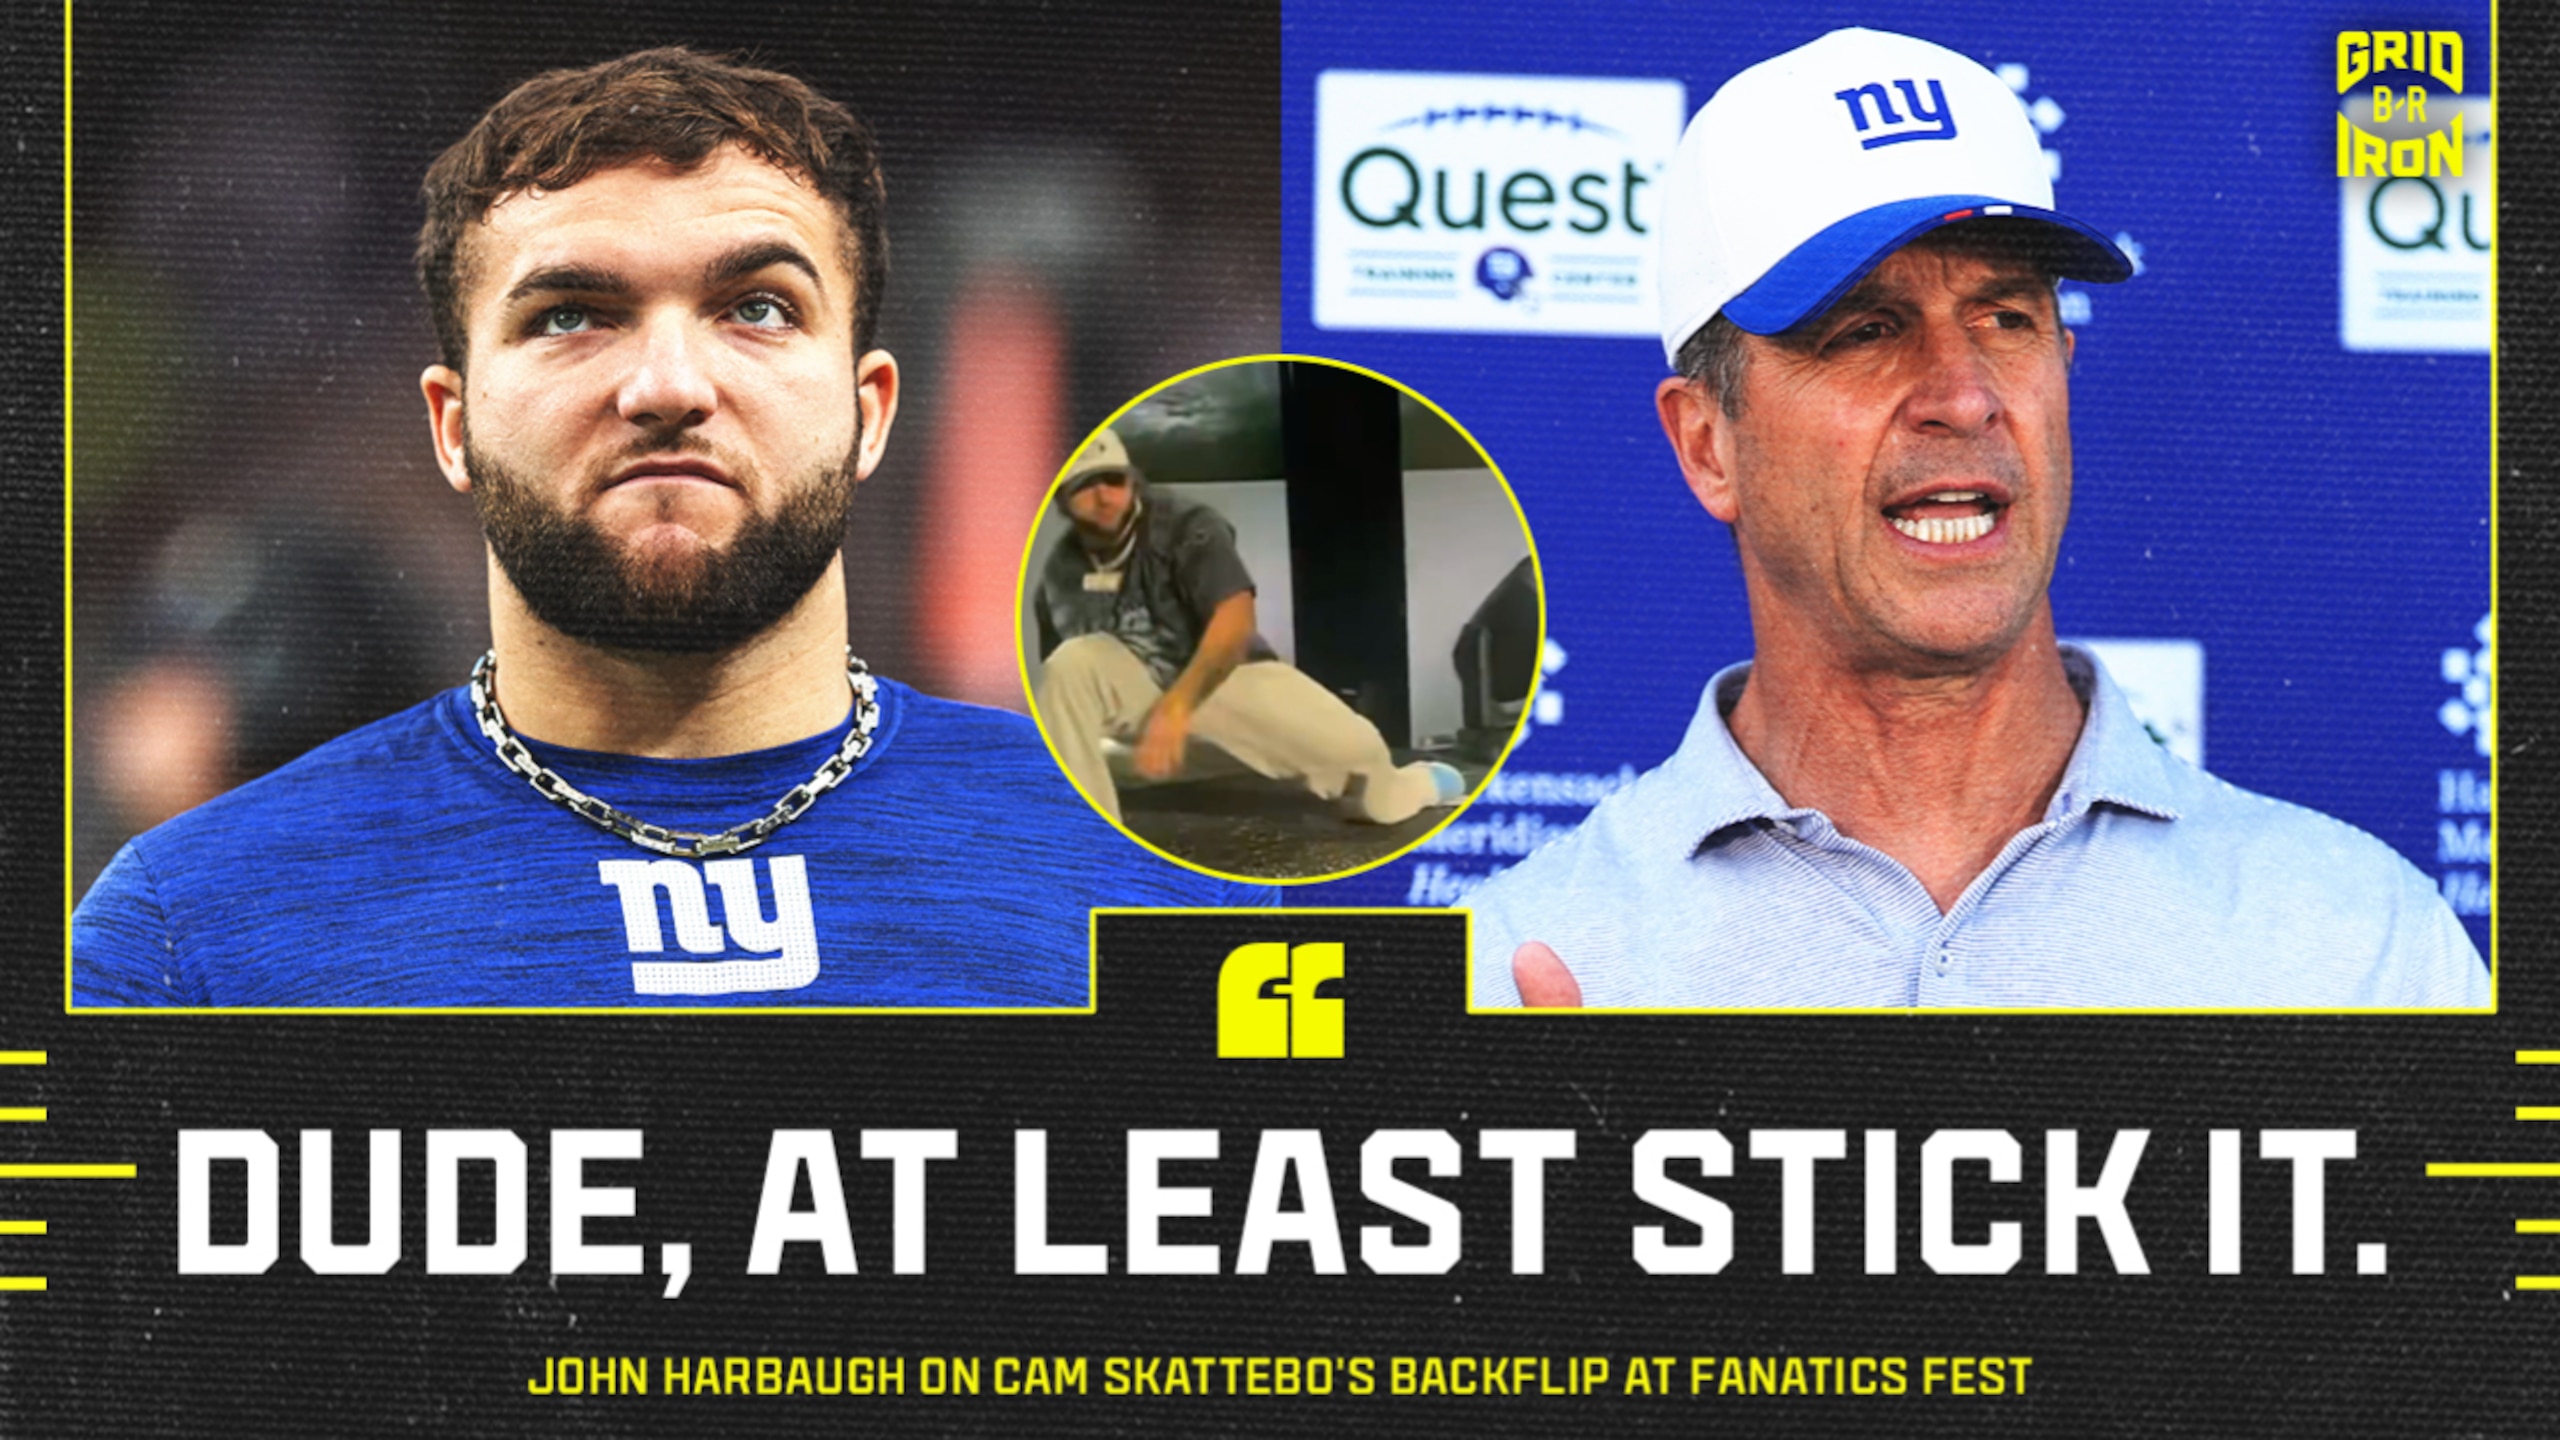
Harbaugh Reacts to Skattebo Flip Fail

Mark Davis Backs Grass Fields
Working versus rookie Jimmie Ward in the 49ers' sub-packages, Marshall beat the first-round pick on the seam route (four verticals), underneath option route and the quick fade (from a slot alignment).
Let's break down Marshall's third touchdown that gave the Bears an eight-point lead late in the fourth quarter.
Personnel: Ace/12 (2WR-2TE-1RB)
Formation: Pro Split Slot (Exchange)
Offensive Concept: Smash-7 (Fade)
Defensive Scheme: Cover 1

The Bears align Marshall and Alshon Jeffery to the open side (weak) of the formation in a slot "exchange" look ("Z" receiver on the ball). This allows Marshall to clear on the vertical release with Jeffery coming underneath on the inside smash route versus Cover 1.
However, with strong safety Antoine Bethea essentially "cutting" the inside release from Jeffery (drive the smash route when "F" blocks), Cutler now has the matchup he wants in the red zone: Marshall versus a rookie defensive back playing from an inside-leverage position.
And given Marshall's size/strength at the point of attack, the Bears wide receiver can stem up the field vertically, create separation and work to the corner of the end zone.

Ward tries to jam/bump Marshall once the wide receiver pushes up the field to disrupt the stem to the fade (jam, play to the hip).
However, Marshall forces Ward to fall back on his heels (once the defensive back initiates contact) and creates the separation he needs to run the route. And with no help over the top, Cutler can target this matchup and throw the fade.

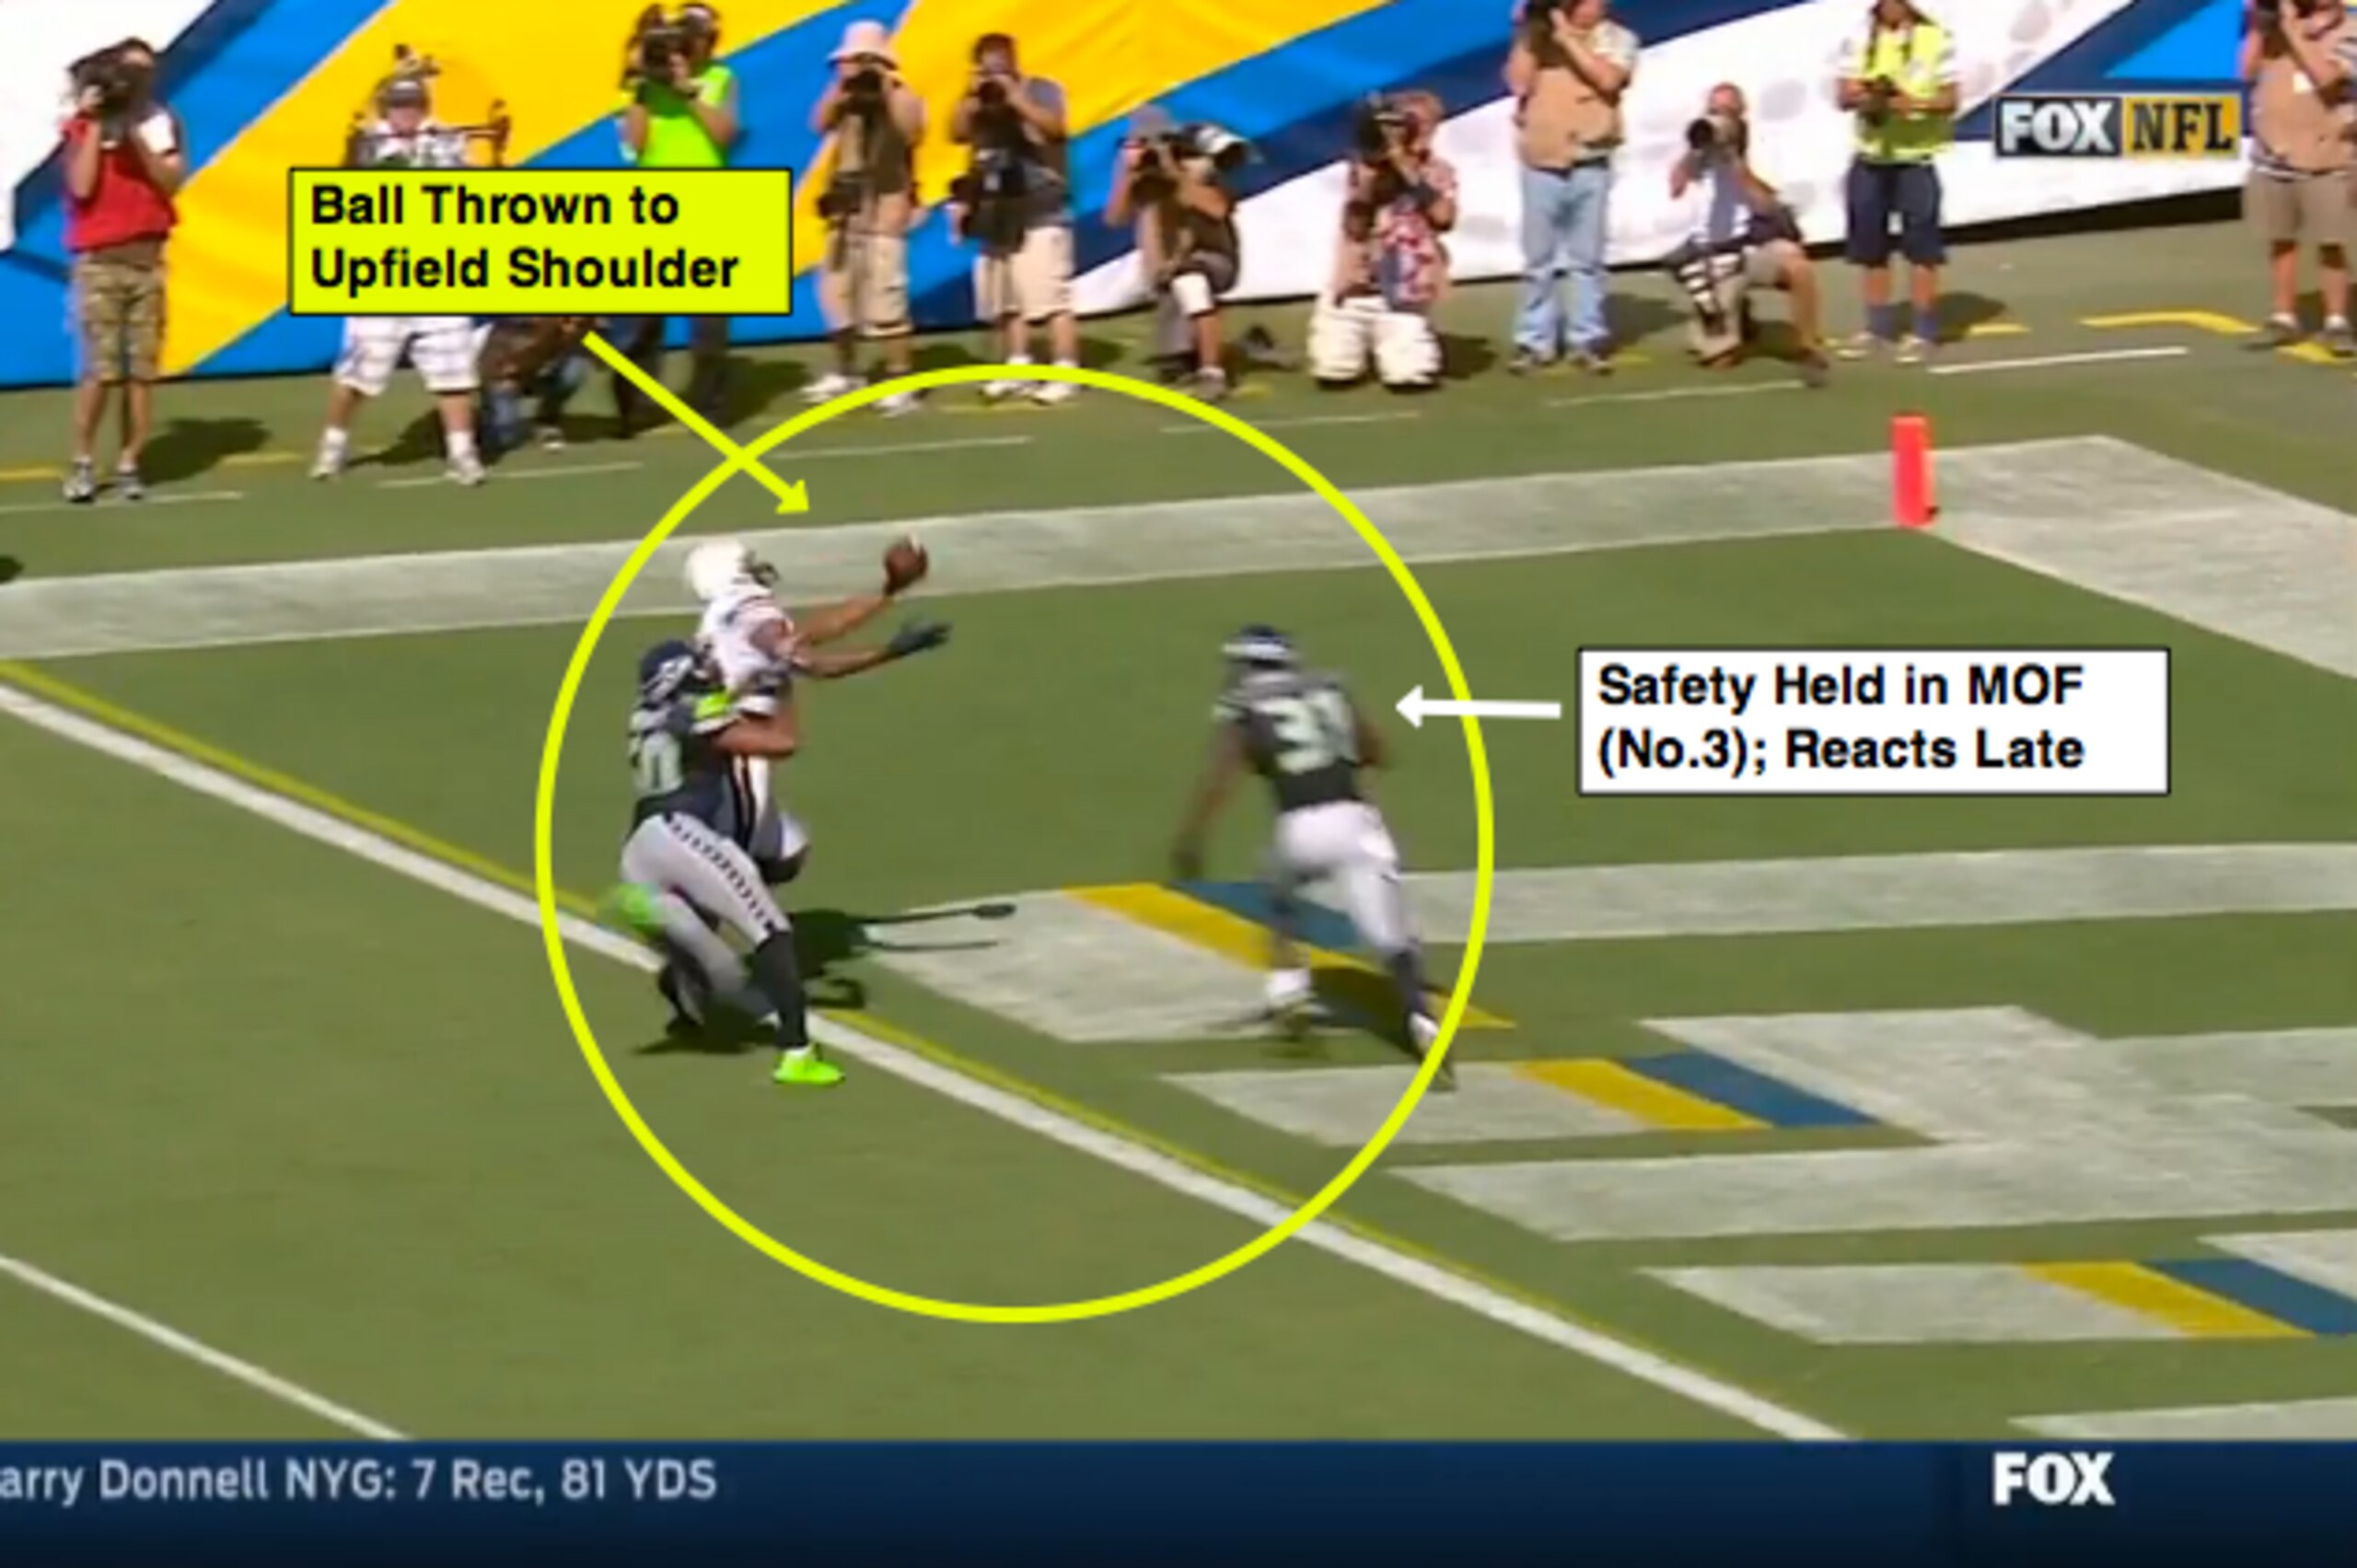
I talk about ball placement all the time in the red zone because it is critical when looking at the leverage position of the defensive back in coverage.
Here, we can see that Ward recovers to get back in-phase (on the hip) versus Marshall on the fade route. However, check out the throw from Cutler as the quarterback puts this ball on the back shoulder of Marshall—away from the defender's leverage.
Find the matchup and exploit it. That's smart football from the Bears based on the game situation and the route scheme.
Tom Brady Identifies "Zero" Pressure, Beats Vikings in Red Zone
During the New England Patriots' 30-7 win over the Vikings in Minnesota, Brady made an excellent check at the line of scrimmage inside of the red zone when he identified zero pressure (seven-man pressure with no safety help) to find wide receiver Julian Edelman on the 7 (corner) route for a touchdown.
Let's talk about the blitz from the Vikings and focus on the route stem from Edelman that allowed the wide receiver to win on the outside breaking cut versus blitz-man technique (inside shade).
Personnel: Ace/12 (2WR-2TE-1RB)
Formation: Unit Wing Slot Gun Far
Offensive Concept: Smash-7 (Corner)
Defensive Scheme: Cover 0 (Zero Pressure)

The Vikings are showing Cover 0 in their pre-snap alignment with a seven-man pressure look and no safety in the deep middle of the field. Plus, with the linebacker in a "green dog" technique (rush to coverage), this plays out as an eight-man pressure from Mike Zimmer's defense.
In this situation, Brady checks at the line with cornerback Captain Munnerlyn playing blitz-man technique (off-man with inside shade) over Edelman in the slot. This creates a one-on-one matchup for the Patriots wide receiver if Brady can get the ball out versus pressure.
And with no help to the outside (zero-pressure rules), Edelman can take a hard, inside stem on the release, press vertically up the field and break on the 7 cut.

Because of the inside stem off the release, Munnerlyn slides to maintain his inside leverage (proper technique).
However, Edelman eats up the cushion versus Munnerlyn (distance between defensive back and wide receiver) and forces the defensive back to "open the gate" (open the hips instead of staying square) while taking a "bucket step" on his transition (step behind).
This creates separation for Edelman at the top of the route and puts Munnerlyn in a trail position versus an outside breaking cut.

Brady takes a shot when delivering this throw, but look at the ball placement on the upfield shoulder. This takes the defensive back out of play because of his inside leverage and the blitz scheme.
I like the defensive call given the field position, and the Vikings do put a hit on the quarterback.
But this is more about the ability of the Patriots offense to identify the pressure, make the check and execute the route scheme in the red zone.
Chargers, Antonio Gates Target Seahawks with the "Dakota" Formation
The San Diego Chargers' game plan in the red zone (and high red zone) focused on creating specific matchups for Gates out of the "Dakota" formation (tight end aligned as the backside "X" in a 3x1 formation) versus the Seattle Seahawks' Cover 1 defenses.
With Gates drawing the matchup of a linebacker or strong safety in coverage, the tight end responded with three touchdowns out of this formation during the Chargers' 30-21 upset win over the world champs.
Let’s break down Gates’ third touchdown catch and discuss why the route stem allowed the veteran to win this one-on-one matchup.
Personnel: Posse/11 (3WR-1TE-1RB)
Formation: Doubles Slot "Dakota"
Offensive Concept: 9 Fade (Dino)
Defensive Scheme: Cover 1 "Robber"

Here's a look at the Dakota formation versus the Seahawks' Cover 1 "Robber" defense (safety drops down to inside hole).
As you can see, Gates is aligned as the backside "X" in this formation with a trips look to the open side. This puts linebacker K.J. Wright in a matchup versus the tight end with safety Kam Chancellor playing in the deep middle of the field.
There's the one-on-one matchup quarterback Philip Rivers can target with a smash-7 (corner) route to the open side (trips alignment) to hold/occupy the free safety over the top.

This is a veteran route from Gates because of the stem to create some separation versus Wright playing from an outside leverage position.
Gates initiates the contact down the field and leans into Wright. This allows Gates to show the outside cut (7 route), while forcing Wright into a trail position.
This is a technique used by tight ends across the league within the route stem (shows up often in the red zone on inside seam routes), as it creates leverage/separation versus man coverage.

With Rivers stepping up in the pocket, Gates is in a position to stack on top of Wright as he carries this route down the field.
The tight end separates from the coverage and now has an opportunity to locate the ball with Chancellor breaking from the deep middle of the field.
This is an excellent adjustment to the ball as Rivers drops the throw over the outside shoulder with Wright trailing the play.
And with Chancellor breaking late (occupied in the middle of the field), Gates can win another one-on-one matchup out of the Dakota formation.
Sammy Watkins Produces First NFL TD on Hi-Lo Mesh Concept
The rookie wide receiver showcased his playmaking ability Sunday (eight receptions, 117 yards, one touchdown) as the Buffalo Bills moved to 2-0 on the season with a 29-10 win over the Miami Dolphins.
Here's a look at Watkins' first career touchdown with the Bills creating an opportunity for the wide receiver to catch the ball in space (shallow drive route) off the inside mesh action.
Personnel: Posse/11 (3WR-1TE-1RB)
Formation: Doubles Slot (Bunch) Gun Far
Offensive Concept: Hi-Lo Mesh
Defensive Scheme: Quarters "Box"

With a bunch alignment to the closed side of the formation, the Bills align Watkins in a reduced split (tight to the core) on the open side (high alert for shallow drive route).
At the snap, the Bills clear out the underneath defender to the closed side on the wheel route (forces defender to carry/match), run the inside curl (occupy the cornerback) and send the tight end on the crossing route to pick the linebacker.
This prevents the linebacker from "walling off" Watkins on the shallow crossing route, while the receiver can work to the vacated zone in the closed-side flat.

This is a good look at the "pick" from the tight end, as Watkins is now in a position to stem this route across the field with no immediate threat underneath.
And with the wheel route/inside curl clearing out the closed side of the formation, quarterback EJ Manuel targets Watkins on the shallow drive route.
This allows the Bills to cater to Watkins' skill set in the open field by getting him the ball in space. Clear out the flat, remove the linebacker and let the rookie make a play.
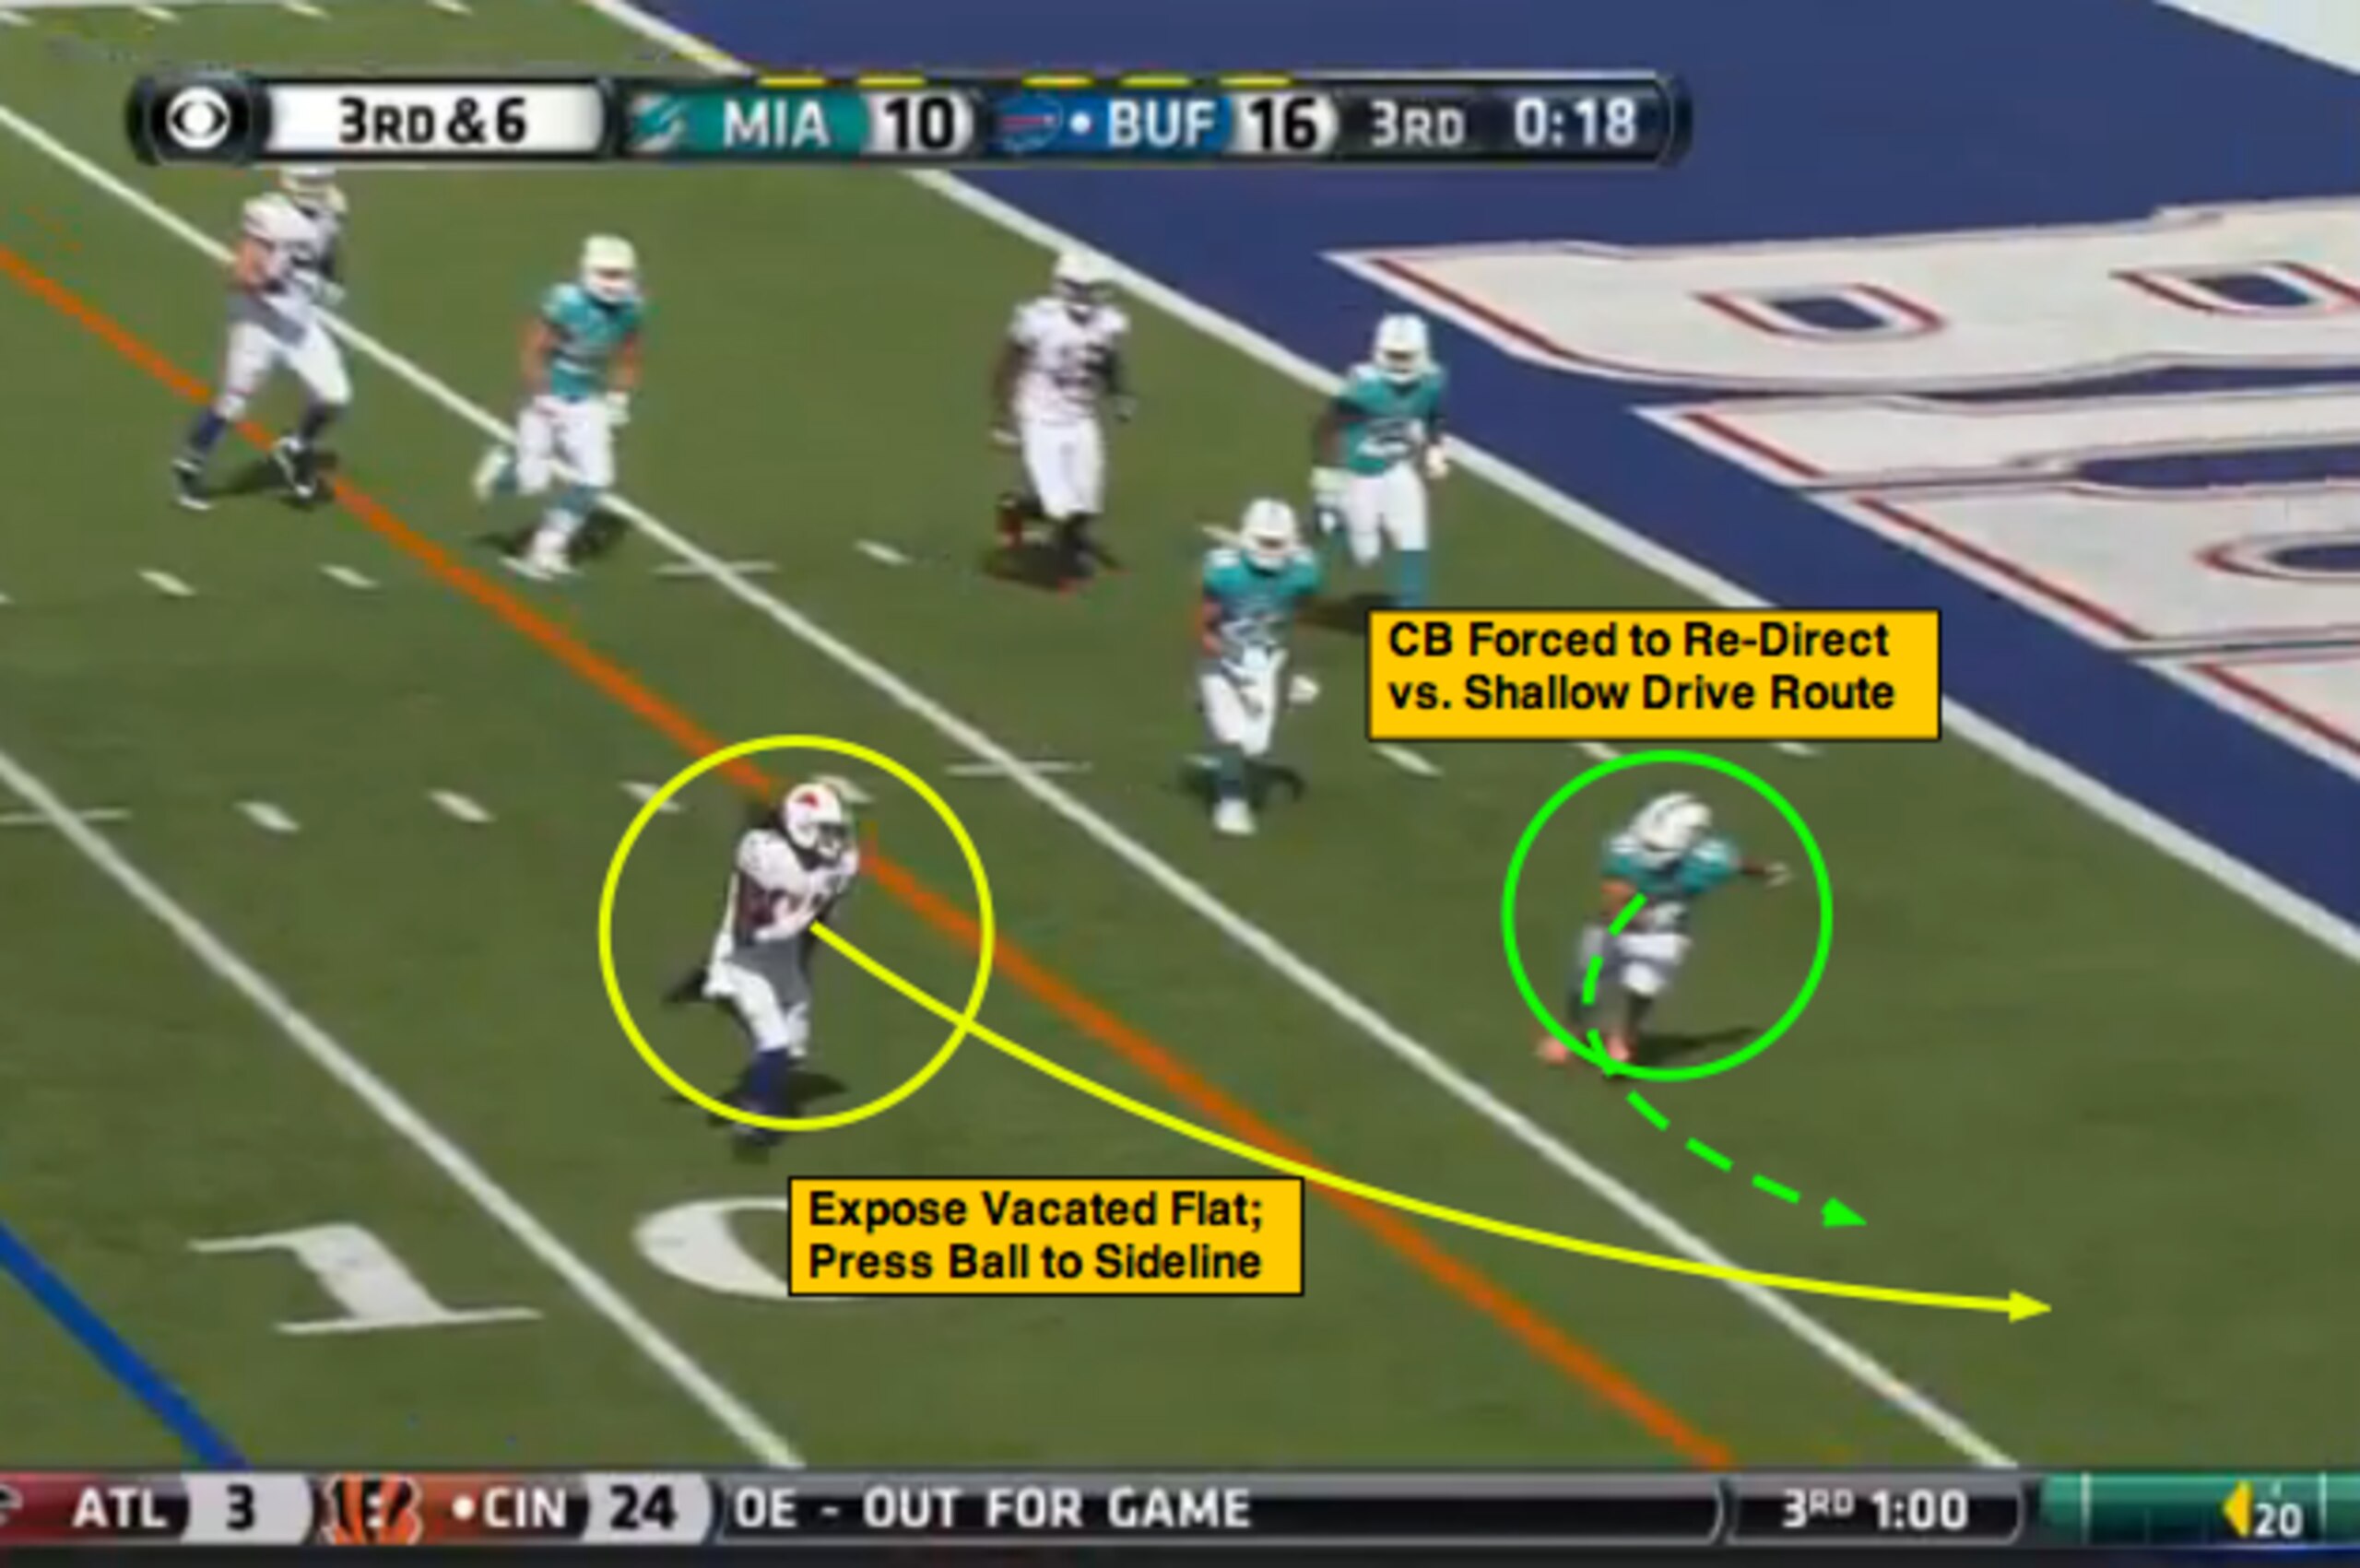
The cornerback drops the inside curl and tries to redirect to create an angle to Watkins in the flat.
However, Watkins presses this ball to the sideline, eliminates the angle and puts this ball across the goal line for his first touchdown as a pro.
The Bills leaned on inside breaking routes with Watkins on Sunday, and I would expect more of that as the season progresses because of the rookie's ability to win versus outside leverage and produce after the catch.
Jordy Nelson Beats the Jets on the Double-Move
With the score tied 24-24 in the fourth quarter at Lambeau Field, the Green Bay Packers dressed up the deep double-move using personnel, wide receiver splits and play action to execute the out and up for an 80-yard score versus the New York Jets' Cover 1 defense.
Here's a look at Aaron Rodgers' touchdown pass to Jordy Nelson (nine receptions, 209 yards, one touchdown) with the Packers showing eight-man protection out of Tank/22 personnel to take advantage of poor eye discipline in the secondary.
Personnel: Tank/22 (1WR-2TE-2RB)
Formation: I Tight
Offensive Concept: Out/Up (Max Protection)
Defensive Scheme: Cover 1

With Tank/22 personnel on the field in an I Tight alignment (run alert), the Packers show play action to the open side of the formation.
This creates an eight-man protection look for Green Bay and gives Rodgers time to set his feet at the top of the drop while the double-move develops.
To the closed side, Nelson is aligned at the bottom of the numbers. That's a key/tendency for the out route (receiver tightens split to create room for an outside breaking cut).
However, by stemming this route to almost 10 yards at the break point, Nelson is in a position to run the double-move with cornerback Dee Milliner playing for the out route based on the pre-snap split of the receiver.

Milliner plays through the release with a "bail" technique (open hips, sink) and is in a position to stack on Nelson as the receiver pushes vertically up the field.
However, poor eye discipline is the No. 1 reason defensive backs get beat in man coverage (at any level of football). And that's what we see here from Milliner at the top of the route as the cornerback squats while sticking his eyes in the backfield.
That allows Nelson to sell the double-move and continue to stem up the field with Milliner now stuck in a trail position that he won't recover from.

Even with Milliner beat, the Jets still have a chance to get the ball-carrier on the ground because of the single-high safety defense.
But instead of using the sideline as his help (squeezing the receiver to the boundary), rookie safety Calvin Pryor takes a poor angle to the ball (fails to attack inside shoulder) and opens up the door for Nelson to cut back into the open field.
The Jets secondary lacked the proper technique and discipline in this situation, but give credit to the Packers for setting up the double-move to produce the game-winning score.
Seven-year NFL veteran Matt Bowen is an NFL National Lead Writer for Bleacher Report.
.jpg?w=2560 "Eagles Football")


