NFL 101: Breaking Down the Basics of Man Pressure
In this installment of the "NFL 101" series at Bleacher Report, former NFL defensive back Matt Bowen breaks down the basics of man pressure to give you a better understanding of the scheme and its execution at the pro level.
Click here for the previous “NFL 101” breakdown: Red-Zone Route Combinations
When we last looked at the defensive side of the ball, our focus was on the disguise and execution of zone pressure. Think of five-man rush schemes (rush five, drop six) with a three-deep, three-under (matchup) zone shell in the back end.
TOP NEWS
Week 2 NFL Power Rankings 📊
.jpg?w=2560 "Patriots Seahawks Football")
Report: Darnold Could Miss 3-6 Weeks
2026 NFL Trade Block Big Board Entering Week 2 🏈
Today, let’s break down the basic principles of man pressure using examples of both Cover 1 (free safety help in the middle of the field) and Cover 0 (man coverage with no safety help) to highlight the responsibilities in the blitz schemes.
As with any man-coverage defense, technique, alignment, leverage and knowing where your help is (free safety/sideline) are major keys to winning when the ball comes out hot (sight adjust) or when the pressure fails to get home.
Using some examples from the All-22 tape, let’s start talking about man pressure at the NFL level while hitting on the key terminology (green dog, peel, flat-foot read, etc.) associated with these blitz schemes to ensure coverage discipline at the second level and in the secondary.
Cover 1 Pressure vs. "Zero" Pressure (Leverage/Help)
When you are watching games during the season (or studying tape) be aware of the leverage in the secondary when teams are sending man pressure—because that tells the story.
As we talked about in the offseason when looking at base Cover 1 (man free), the defensive backs will align with an outside shade (outside eye of the receiver) and “funnel” (or force) the route to their help in the middle of the field (free safety).
That doesn’t change in a Cover 1 pressure scheme (press or off-man) with the free safety (or strong safety, based on the pre-snap look) rolling to the middle of the field.
The safety will gain depth—and split the formation—to put himself in a position to close the middle of the field (seam/post) or get over the top of the 9 (fade) route (bottom of the numbers).
Here’s an example of a Ravens man-pressure scheme (five-man pressure) versus the Steelers, with the free safety blitzing to the open (weak) side of the formation and the strong safety playing the deep middle of the field:
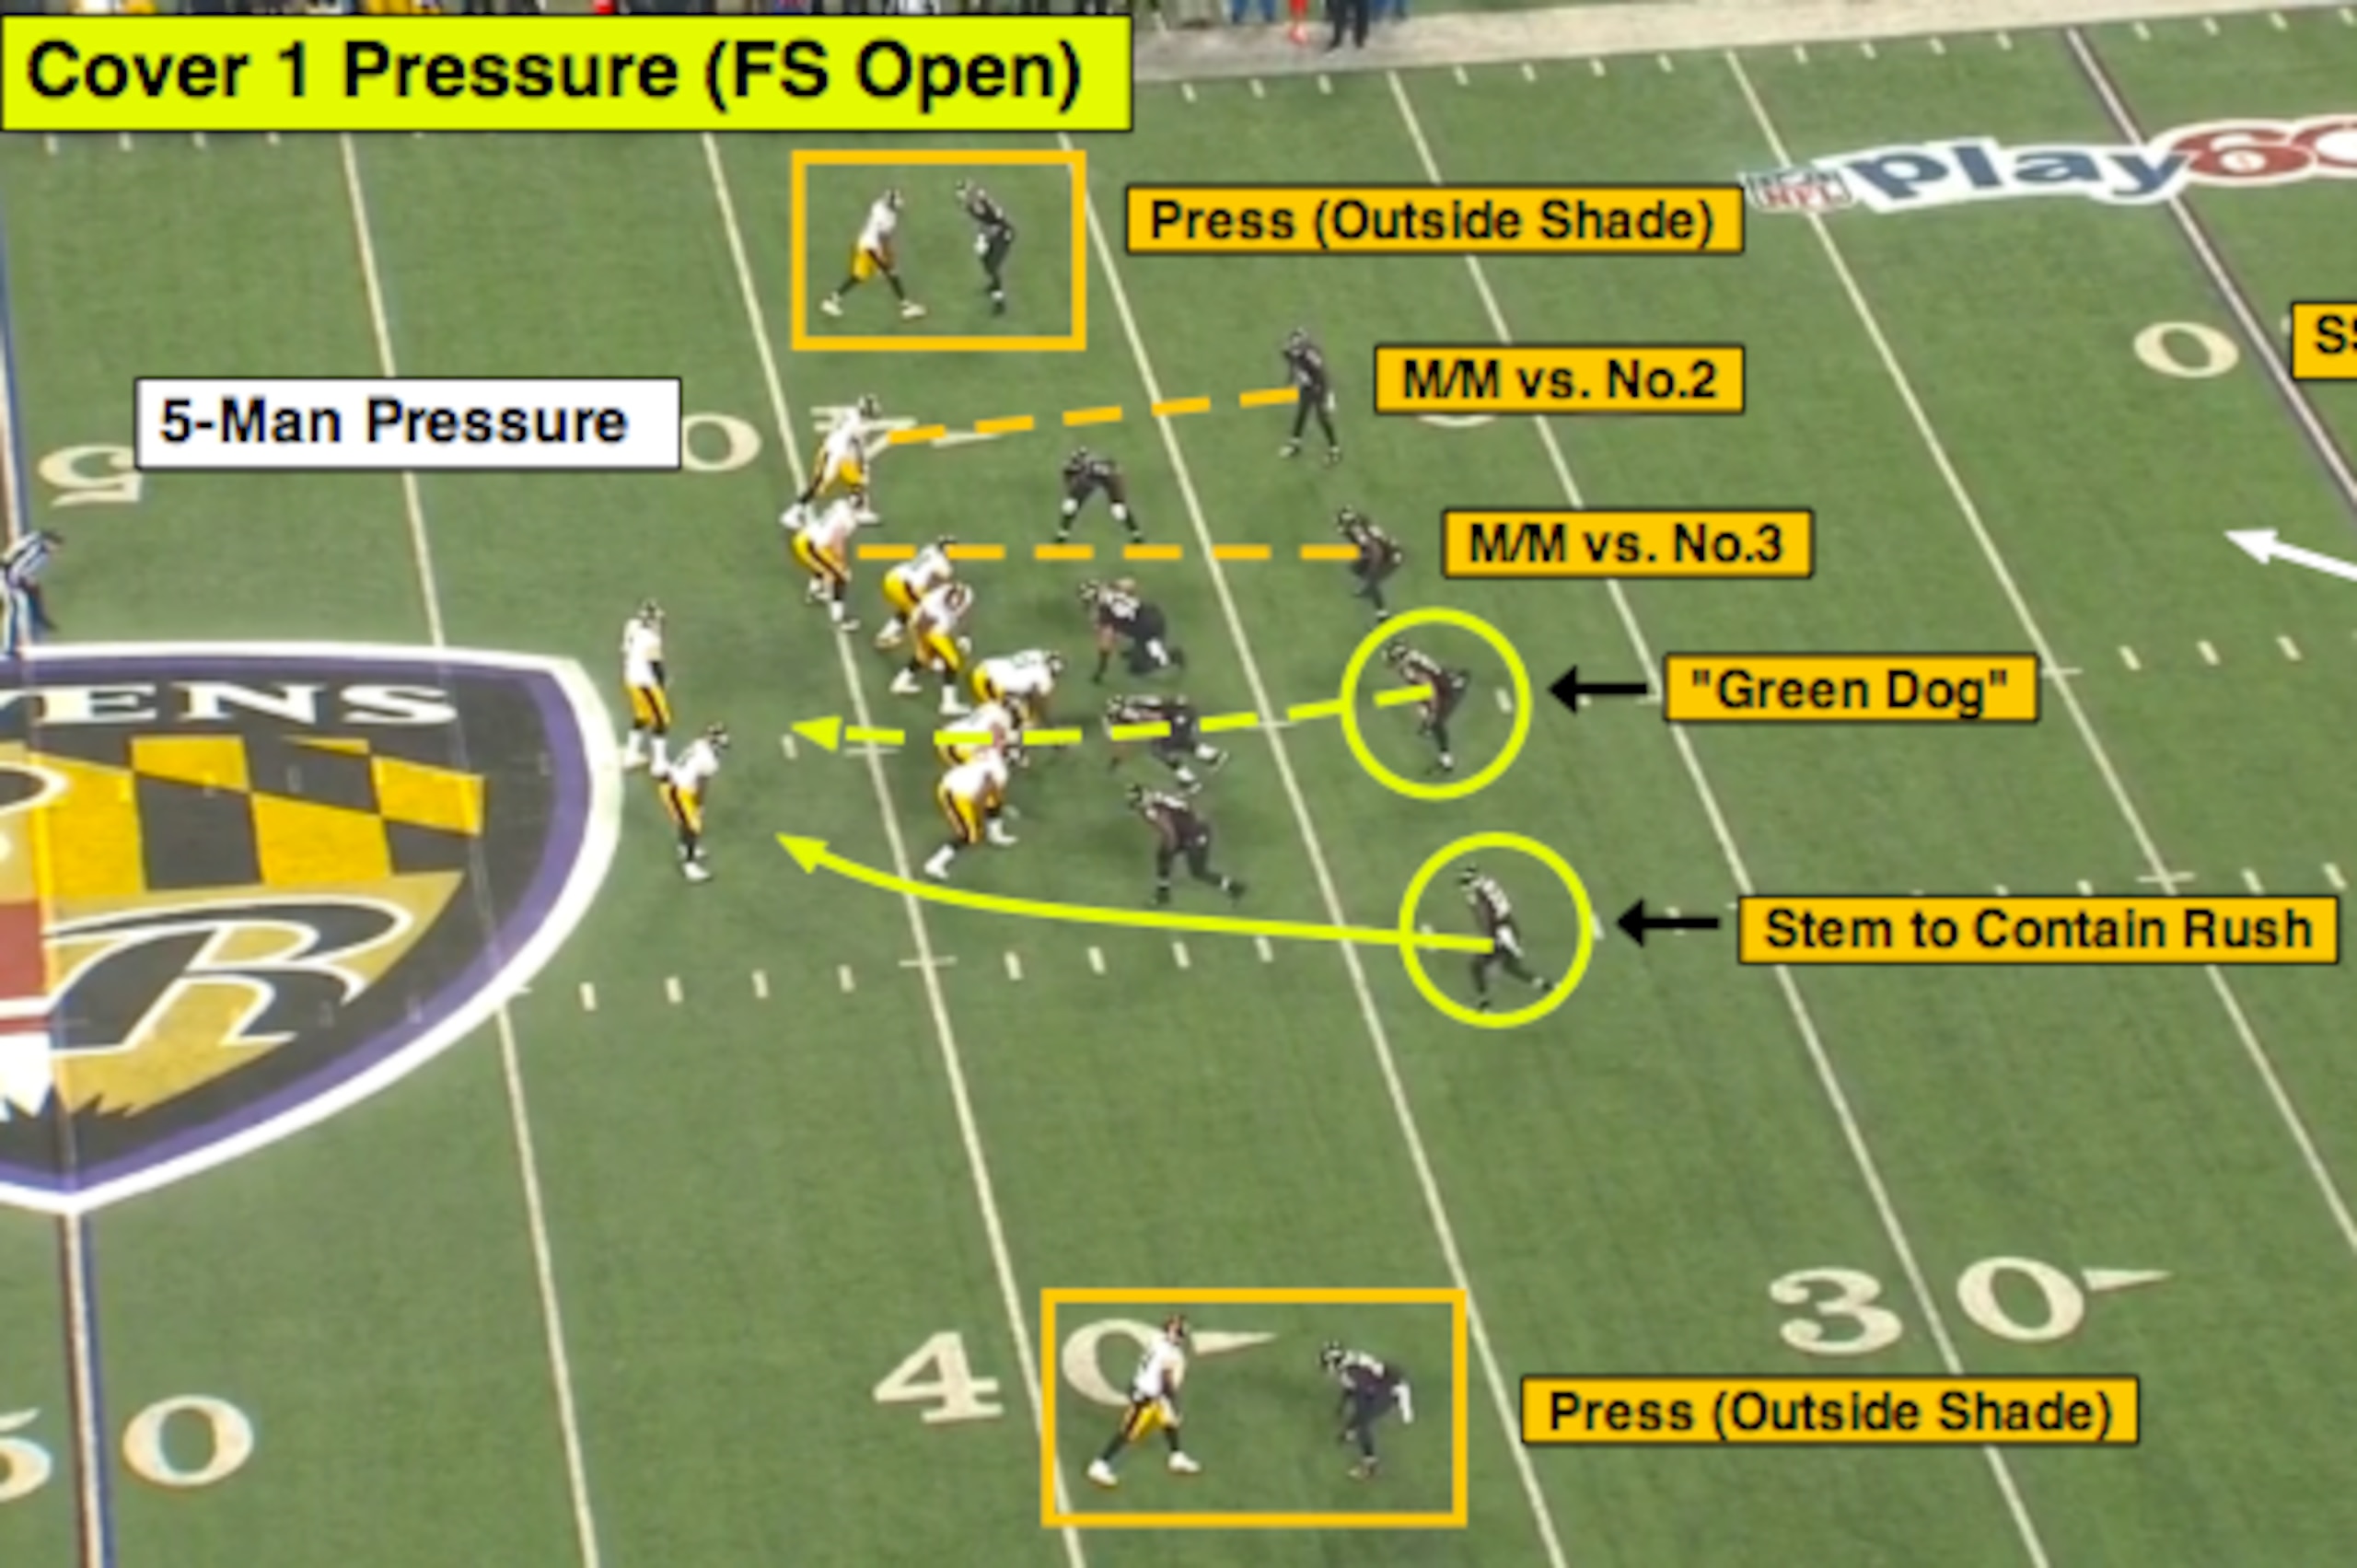
Look at the initial leverage positions of the two cornerbacks and notice the nickel to the closed (strong) side of the formation. As you can see, they are playing from an outside leverage position and will “funnel” those receivers to their safety help in the middle/over the top.
Now let’s look at a playbook diagram of a Cover 0 pressure (“zero” pressure) from my old Redskins defensive playbook under coordinator Gregg Williams: Under Strike Closed Zero.
It's a six-man pressure scheme used in early-down-and-distance situations versus Regular/21 personnel (2WR-1TE-2RB).
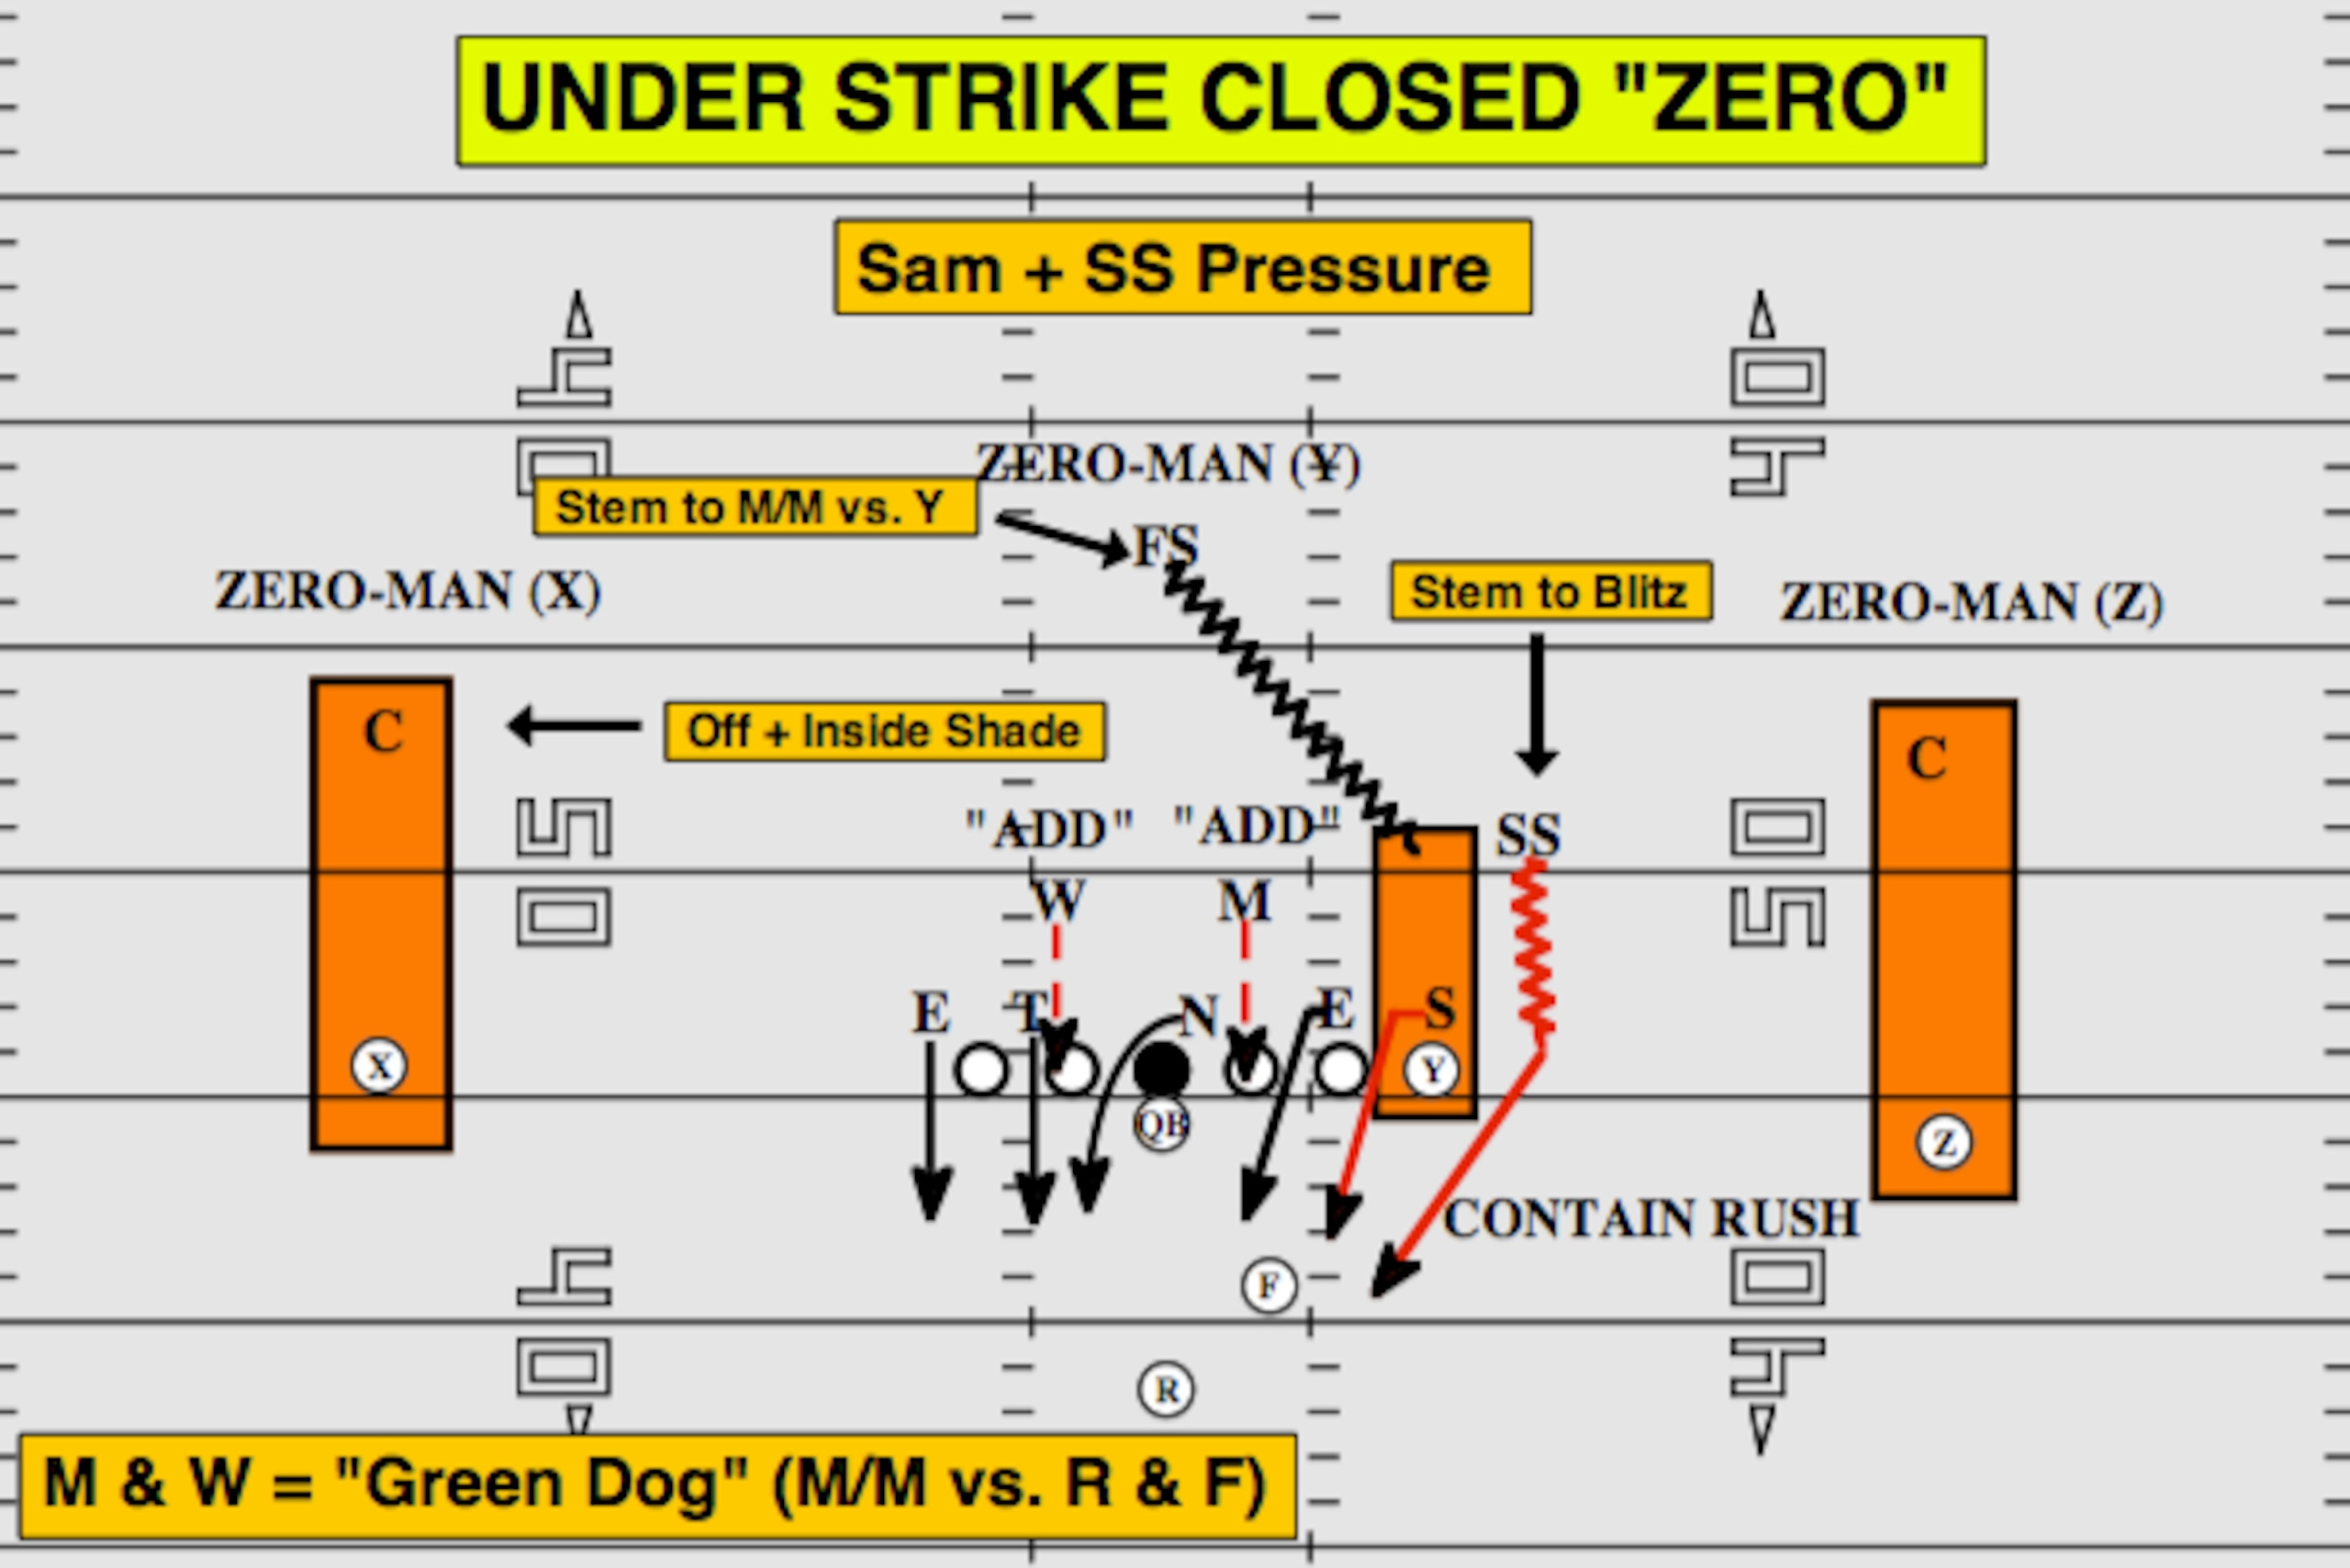
In “zero” pressure, the defenders play from an inside shade (inside eye of the receiver) without any safety help in the middle of the field.
In this situation, the defense is blitzing to the closed side of the formation from a 4-3 “under” front (nose tackle aligned to the closed side) with the "Sam" linebacker (S) slanting inside the tight end (Y) and the strong safety (SS) stemming to a blitz alignment to rush off the edge with contain responsibilities.
This allows the free safety to match up to the tight end in coverage with both linebackers ("Mike" and "Will") responsible for the running back (R) and fullback (F).
That leaves the corners to match up to the wide receivers (Z, X) from that inside-leverage position.
Where’s the help? The sideline.
The goal is to take away any inside-breaking route (by alignment) and recover/use the sideline as your help versus outside-breaking concepts.
And if the offense can get the ball out versus this pressure (and complete an outside-breaking route), that’s on the call in the huddle. Break on the throw, make the tackle and move on to the next play.
"Green Dog" Technique
You may have noticed the linebacker in that example from the Ravens tape using a “green dog” technique to rush the quarterback (making it a six-man pressure).
This is a technique used in both Cover 1 and Cover 0 for linebackers (or safeties) to “add” to the blitz front when their “coverage” blocks.
Let’s go back to that Ravens blitz to see how this plays out on the tape:

In this blitz scheme, the Ravens’ open-side linebacker is responsible for the running back in coverage.
However, when the back slides in protection to pick up the blitzing free safety off the edge, the linebacker can now use the “green dog” technique to "add" to the blitz front while rushing through the open-side “B” gap.
Now, flip over to the closed side of the formation with the linebacker matched up in coverage versus the tight end. With the Steelers keeping the tight end in on protection, that linebacker can also “add” to the blitz front or “zone up” to read the quarterback.
Let’s look at another example of the “green dog” technique from the Raiders-Chiefs game this past season, with Regular/21 personnel on the field for Oakland versus a five-man Cover 1 pressure (Sam and Will):
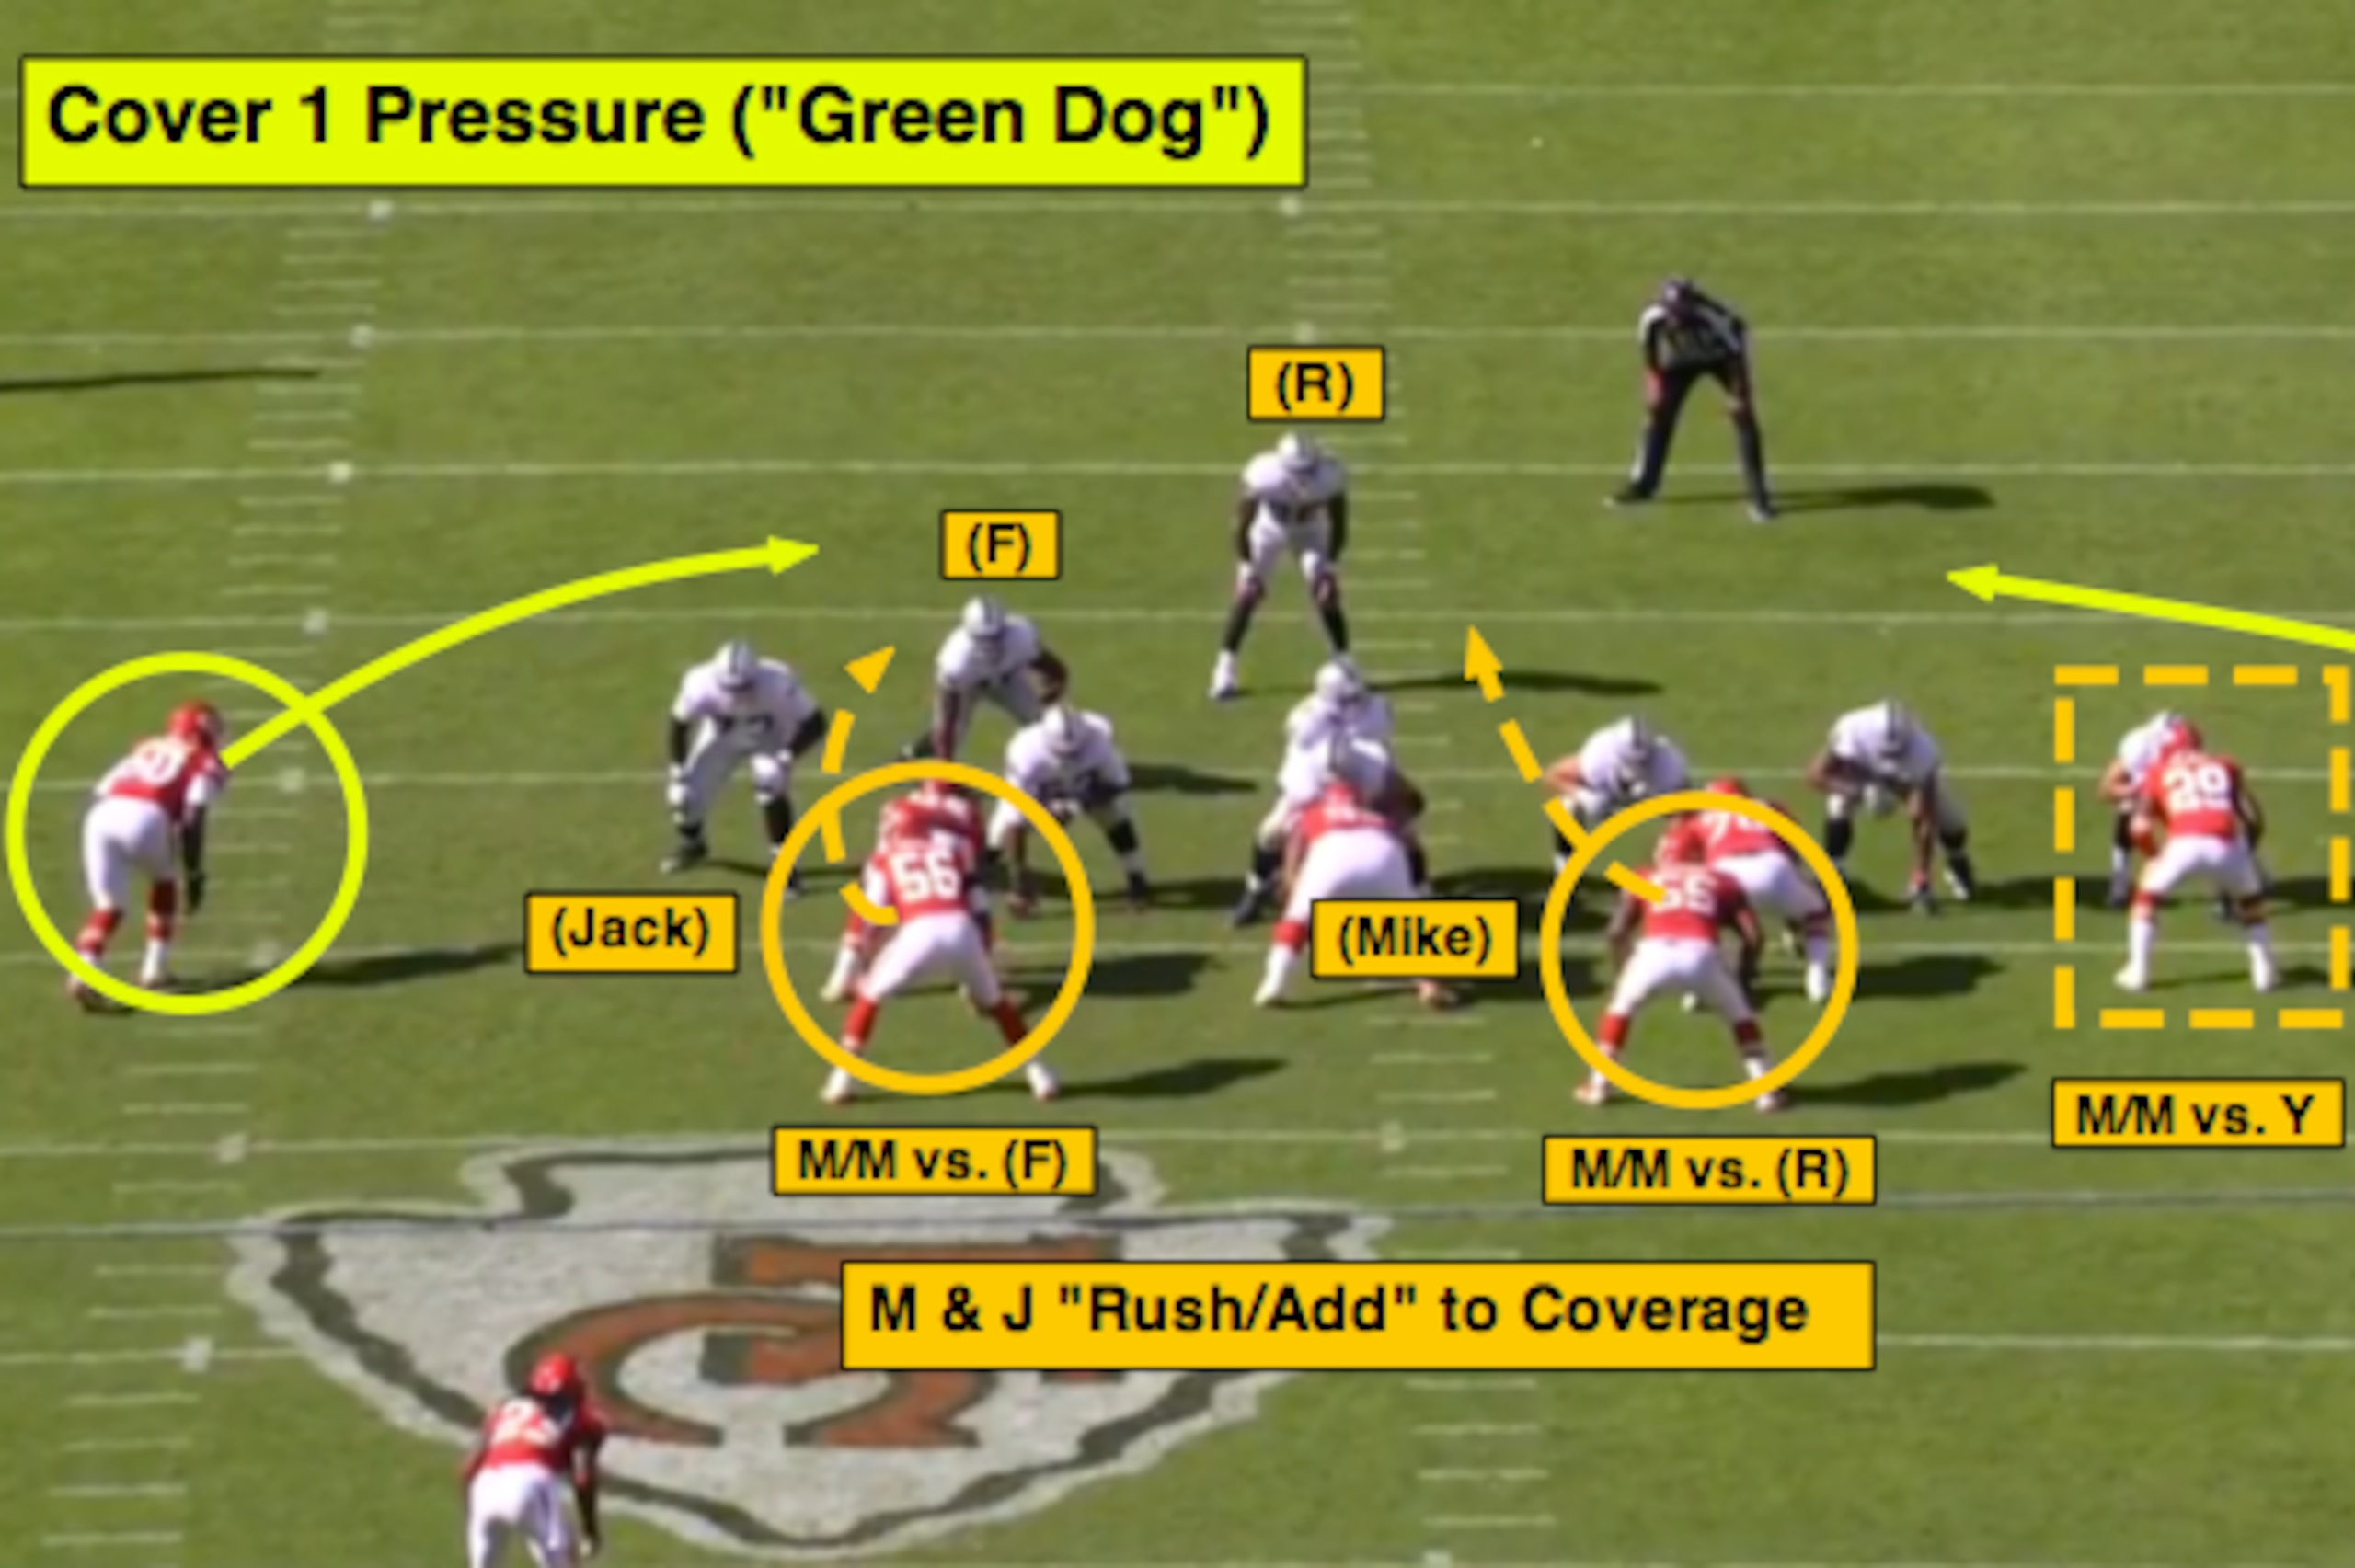
I want to view the end-zone angle so we can discuss the coverage responsibilities for the strong safety plus the Mike and "Jack" ‘backers in the Chiefs' 3-4 front.
In this five-man blitz scheme versus a Pro Weak I formation, safety Eric Berry walks up to press the tight end (Y). That allows the Mike to match to the running back (R) and the Jack to cover the fullback (F).
All three defenders can “add” to the blitz front if their “coverage” blocks at the point of attack (tight end) or stays in on protection.
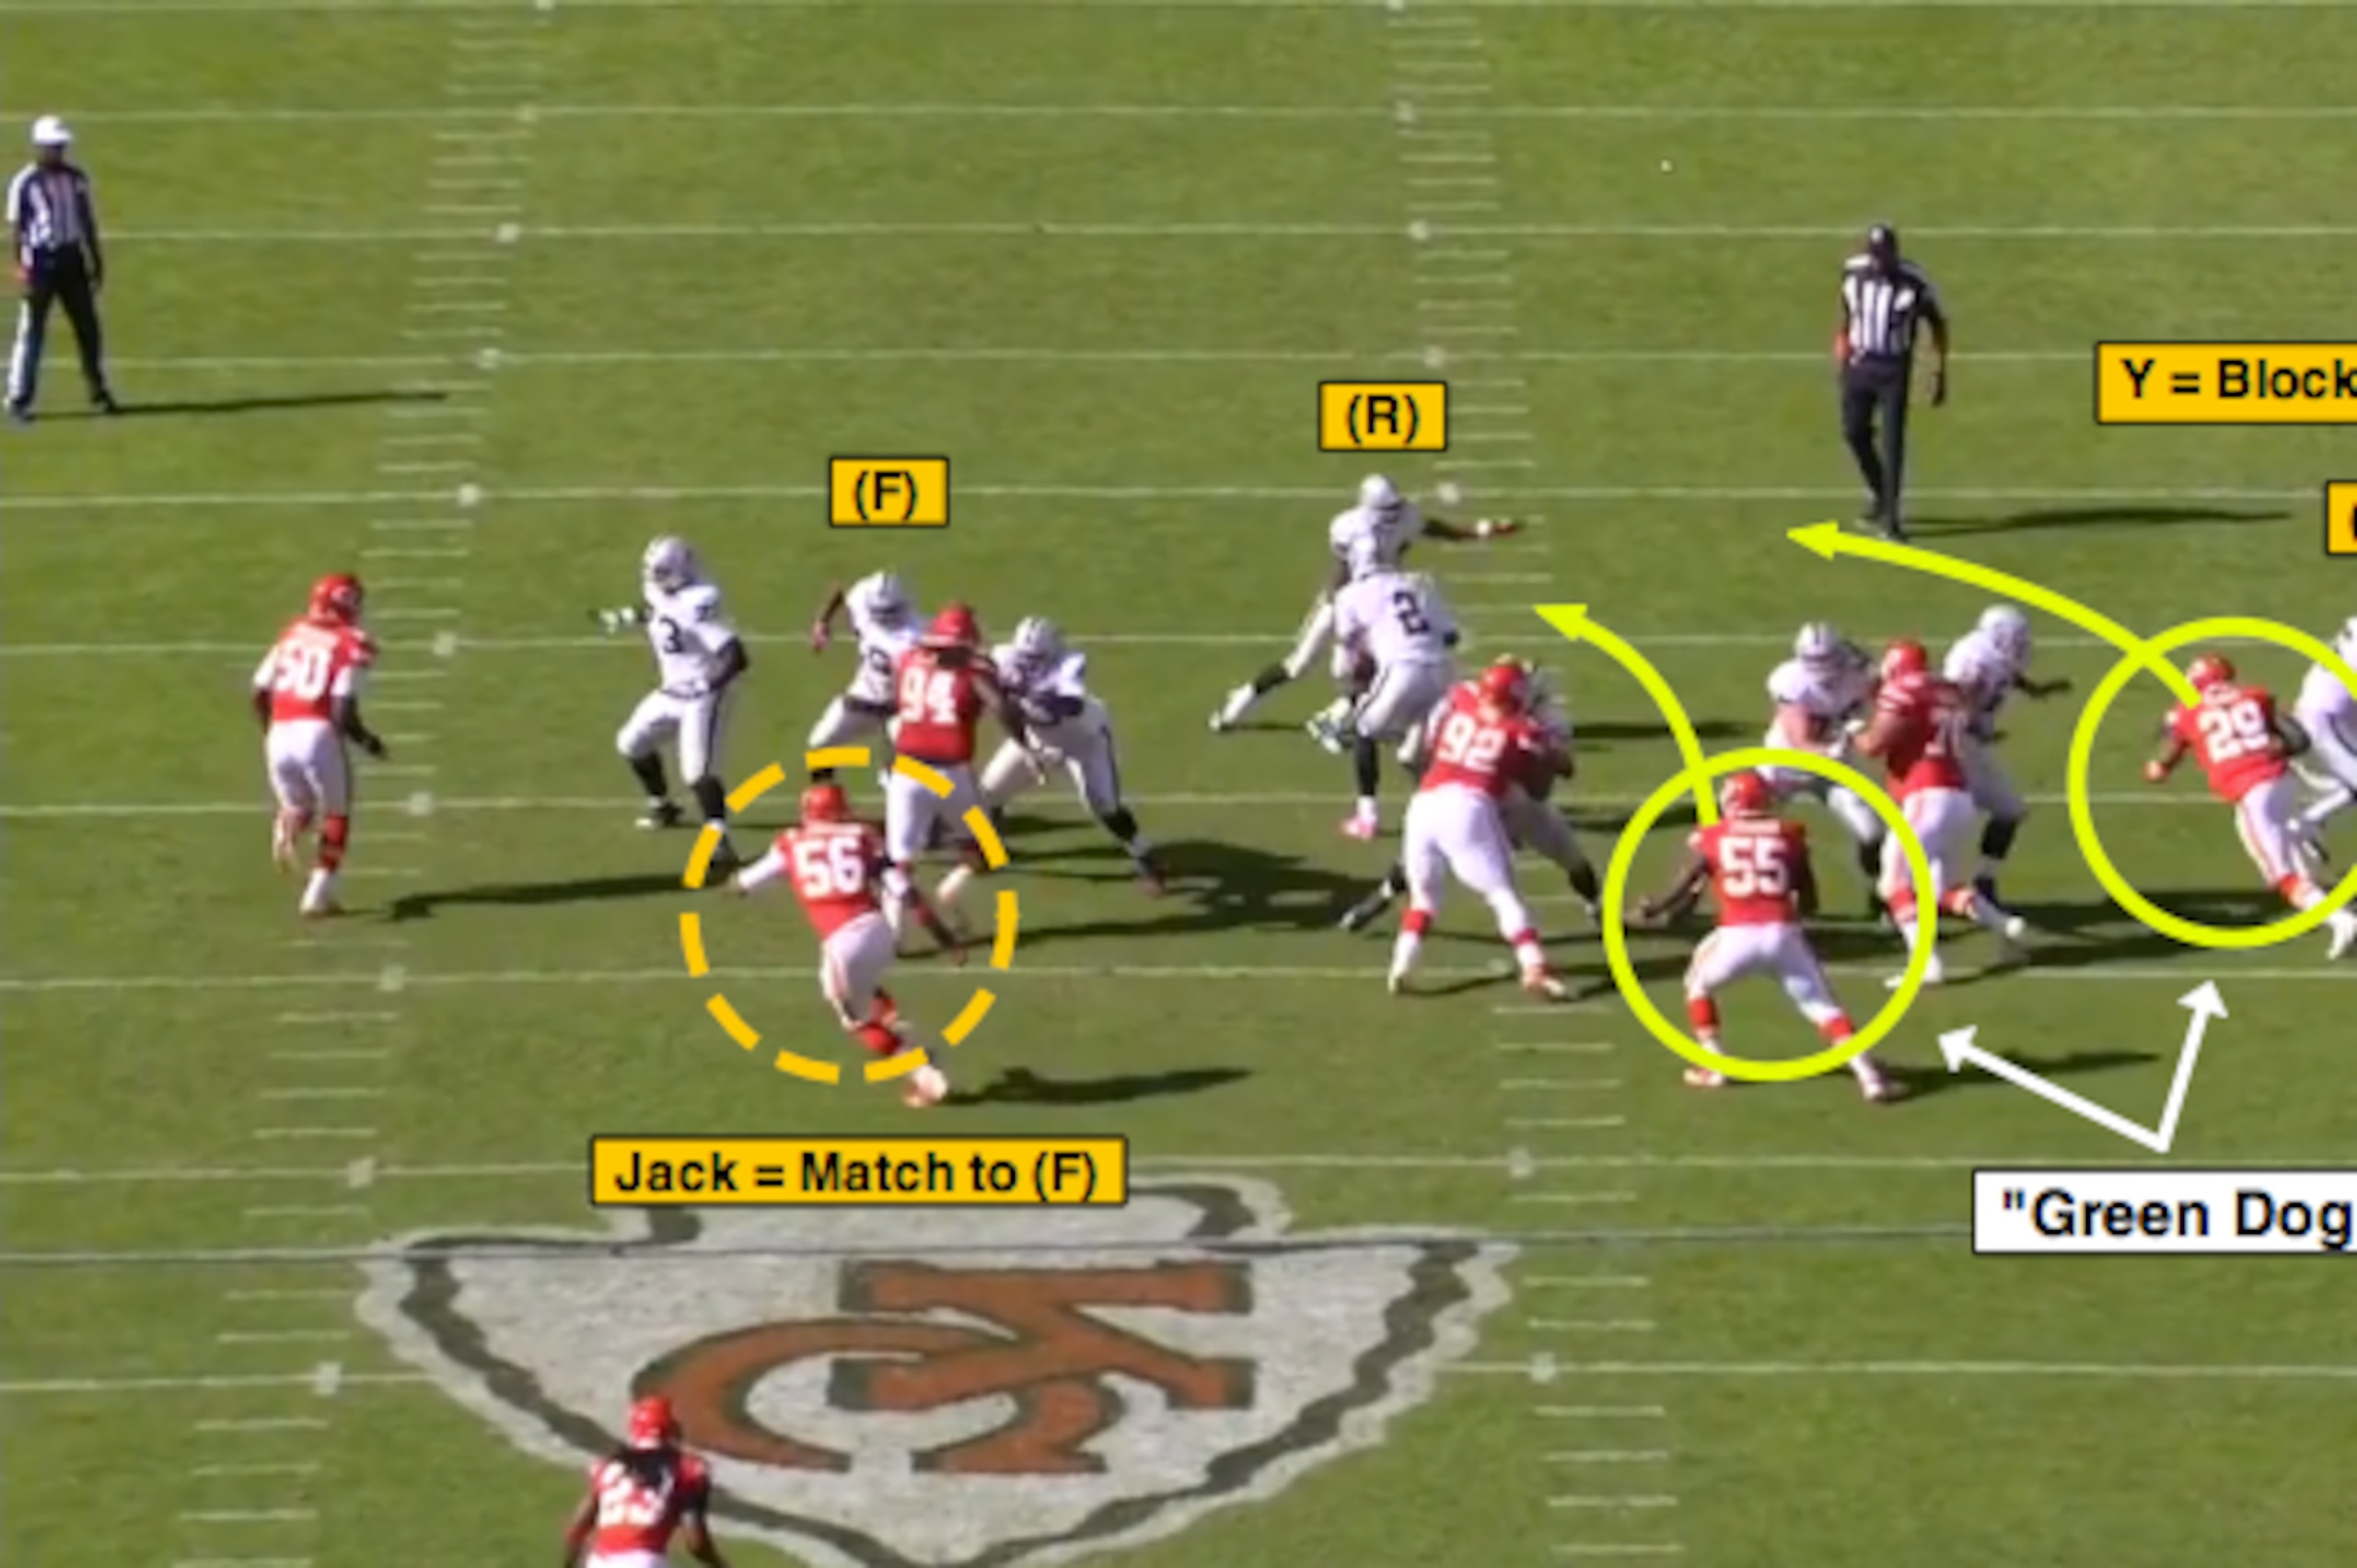
Let’s start with Berry after the snap. With the Raiders sliding the protection to the closed side of the formation, the tight end blocks out on the blitzing Sam ‘backer. This allows Berry to use the “green dog” technique and “add” to the blitz front.
Inside, the Mike 'backer reads the counter-play action and "adds" to the blitz front with running back Darren McFadden working to the closed side in protection. That leaves the Jack ‘backer to match to the fullback releasing to the open side of the formation.
This was a five-man pressure scheme called in the huddle. However, with the Chiefs using the “green dog” technique, they create a seven-man pressure to pick up a sack in this situation versus Raiders quarterback Terrelle Pryor.
“Peel” Technique
The “peel” is a technique used by edge-rushers in pressure schemes to pick up any back who releases out of the backfield (swing route). They will “buy” that coverage and match to the back instead of rushing the quarterback.
Here’s an example of how the “peel” technique plays out from the Jets-Patriots matchup with Houston/20 personnel on the field for New England (3WR-2RB):

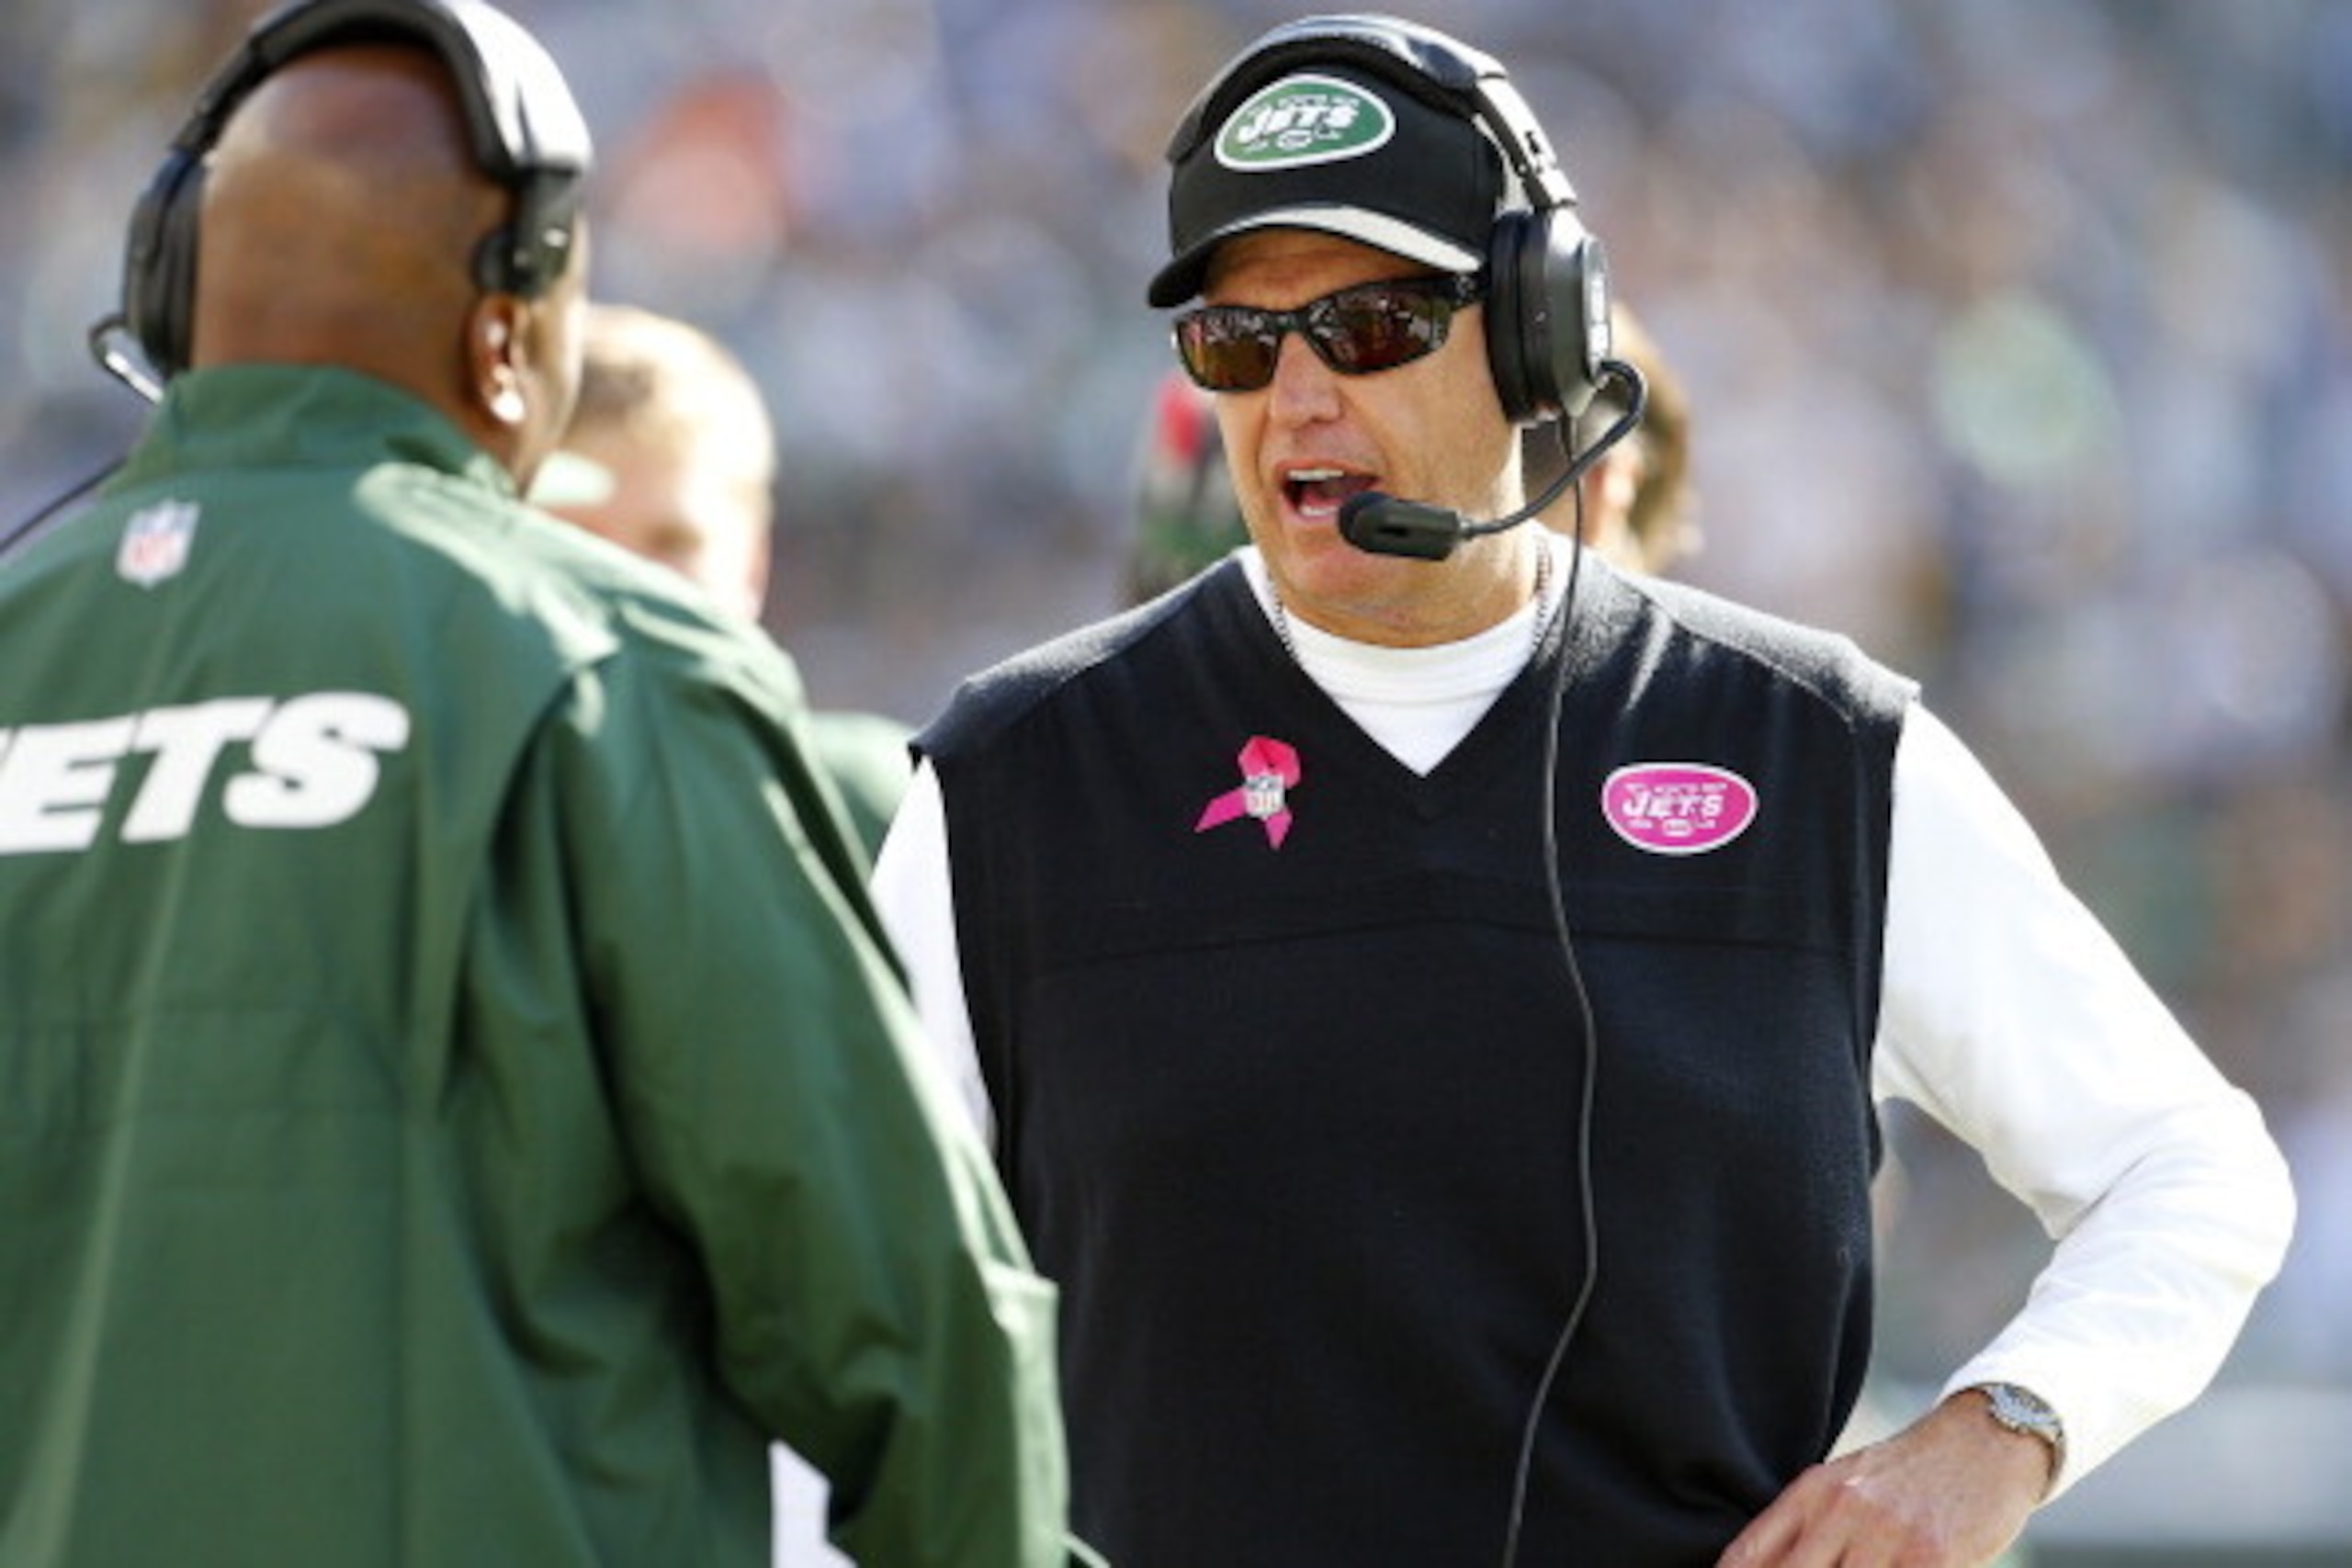
This is a Cover 0 scheme from head coach Rex Ryan and the Jets, with both cornerbacks aligned in press (inside shade) and the nickel playing from an off-man position (using a flat-foot read) over No. 2 to the closed side of the formation.
As you can see, the edge-rusher to the open side of the formation will “peel” on the running back if he releases on the quick swing route. If he blocks to the open side (or uses “scan” protection to the closed side), the edge-rusher continues on the blitz path.
The “peel” technique is built into multiple “zero” pressure schemes as it allows the defense to rush off the edge with the security of matching to the back if the offense wants to use the swing route to give the quarterback a quick read to beat the blitz.
Defending the Sight Adjust (Flat-Foot Read)
The sight adjust (or “hot read”) is a quick, three-step route conversion used by the offense to counter/beat man pressure.
Wide receivers will run the “hot” (slant, hitch, quick out, smoke) when they read pressure and/or off-man.
However, depending on the down-and-distance situation, this is exactly what you want to see from a defensive perspective when using a flat-foot read (no backpedal, read through the three-step drop) in order to drive downhill, make a play or tackle the receiver to get off the field (third down).
Here’s a quick example from the Cardinals-Bucs matchup with nickelback Tyrann Mathieu blitzing to the closed side of the formation—leaving the strong safety matched up in coverage versus Vincent Jackson:
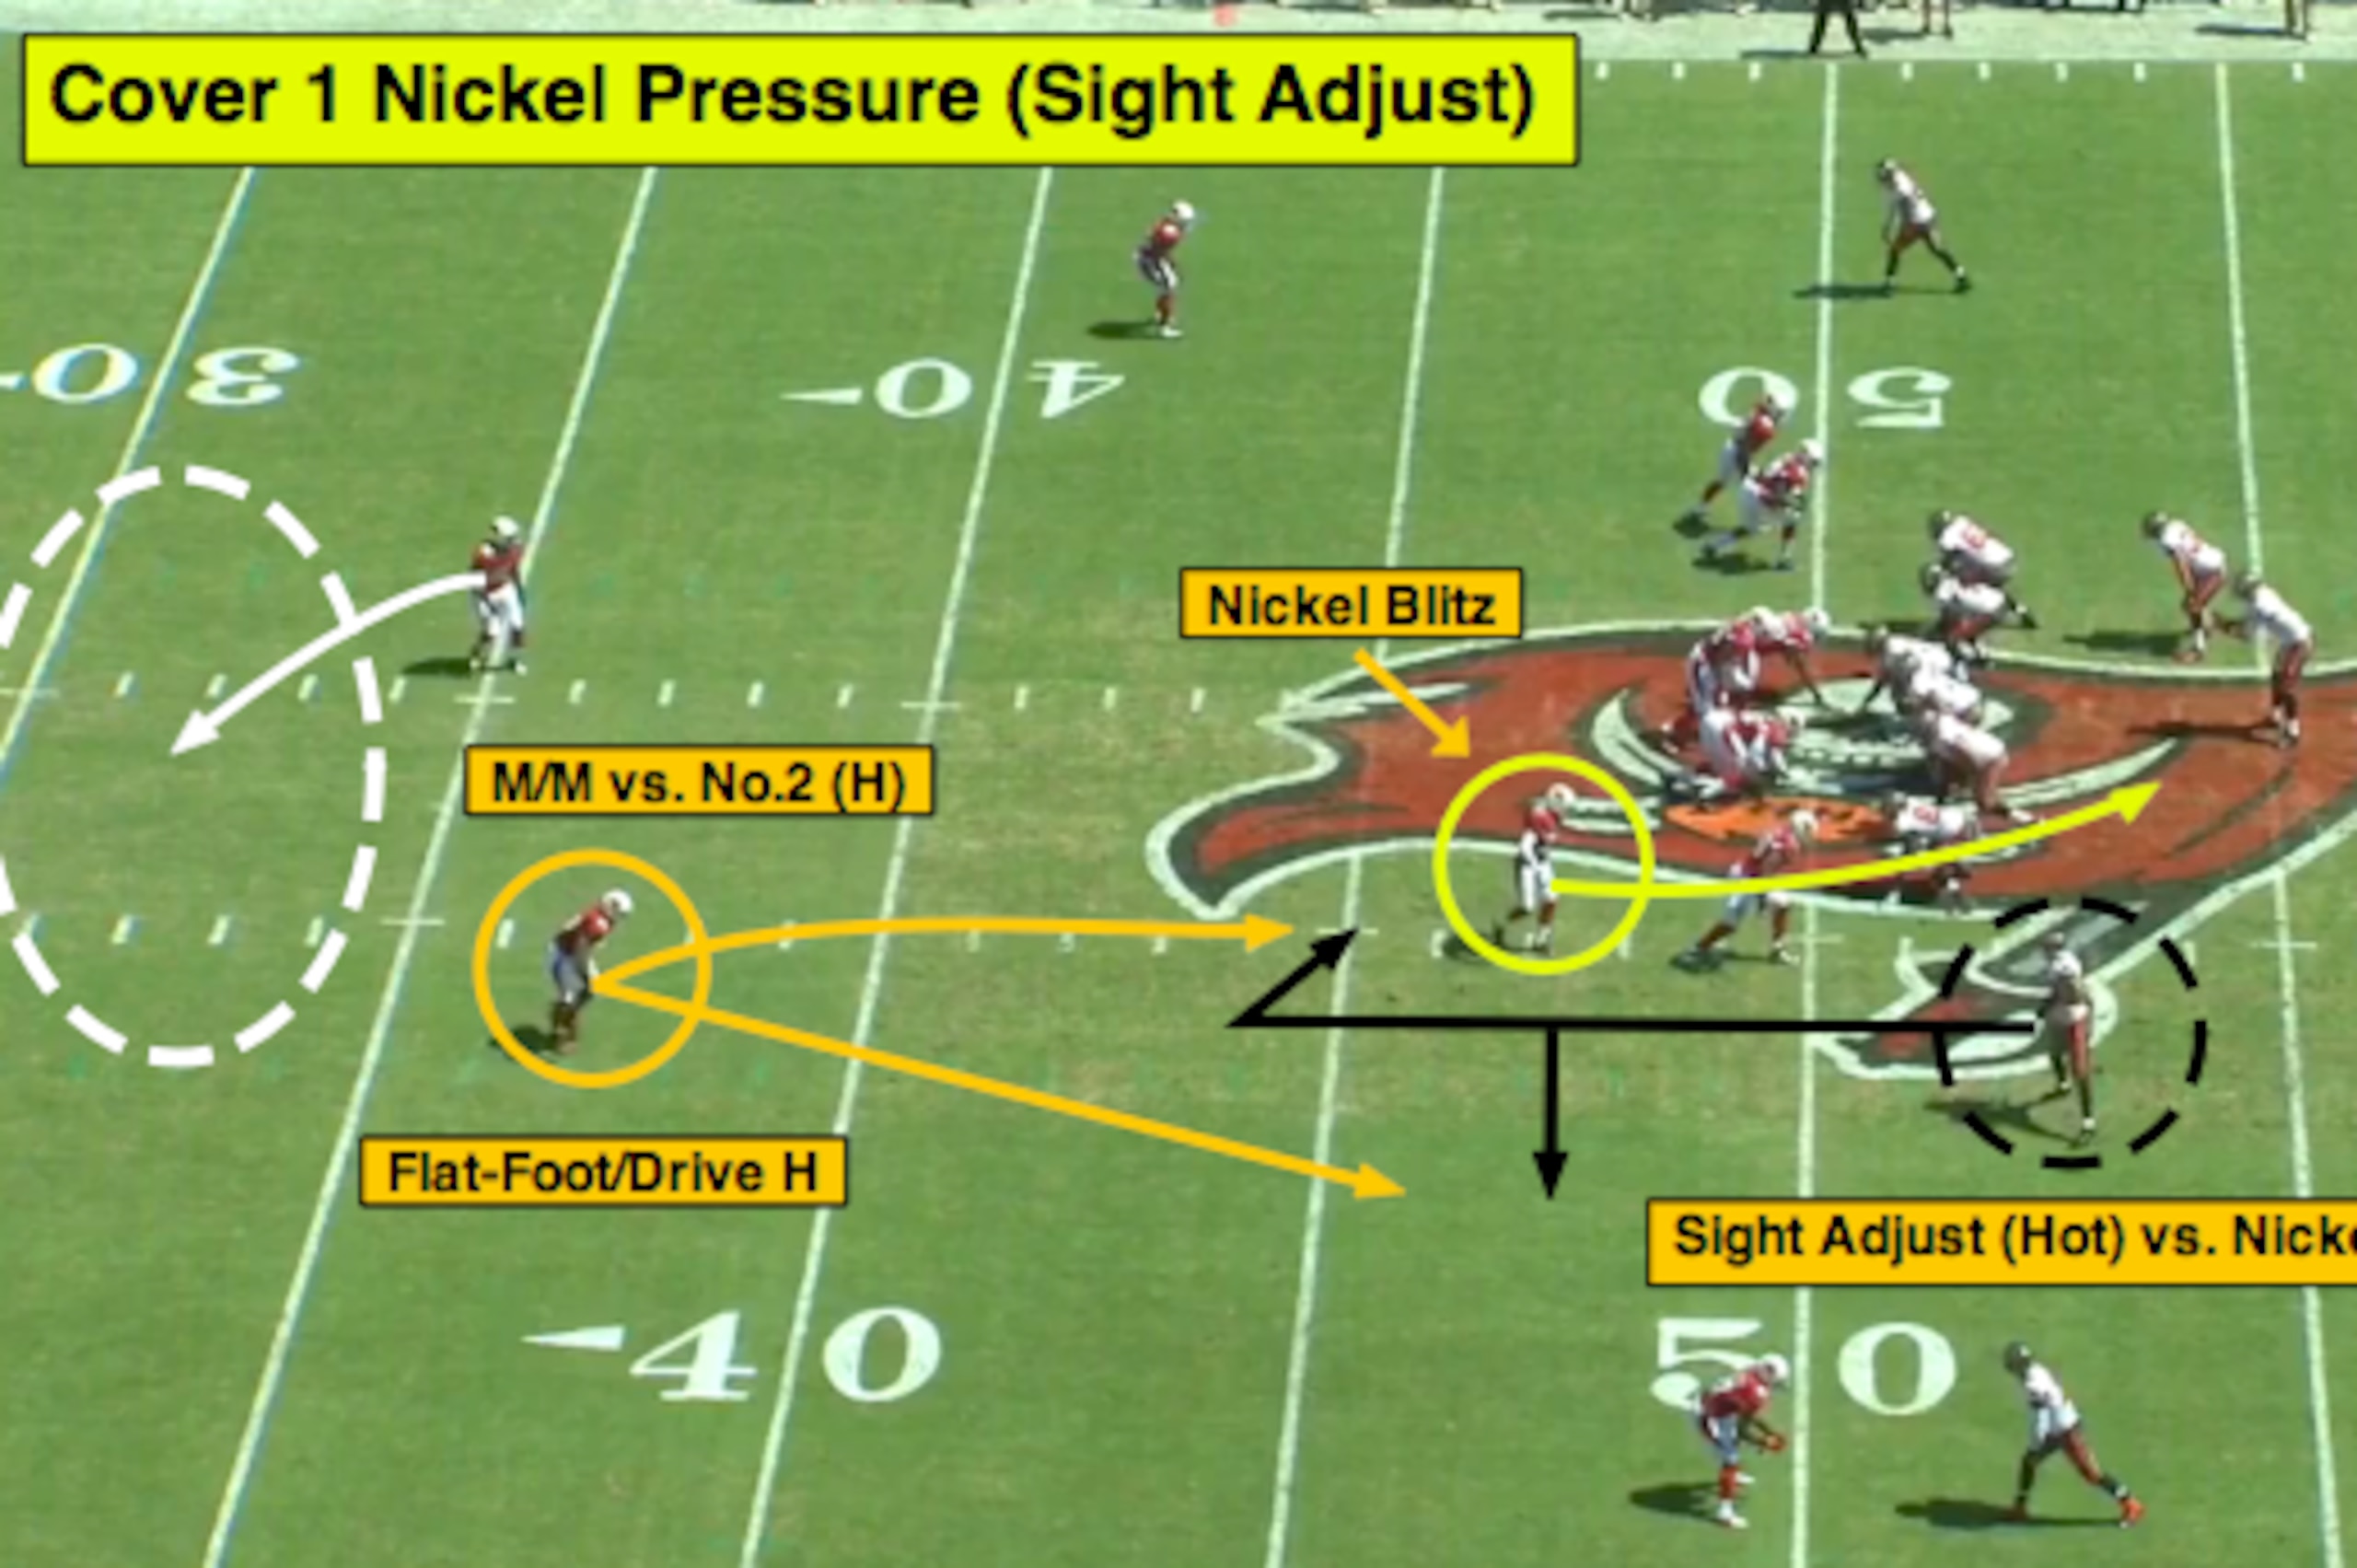
The Bucs wide receiver can run the hitch or quick out, but with the strong safety showing high (pre-snap disguise), he is in a position to use a flat-foot read and drive on the throw (there is no reason to backpedal from an off-man position with a pressure called).
Remember, defensive backs playing from an off-man position can still maintain their cushion and pedal once the receiver pushes through the three-step.
Sub-Package Pressure
Let’s go back to the Raiders-Chiefs matchup to look at Cover 1 pressure out of the Kansas City sub-package with a focus on leverage and safety help:

In this pressure scheme, the Chiefs are sending open-side pressure with Berry aligned in the blitz front and the linebacker adding on a “green dog” technique.
In the secondary, the Chiefs are showing 2-Man (two deep safeties with press man). However, the safeties will roll at the snap with the strong safety matching to No. 3 (using a flat-foot read).
As you can see, both the open-side cornerback and nickel are playing with an outside shade while the closed-side cornerback aligns head-up because of the “plus” split from the wide receiver.
With the Raiders running two inside-breaking concepts from the closed side of the formation (shallow drive, post), the Chiefs defenders can “funnel” No. 2 and No. 3 inside because of their initial leverage position.
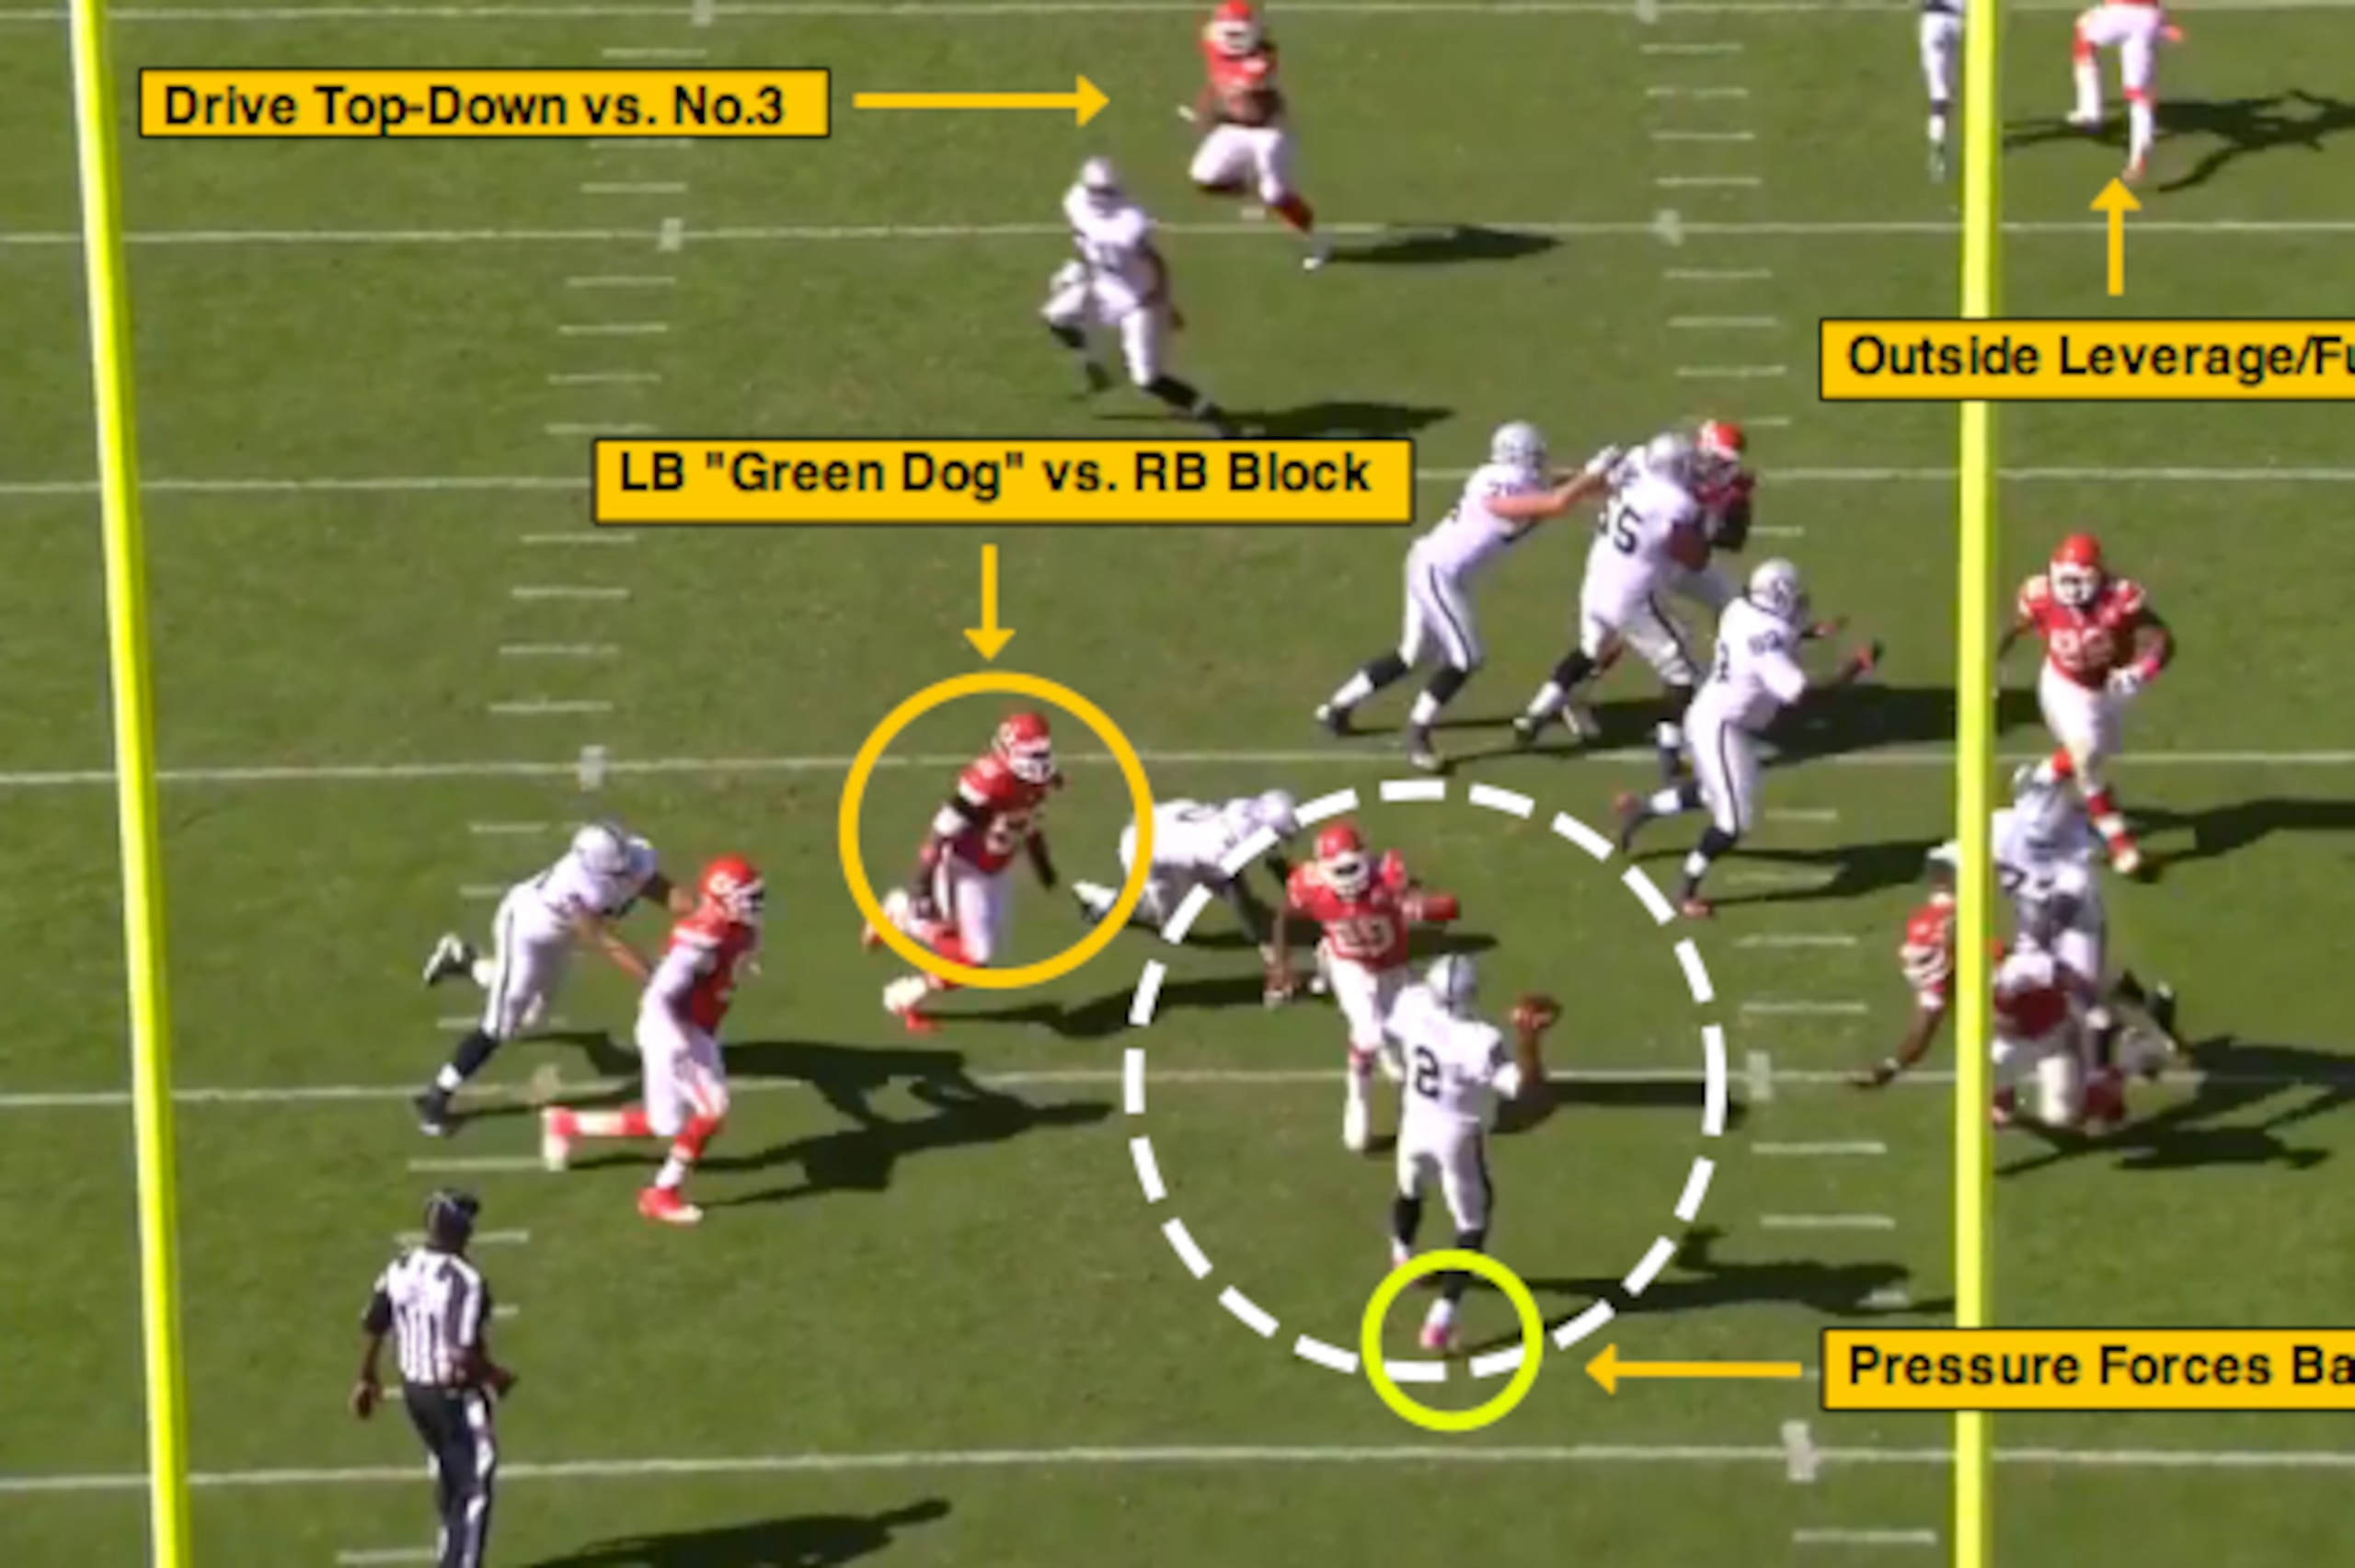
From the end-zone angle, we can see the linebacker using the “green dog” technique when McFadden steps up to block Berry.
However, with the Chiefs safety beating McFadden (and the Raiders losing on the edge), Pryor now has to retreat and throws this ball off his back foot.
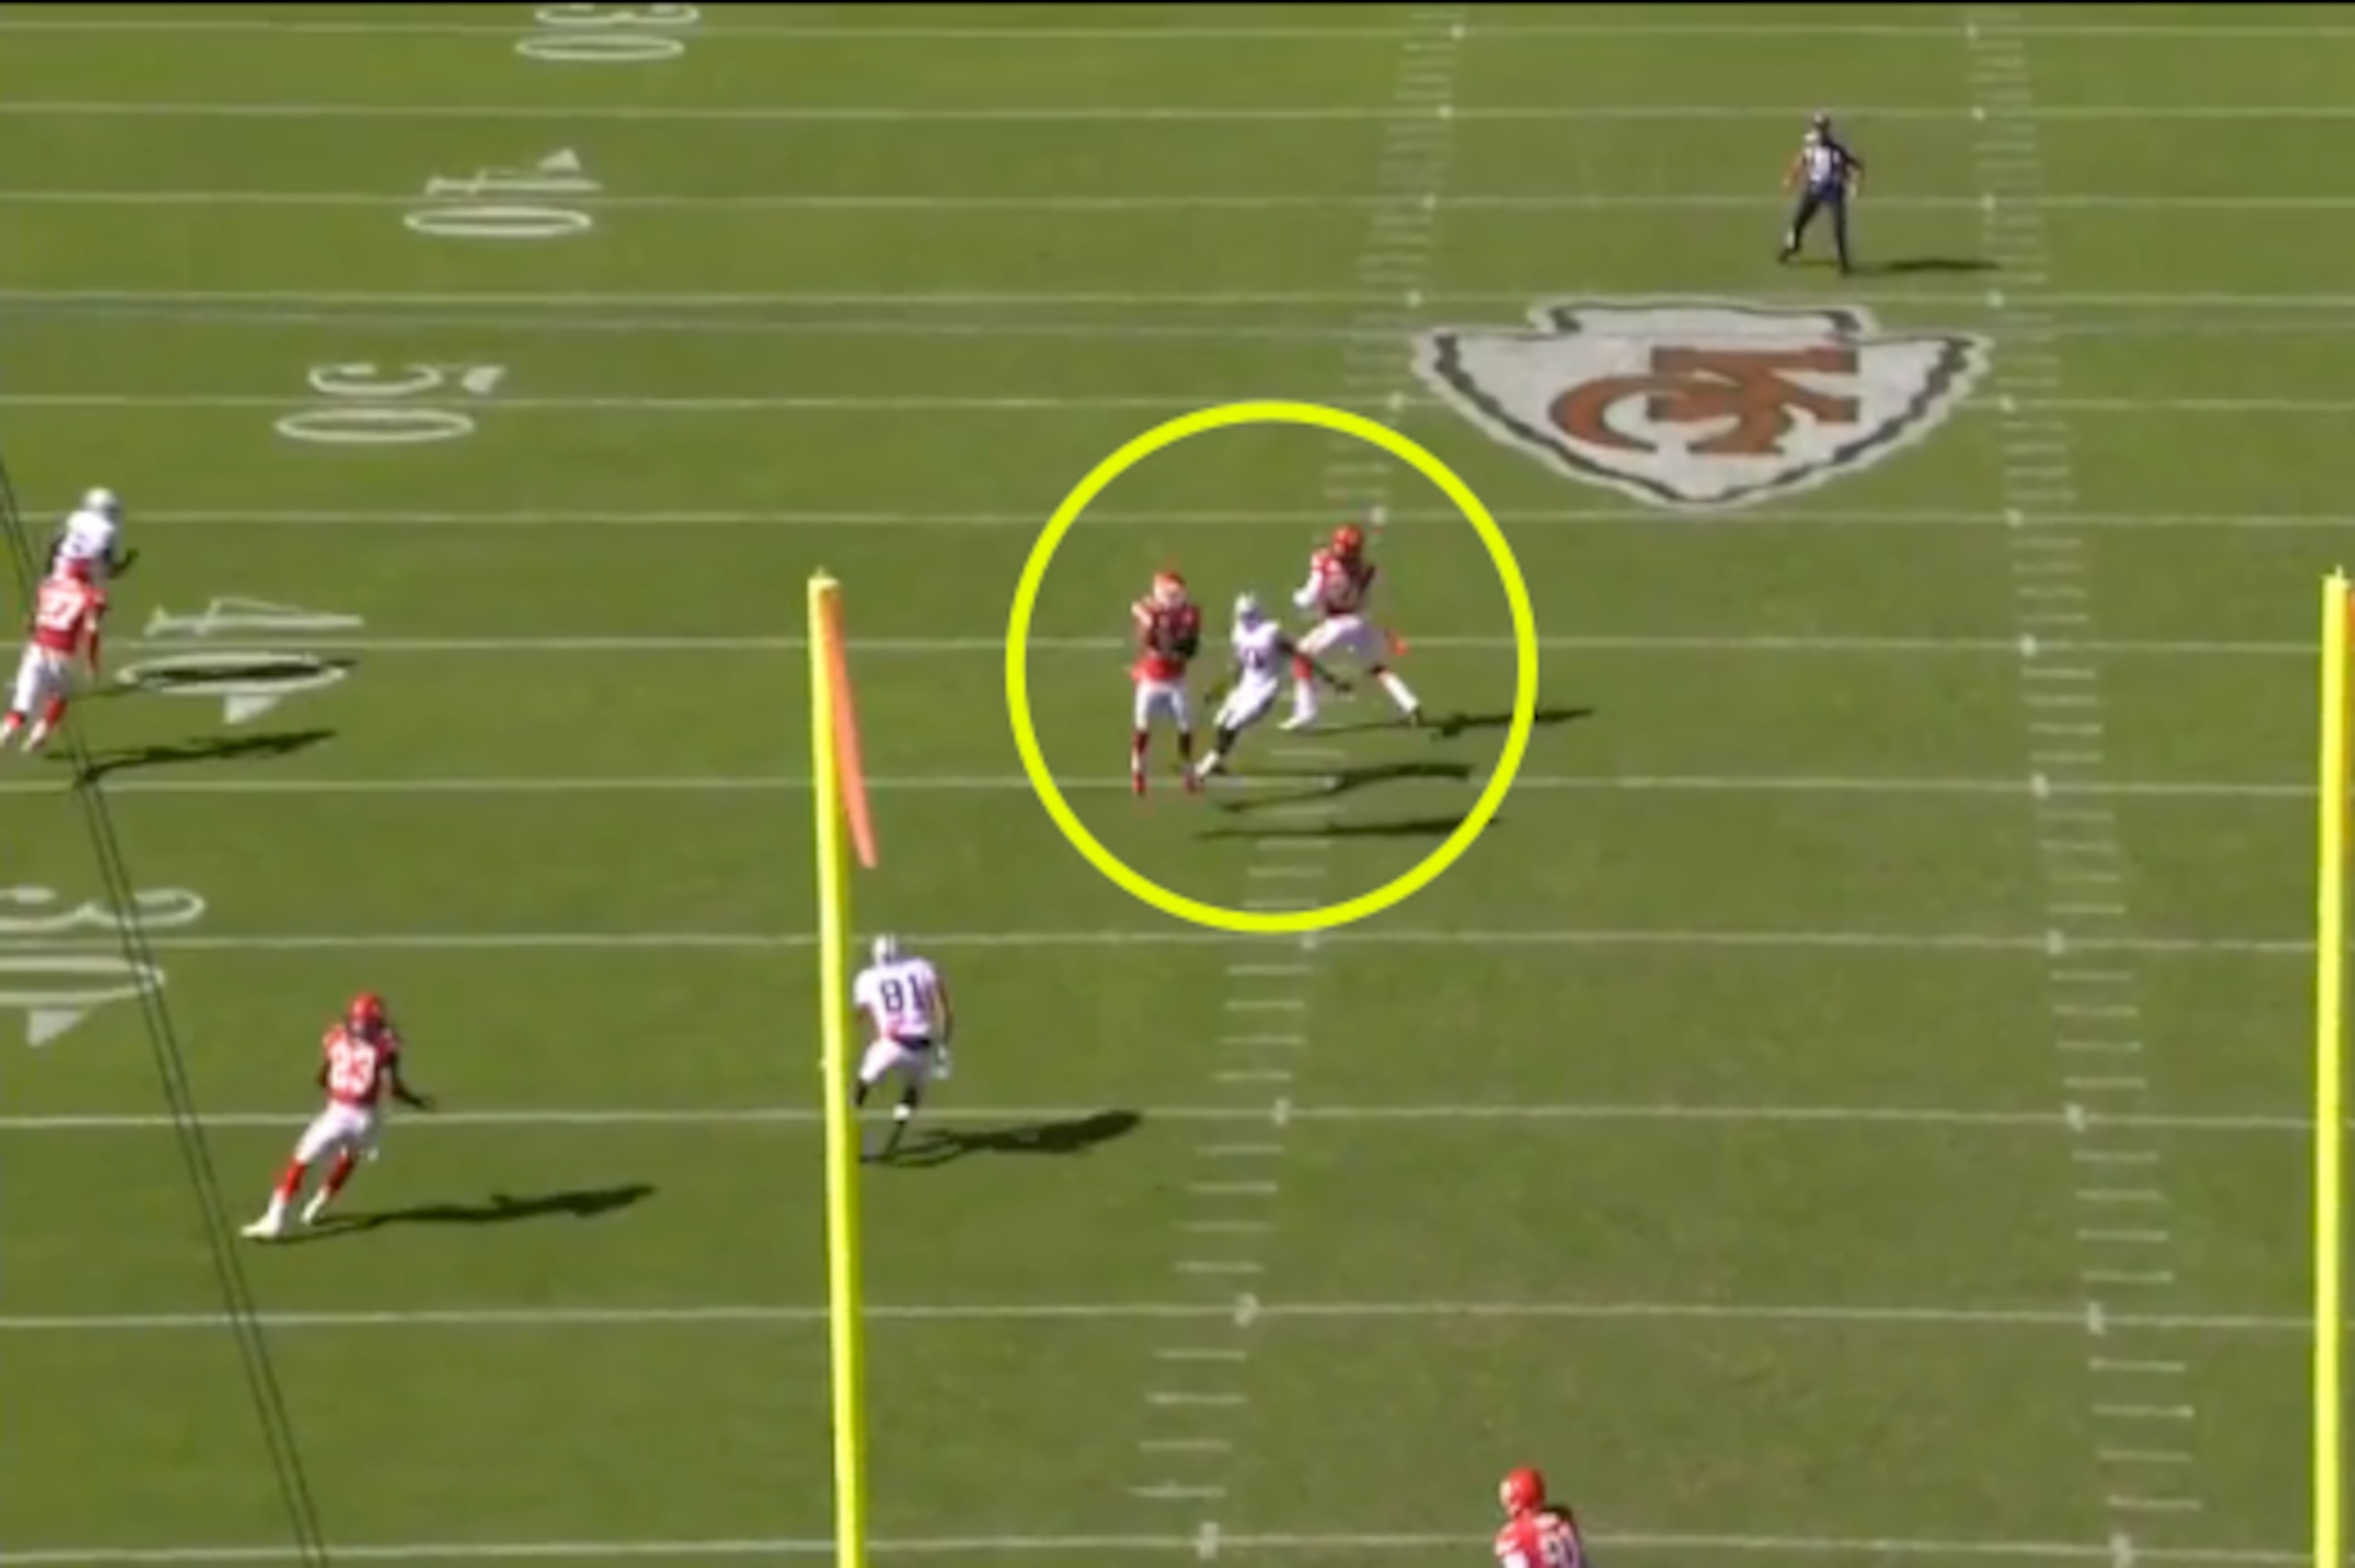
Because of the nickelback’s outside leverage position and “funnel” technique, he can force the post to the safety help in the middle of the field.
And with Pryor making a poor decision to throw this ball into the middle of the defense due to the interior pressure, this turns into an easy pick for Kansas City.
Cover 0 Disguise
Let’s finish with a look at how the 49ers used pre-snap disguise (and an underneath “robber”) to produce an interception against quarterback Matt Schaub and the Texans last season:
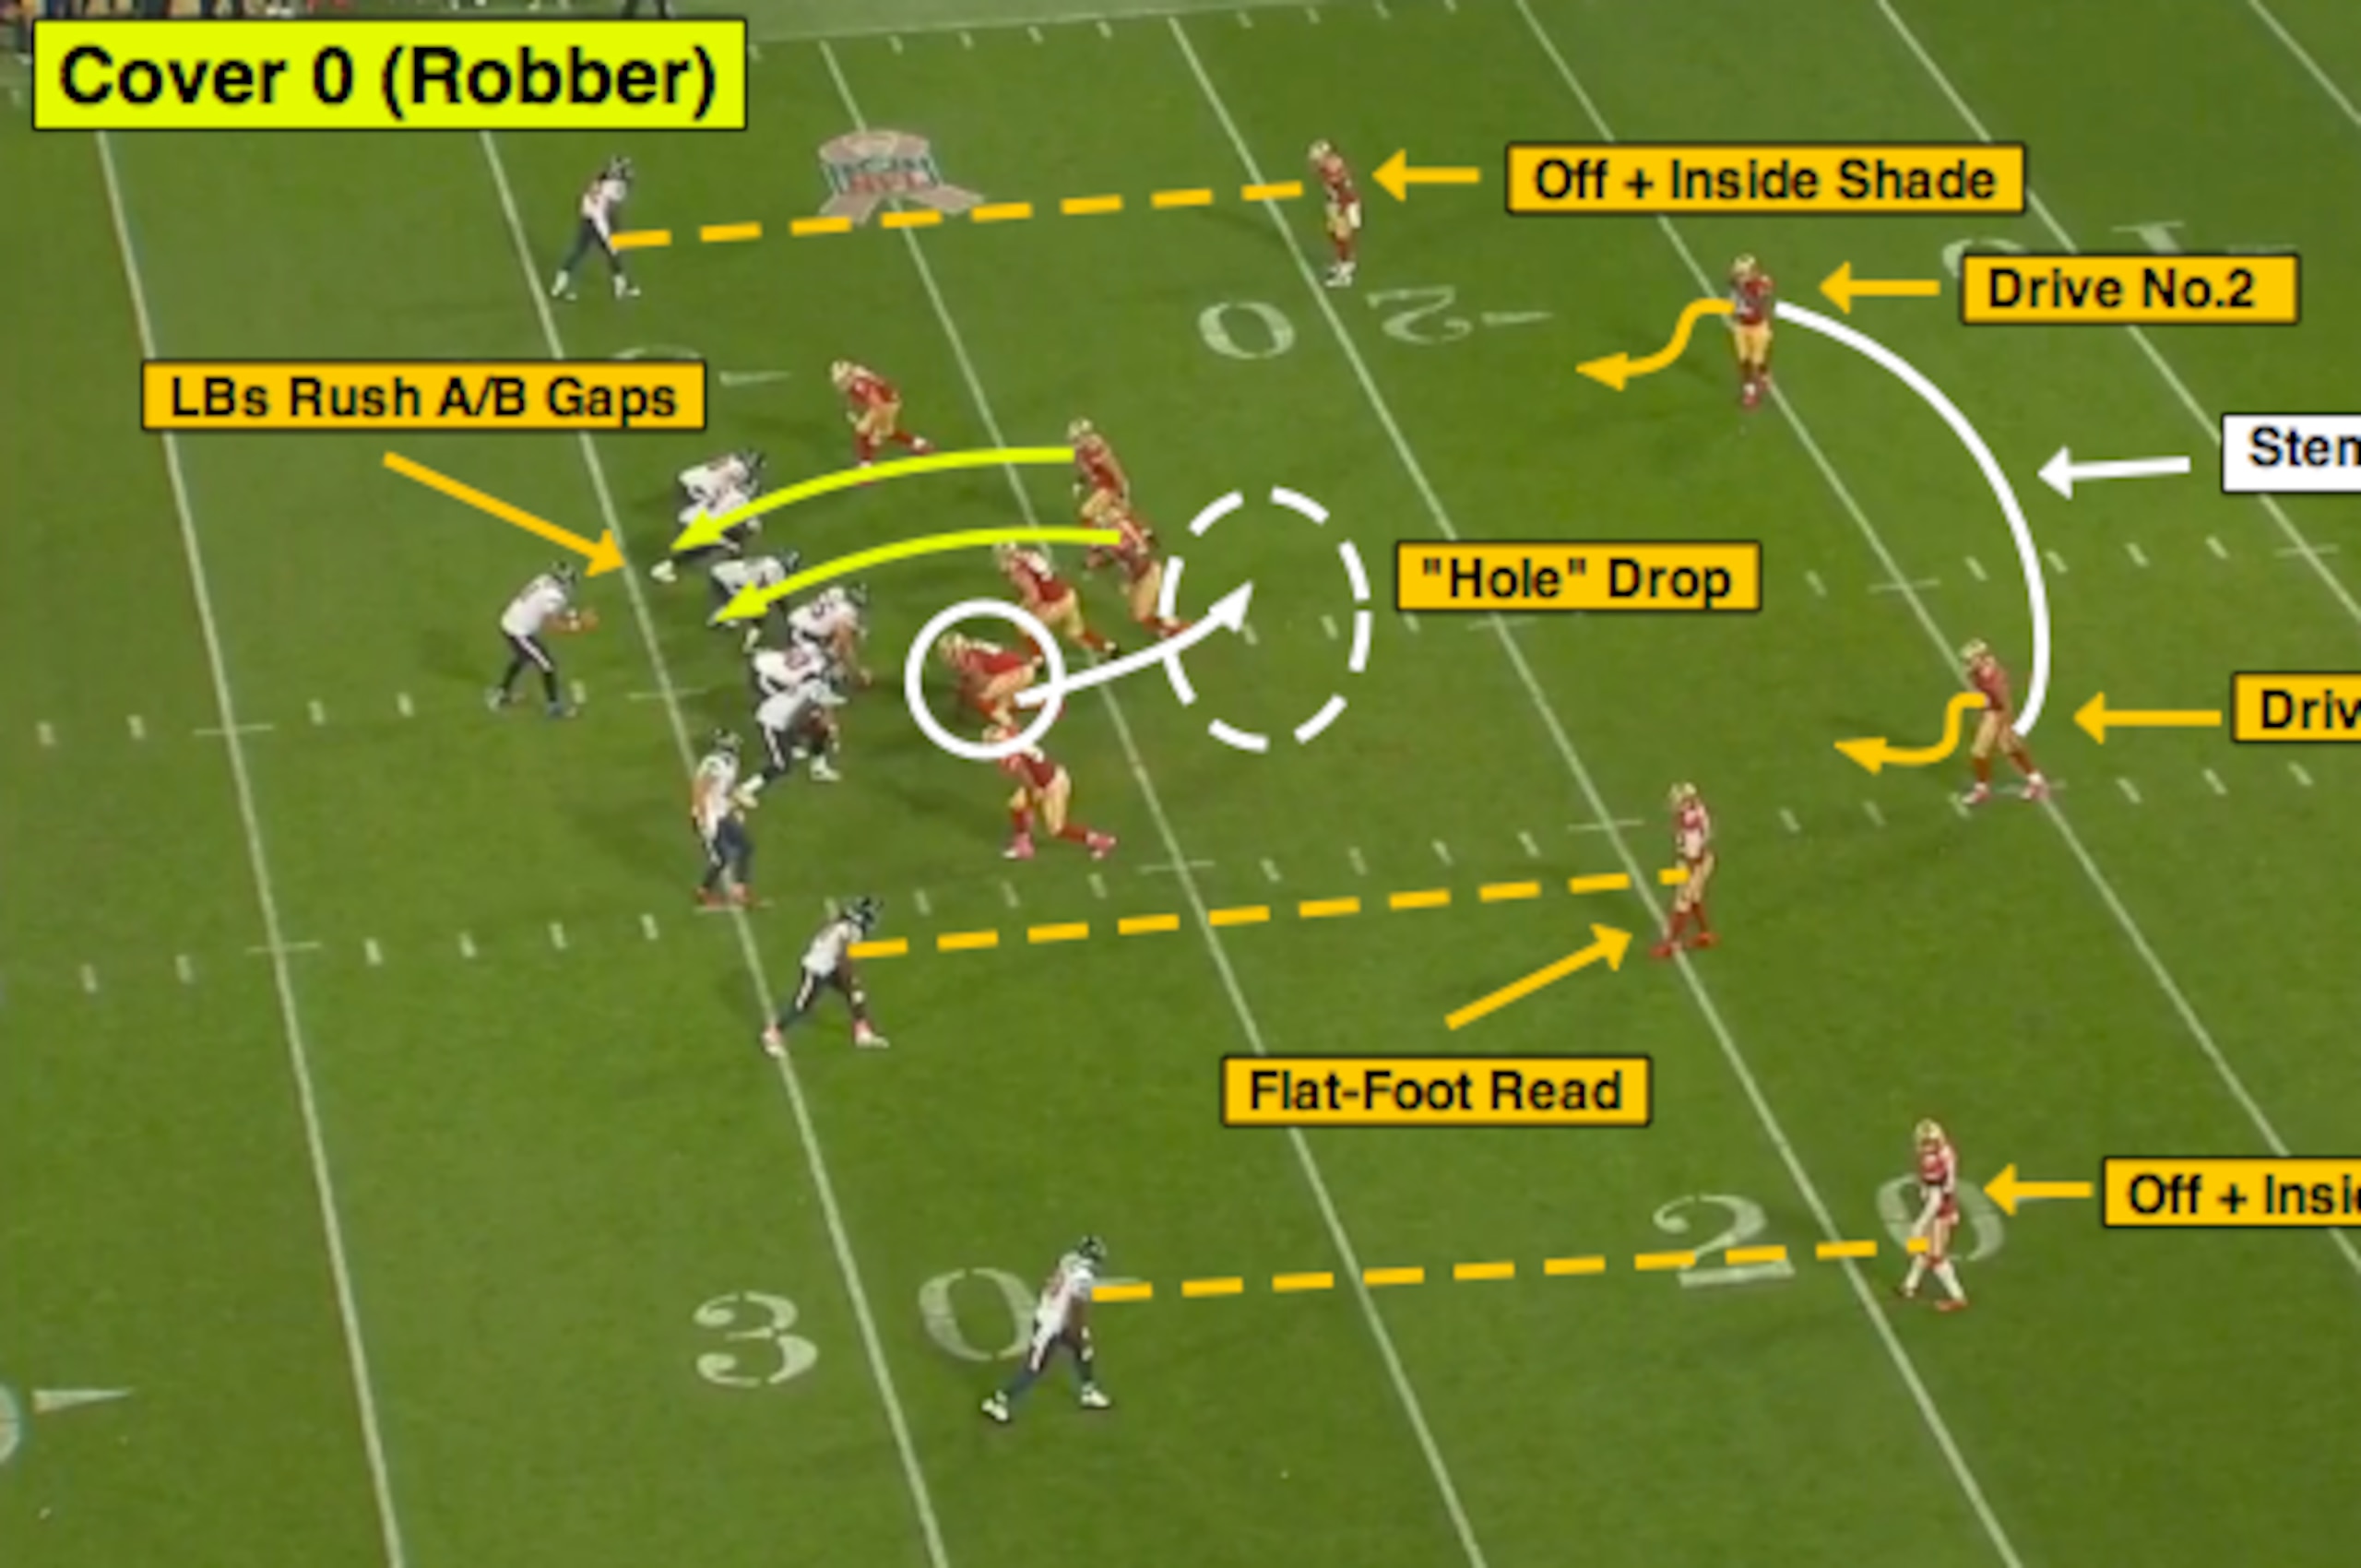
Check out the 49ers' pre-snap alignment. This is a Cover 4 (or quarters) look with both safeties showing high and the cornerbacks playing from an off position.
However, the 49ers will stem to a blitz alignment and send both linebackers to the closed side of the formation with the defensive tackle dropping into the underneath “hole.”
In the secondary, this is the same “zero” man technique we have talked about throughout the piece, with the cornerbacks and nickel playing from an inside shade (flat-foot read technique) and the two safeties driving top-down at the snap to their coverage.
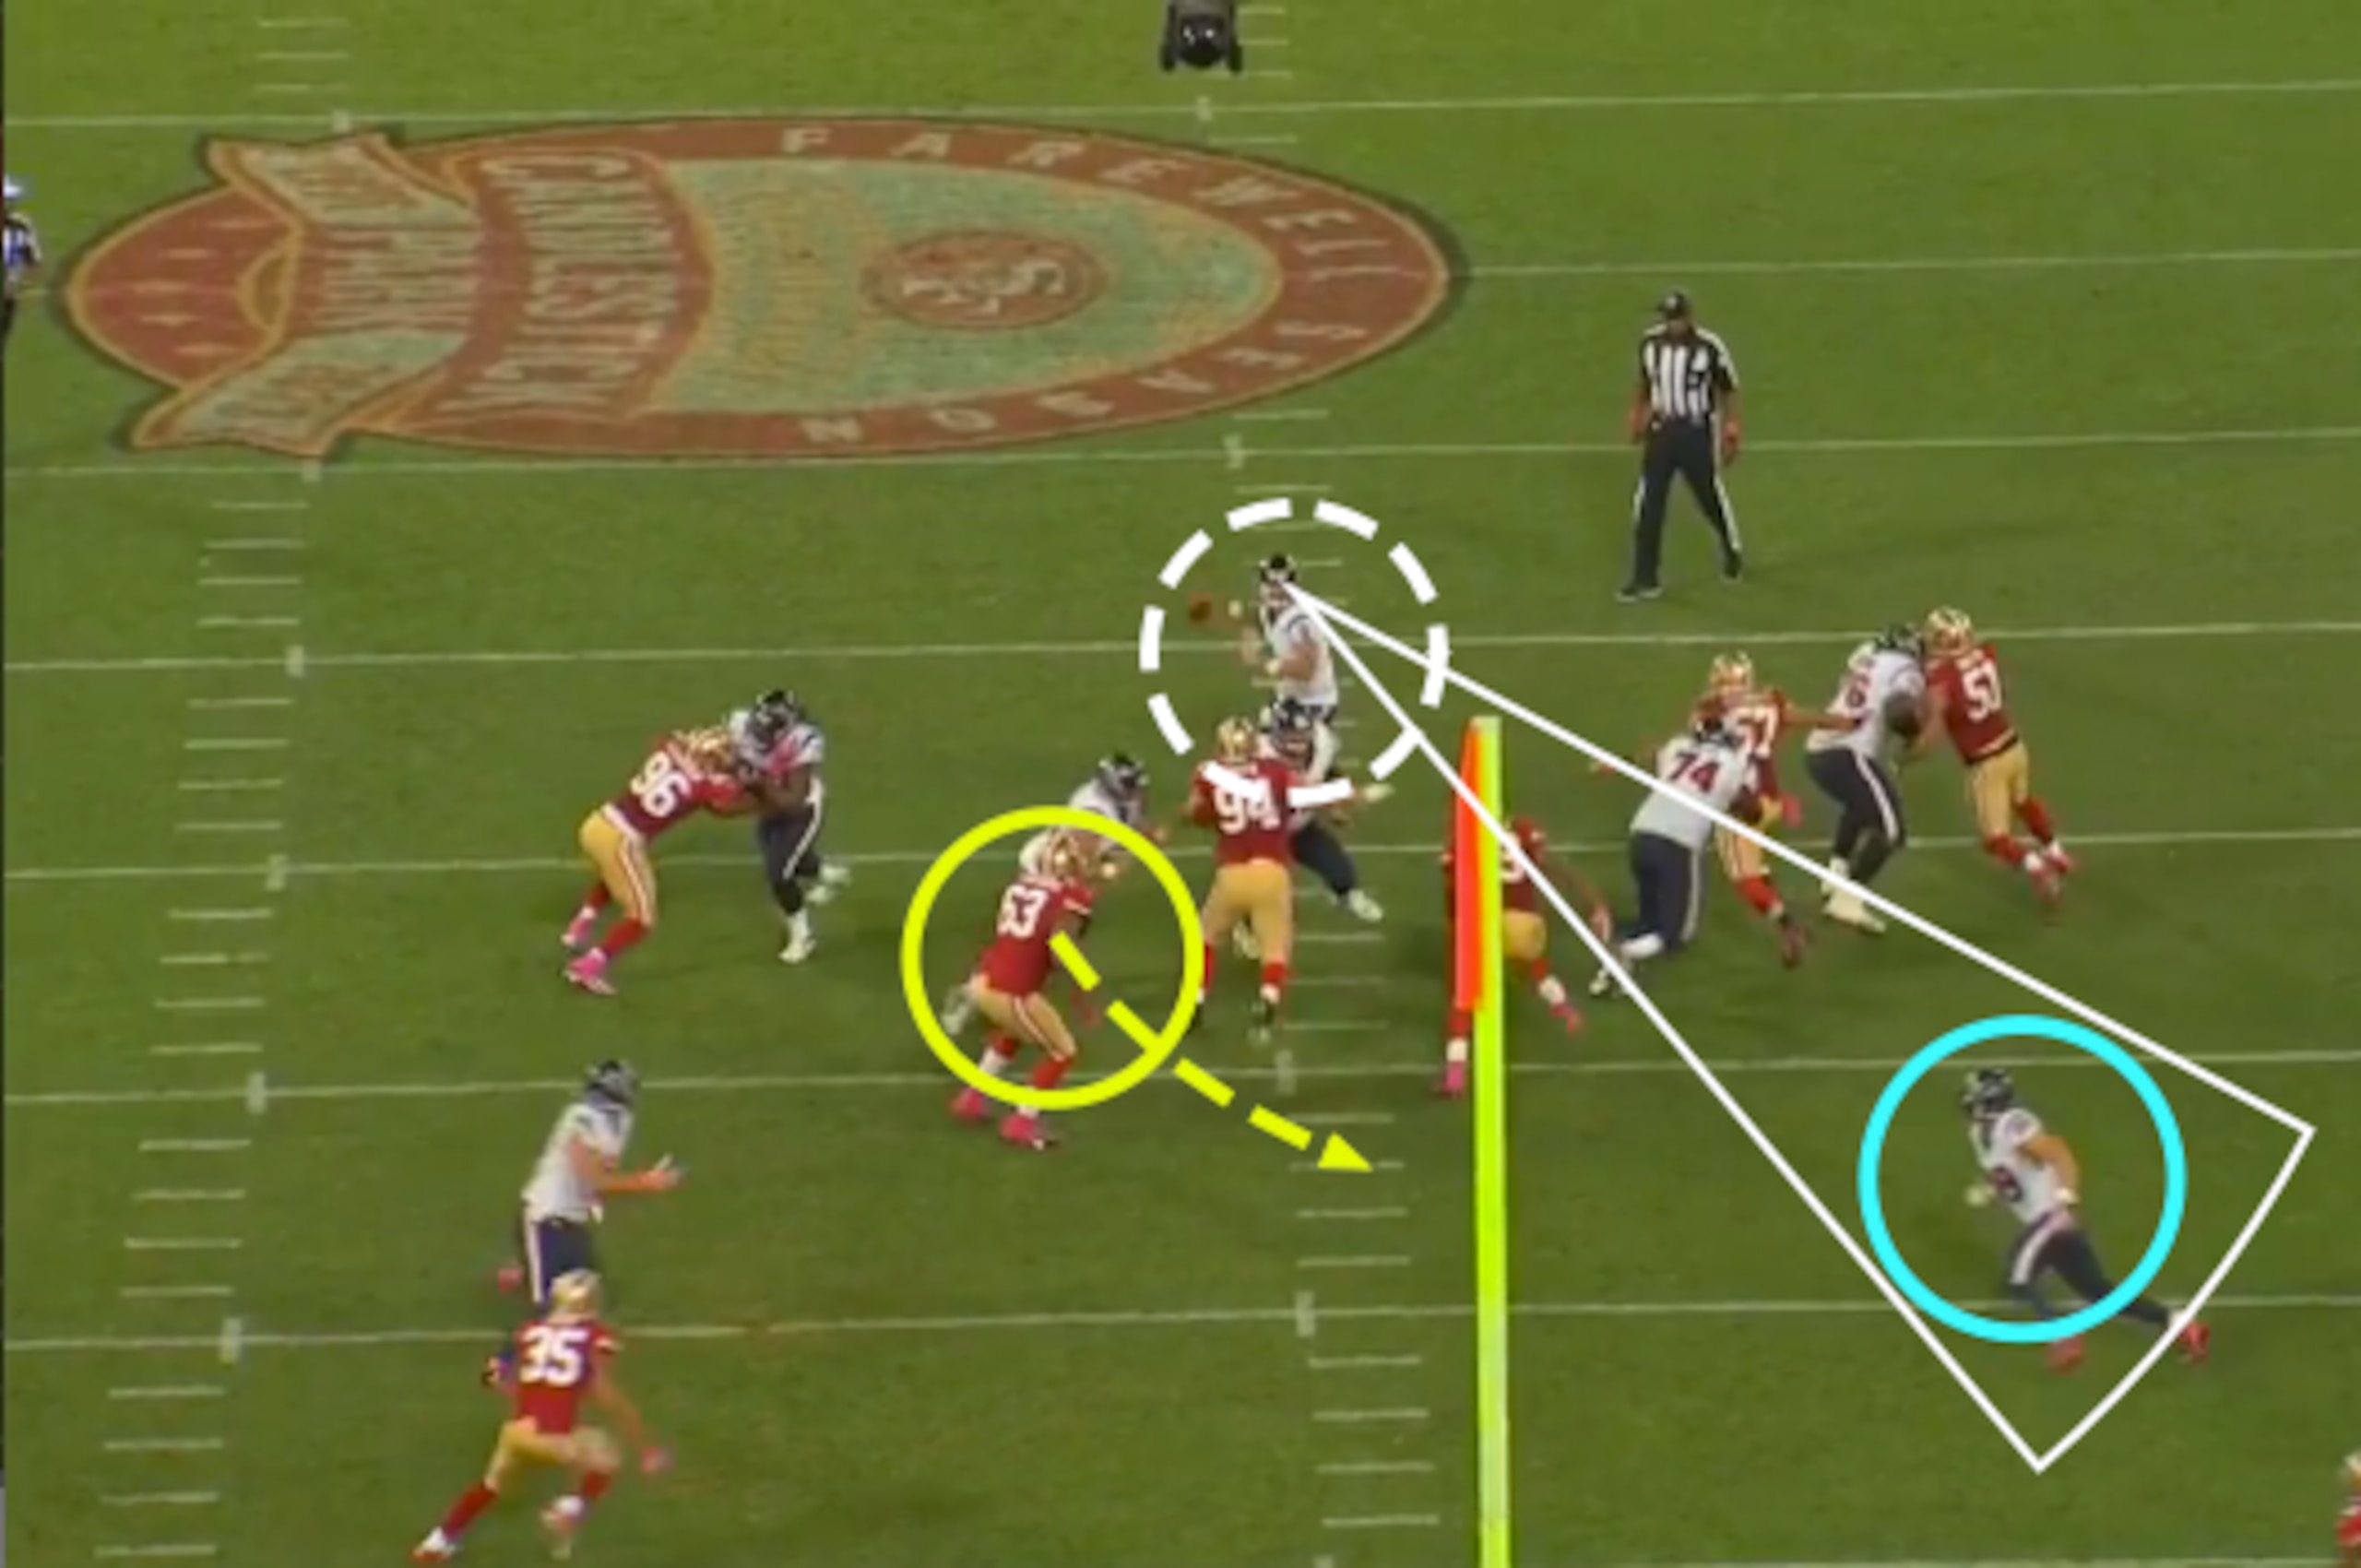
Looking at the end-zone angle, we can see defensive tackle Tony Jerod-Eddie dropping at the snap versus the Texans' inside crossing routes (Hi-Lo Crossers).
With the safeties driving downhill to the tight ends on the underneath concepts, Jerod-Eddie reads Schaub and moves directly into the throwing lane.
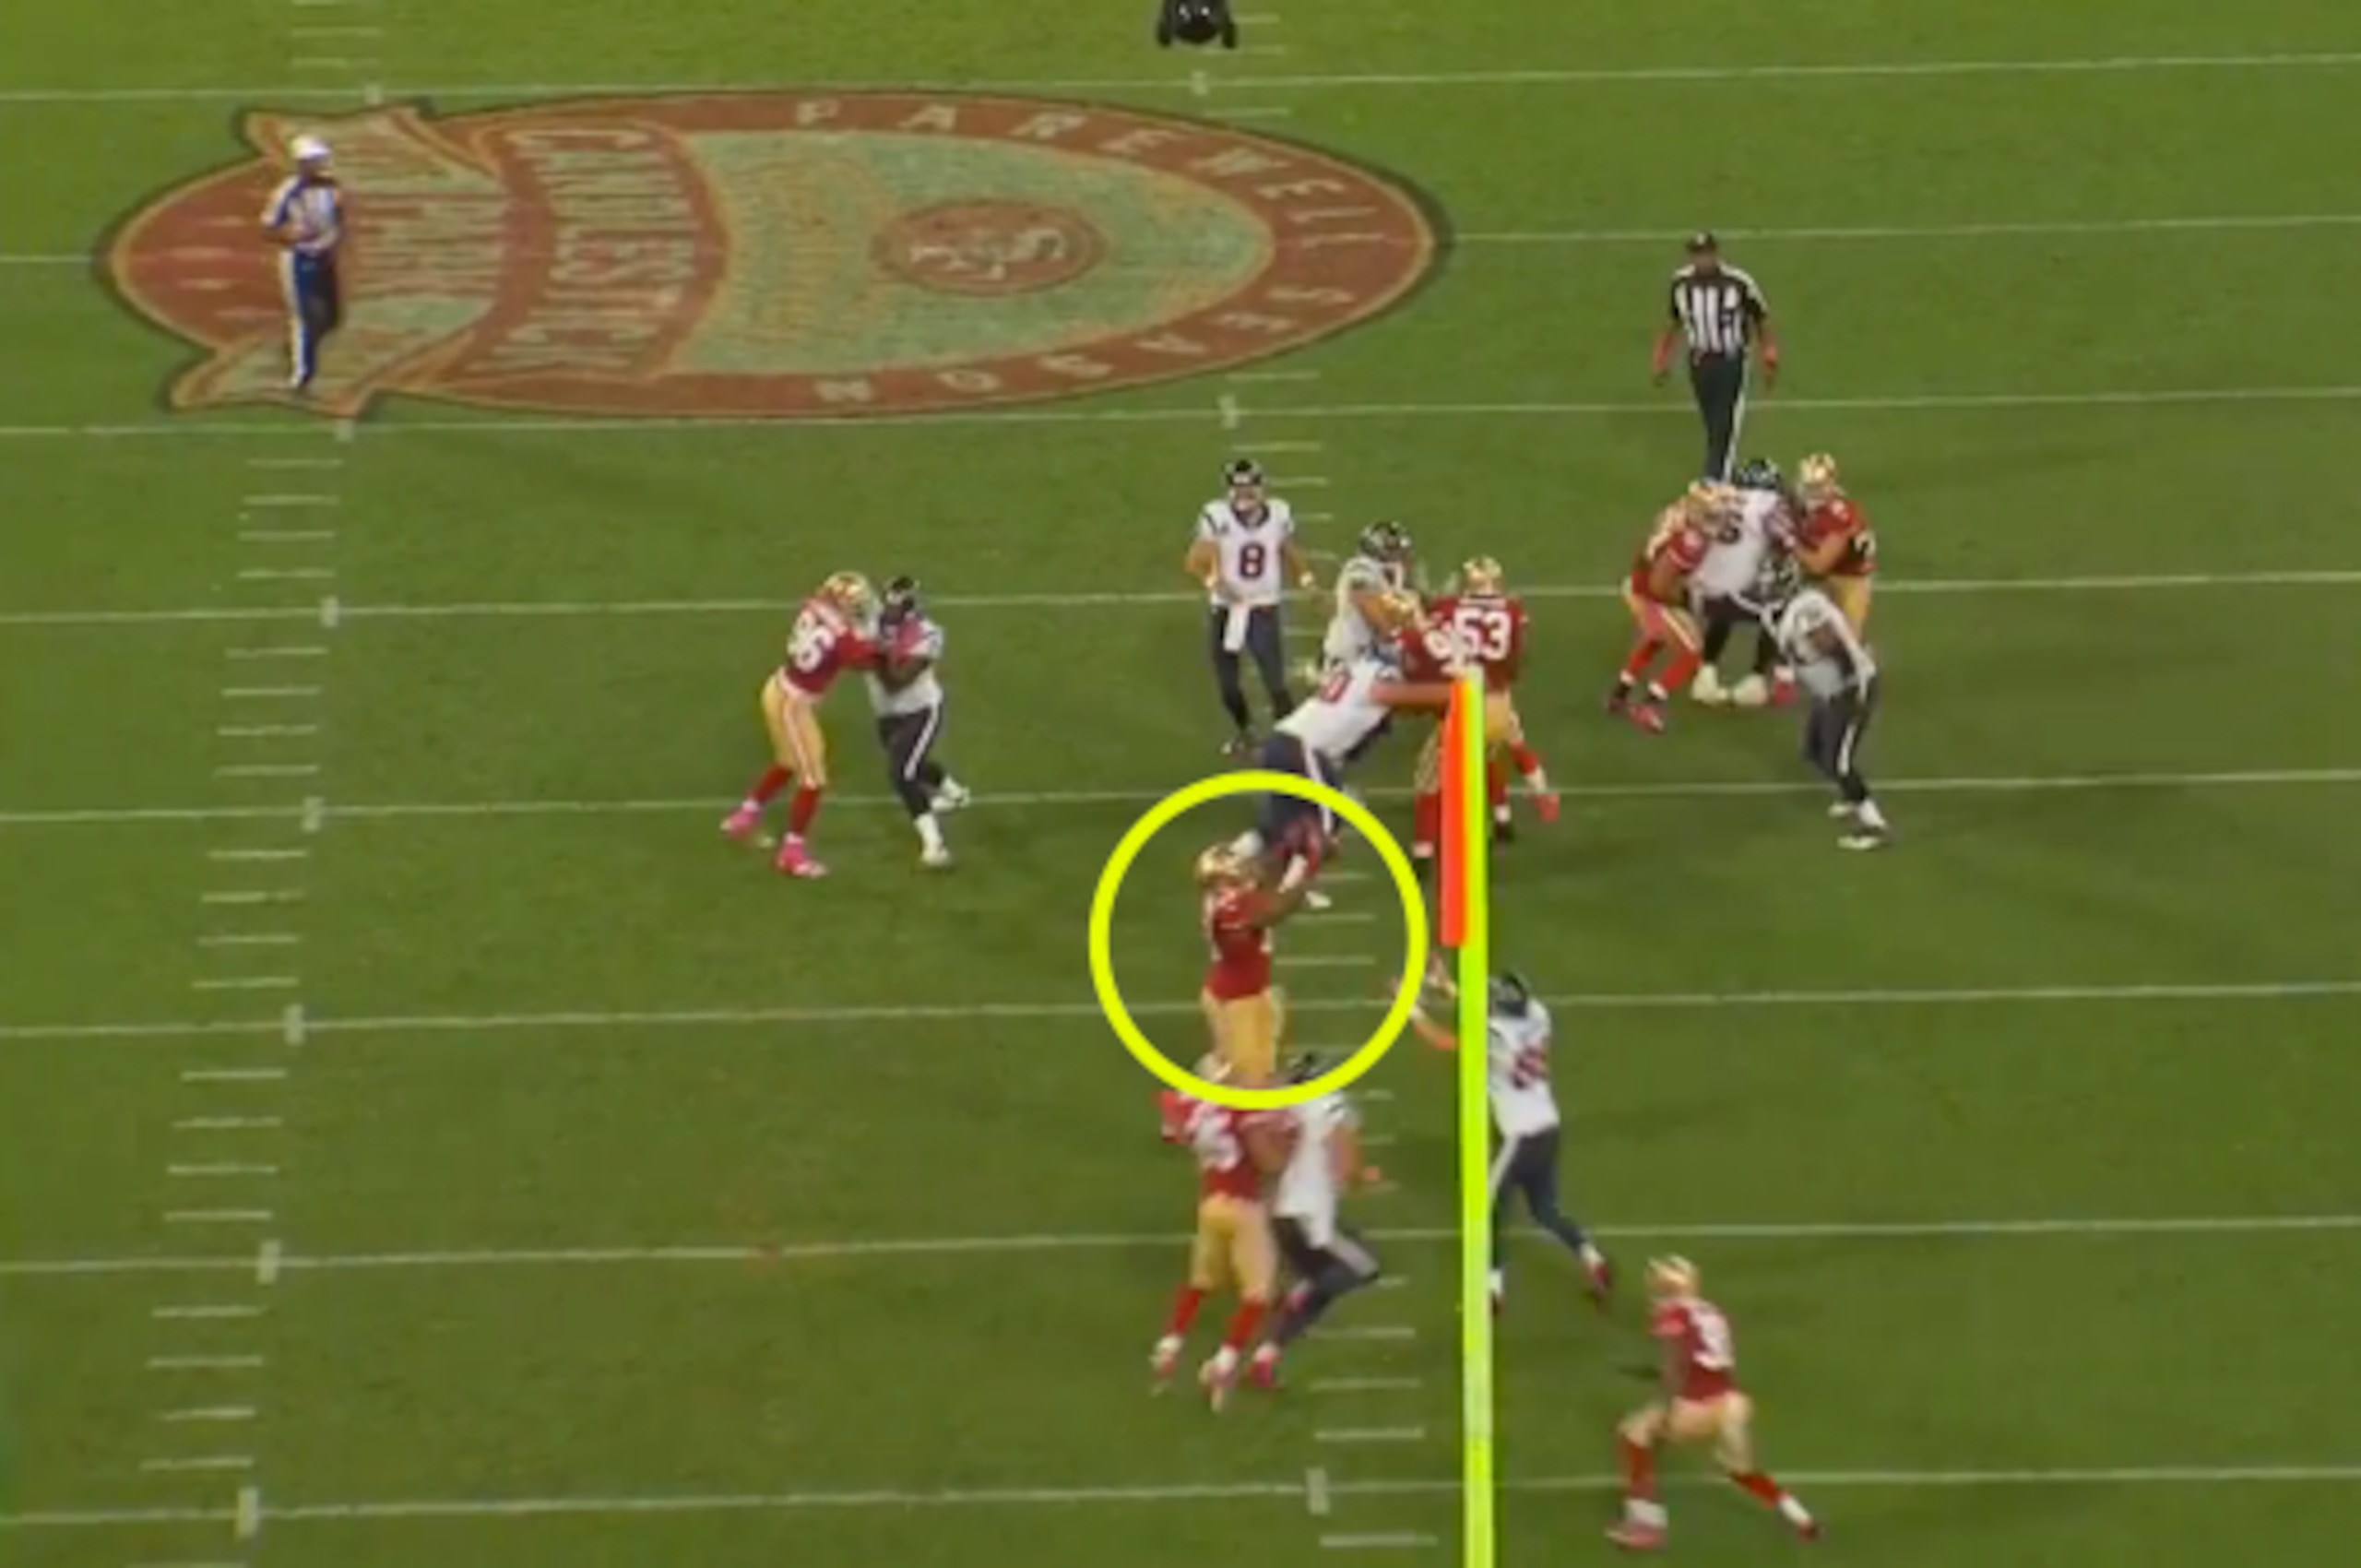
Remember, this is a “zero” pressure scheme. That forces Schaub to identify his quick, underneath options and get rid of the ball.
However, by failing to read Jerod-Eddie as a “hole” dropper, the result is an interception for the defensive tackle—another example of how pressure can force quarterbacks to panic and make questionable decisions with the ball.
Up Next in the “NFL 101” series: Breaking Down 2-Man.
Seven-year NFL veteran Matt Bowen is an NFL National Lead Writer for Bleacher Report.
.jpg?w=2560 "Buccaneers Football")
.jpg?w=2560 "Jaguars Dolphins Football")