
NFL 101: Introducing Trap Coverage
In this installment of the "NFL 101" series at Bleacher Report, former NFL defensive back Matt Bowen breaks down the basics of "trap" coverages to give you a better understanding of the scheme and its execution at the pro level.
Click here for the previous "NFL 101" breakdown: 2-Man coverage.
As we get back into the "NFL 101" series, let's take some time to talk about a specific coverage—or scheme—that allows defensive coordinators to send pressure, force the ball to come out and then go steal one by setting a "trap" in the secondary.
TOP NEWS
Colts Release CB After Trade Request
Projecting Every NFL Team's Starting Lineup 🔮
Rookie WRs Who Will Outplay Their Draft Value 📈
Run at both the pro and college levels, these trap coverages have different terminology, such as "gold," "2-Trap" or "Kathy." But the technique, reads and secondary discipline are the same, with a safety protecting over the top and a cornerback underneath lying in the weeds to jump the first outside breaking route.
The trap coverages (and pressure) are common schemes used in the playbooks of defensive coaches Gregg Williams (St. Louis Rams) and Dick LeBeau (Tennessee Titans), with the secondary rolling the coverage and using multiple pre-snap looks/fronts to disguise the concept.

The idea here is simple: Create chaos, force the quarterback to panic and then capitalize by taking away a quick option underneath in a scheme that allows the defense to limit the deep ball.
Using examples from the All-22 coaches tape, let's break down the technique of the trap scheme, discuss the "reads" for the cornerback and even get into some exotic looks that allow the defense to dictate the flow of the game from a secondary perspective.
The Basic Rules of Trap Coverage
Think of this scheme as a double read for the cornerback versus a two-receiver side of the formation with the safety over the top and an inside defender that matches No. 2 (count outside-in) up the field. This allows the cornerback to read the release of No. 2 while the defense is protected against vertical concepts that can stretch the top of the secondary.
Let's start by showing the scheme with the defense playing Cover 6 (quarter-quarter-half) in the secondary out of base personnel in an Under front. This was a core call at the University of Iowa under the late Norm Parker.
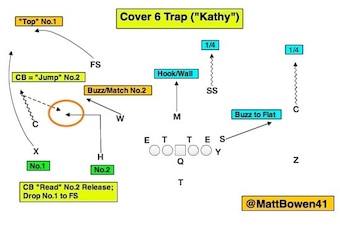
To the closed side of the field, the defense is playing Cover 4 (Quarters) with the strong safety and cornerback matching the vertical releases of No. 1 (Z) and No. 2 (Y). However, to the open side of the formation, the defense is aligned in Cover 2 and playing a "trap" or "Kathy" technique. This allows the open-side cornerback to read the release of No. 2 (H) with the "Will" 'backer (W) matching the release.
If No. 2 breaks on an outside cut (as shown here), the cornerback will drop No. 1 (X) to the free safety ("top" the fade) and essentially jump the out route with the protection of the 'backer inside. But if No. 2 releases on a vertical concept (seam route), the cornerback continues to sink and breaks on the throw underneath while the safety plays his Cover 2 responsibilities.
From a pre-snap alignment, this looks like Cover 2—and that's exactly what the defense wants to show. Tell the quarterback he can clear out the corner with the outside release of X, and then target the zone window underneath. That's a classic Cover 2 beater with the cornerback sinking versus the release of X to protect against a possible 7 (corner) route and the Will dropping to the seam/hook zone.
However, with the cornerback using a "soft squat" technique (sink, "clue" inside to No. 2), he can open his hips to the quarterback and bait the throw to No. 2. You want to show the cornerback trailing the release of No. 1 with the intention of inviting the quarterback to toss this ball to H on the out cut.
This is a simple way to rob the flat versus offenses that install Cover 2 (or Cover 6) beaters in the game plan. And it's an easy way to steal one when the quarterback reads two-deep and dumps this ball.
It's a small thing defenses can add to both their base and sub-package game plans to take away outside breaking cuts, but it becomes even more effective when you add in a pressure scheme.
Setting the Bait with Pressure
Running the "trap" scheme with pressure is a beautiful thing when it forces quarterbacks to speed up their progression, look for a "hot" read and throw the ball into a window that closes immediately.
The defense can run this from nickel (five defensive backs), dime (six defensive backs), "Ruby" (three defensive linemen, two linebackers, six defensive backs) or any other front you want to draw up on the chalkboard. Coordinators can get as creative as they want with overload blitzes and inside vertical hook defenders who drop to match routes.
But the key is the technique, the pre-snap look at the ability of the secondary to play the technique of the "trap" scheme.
Here's an example of the Rams' "Ruby" package, with Williams sending both his nickel and dime defenders while dropping the linebackers. Those 'backers have to match to No. 2 (slot receivers) with the cornerbacks already playing off. That allows the corners to use their vision and get their eyes on No. 2 with the safeties in a position to "flat-foot" read the releases (no backpedal) and work to get over the top of No. 1 (plays like a Quarters technique for the safeties versus two vertical releases). This is called "Gold" in Williams' playbook.

This pre-snap look can confuse the protection count for the offense, allowing the Rams to get a free hit on Bucs quarterback Josh McCown. But more importantly, it sets the bait and invites McCown to dump this ball underneath on a possible flat route with the corner in a position to make a play.
Let's take a look at another example from Williams' playbook, this one from the Rams-Redskins matchup last season. In this play, the Rams are sending overload pressure and playing their trap technique to the closed side of the formation with a "Fist" call (2-Man) to the open side.
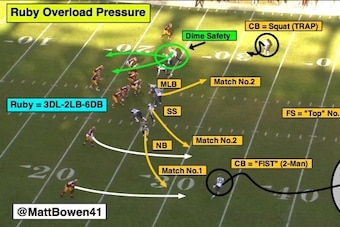
As you can see, the open-side cornerback drops to the deep half with two "vertical hook" defenders matching No. 1 and No. 2 (also called a "swipe" technique). This protects the Rams to the open side while they roll the strong safety over the top of No. 1 to the closed side with the cornerback squatting underneath.
This puts the cornerback in a position to jump any route underneath with the protection of the safety over the top of No. 1 to take away the fade or even a possible dig route.

With the Rams bringing five-man pressure, the cornerback gets his eyes on the tight end releasing to the flat and can break downhill as the safety (playing with depth) is in a position to overlap the fade or drive on the dig.
Remember, there are no guarantees the blitz will get home, so it's on the secondary to play the technique of the trap scheme.
Check out this GIF of the end-zone angle with dime safety Mark Barron beating the running back in protection and producing a sack on quarterback Colt McCoy. A great example of how rush and coverage work together in a scheme can confuse the quarterback and take away his primary reads.

The Perfect Execution of 'Trap' Coverage
In the 2013 NFL playoffs, the San Diego Chargers ran the "trap" scheme to perfection when they sent overload pressure against Andy Dalton and the Cincinnati Bengals.
Let's take a look at how the Chargers created confusion up front in the protection count and produced an interception when Dalton panicked and threw the out route directly into the cornerback squatting in the flat.

Based on their alignment, the Chargers are showing man pressure with the free safety in the deep middle of the field and a defender aligned over No. 2 to the closed side of the formation.
At the snap, the Chargers send pressure to the closed side with cornerback Shareece Wright playing the trap scheme. At the snap, Wright releases No. 1 outside to the safety rolling from the deep middle of the field ("tops" the coverage) with the inside slot defender matching to No. 2.

With pressure getting up the field on Dalton, the Bengals quarterback is forced to unload the ball and target the outside breaking route from the slot. This allows Wright to read the break of No. 2, get his eyes back inside and drive on the ball to go finish the play.
This is exactly how the pressure and coverage are scripted to play out with the rush getting home and the cornerback in the proper position to read the cut and jump the route.
Here's the sideline angle of the play. This GIF shows the technique, with Wright dropping No. 1 and stealing this ball against Dalton:

Exotic, Complex and Creative Trap Coverages
The great thing about the trap scheme is that defenses can run it out of a base personnel or get as exotic as they want with it in sub-packages, with movement, pressure, disguise and multiple fronts that create confusion in protection schemes.
To give you an example, here's one of Williams' old-school schemes that we ran back in Washington during my time in the league, with the cornerback and "Sam" 'backer coming on the blitz and the free safety "replacing" as the underneath defender in the trap scheme.
Check out Ruby "Weak Cat Gold" in this playbook diagram I drew up against a 2x2 formation with Posse/11 personnel (three wide receivers, one running back, one tight end) on the field:

To the closed side of the formation, I'm sending the cornerback (C) on the "cat" (cornerback blitz) and the Sam 'backer after he stems to a pressure alignment. That allows the free safety (FS) to drop down as the "trap" defender, with the strong safety (SS) rolling to "top" No. 1. That's a long way for the strong safety to go, but defense will time the snap count based off the film. This tells the safety how much time he has to move from his disguise once the quarterback starts his cadence.
To the open side, the nickelback (N) shows over the slot but drops and gains depth to play over the top of No. 1 as the cornerback runs the trap scheme with both the dime back (D) and Mike 'backer (M) matching inside to the No. 2 receiver.
If the quarterback reads this blitz and immediately throws a "smoke" route (zero-step hitch) out to the No. 1 receiver to the closed side (Z), it's on the free safety to make an open-field tackle as he drops down.
This is just one example (of many) that I could draw up to show how creative NFL defensive coordinators are with the pressure/trap combo. Plus, we are just scratching the surface when it comes to the adjustments for the defense against 3x1 formations (Richie/Louie calls), motion to empty, etc., in these blitzes. This stuff can get complex in the secondary when the offense uses pre-snap movement.
However, I believe we can use this as an introduction to the technique required to run the trap scheme at any level of the game. Bring the heat, set the bait and then let the cornerback go make a play.
Seven-year NFL veteran Matt Bowen is an NFL National Lead Writer for Bleacher Report.

.png)
.jpg)
.jpg)

.jpg)