
NFL 101: Breaking Down the Basics of the Zone Blitz
In this installment of the "NFL 101" series at Bleacher Report, former NFL defensive back Matt Bowen breaks down the basics of the zone blitz in order to give you a better understanding of the scheme and its execution at the pro level.
Click here for a breakdown of Cover 4.
The base zone blitz (or fire zone) allows the defense to apply five-man pressure with the protection of a three-deep, three-under zone shell in the back end.
.jpg?w=2560 "Commanders Chargers Football")
.jpg?w=2560 "Cardinals Saints Football")
.jpg?w=2560 "Bears Eagles Football")
Utilized out of base (4-3, 3-4) and sub-package (nickel, dime) personnel, the zone blitz can be dressed up through pre-snap disguise in order to cause confusion in an offensive protection count while producing a free runner to the quarterback.
A blitz concept that is a staple of Dick LeBeau’s playbook in Pittsburgh, these fire zones can force the quarterback to throw “hot” (sight adjust), while the defense drops second-level defenders directly into the throwing lanes (seam-flat, middle-hook).

Here, we will break down the basics of the zone blitz schemes in the NFL using the All-22 coaches film along with some playbook diagrams to take a closer look at the blitz fronts and coverage techniques that allow the defense to “match” specific route concepts.
Rush Five, Drop Six
As I said above, the base zone blitz schemes we see in the NFL consist of a five-man pressure with six players dropping into coverage (three-deep, three-under).
Here’s a look at “Under Smash” in the playbook diagram I drew up out of a 4-3 “Under” front (nose tackle aligned to the closed side of the formation). This is a core zone blitz scheme in Tampa Bay Buccaneers head coach Lovie Smith’s playbook:
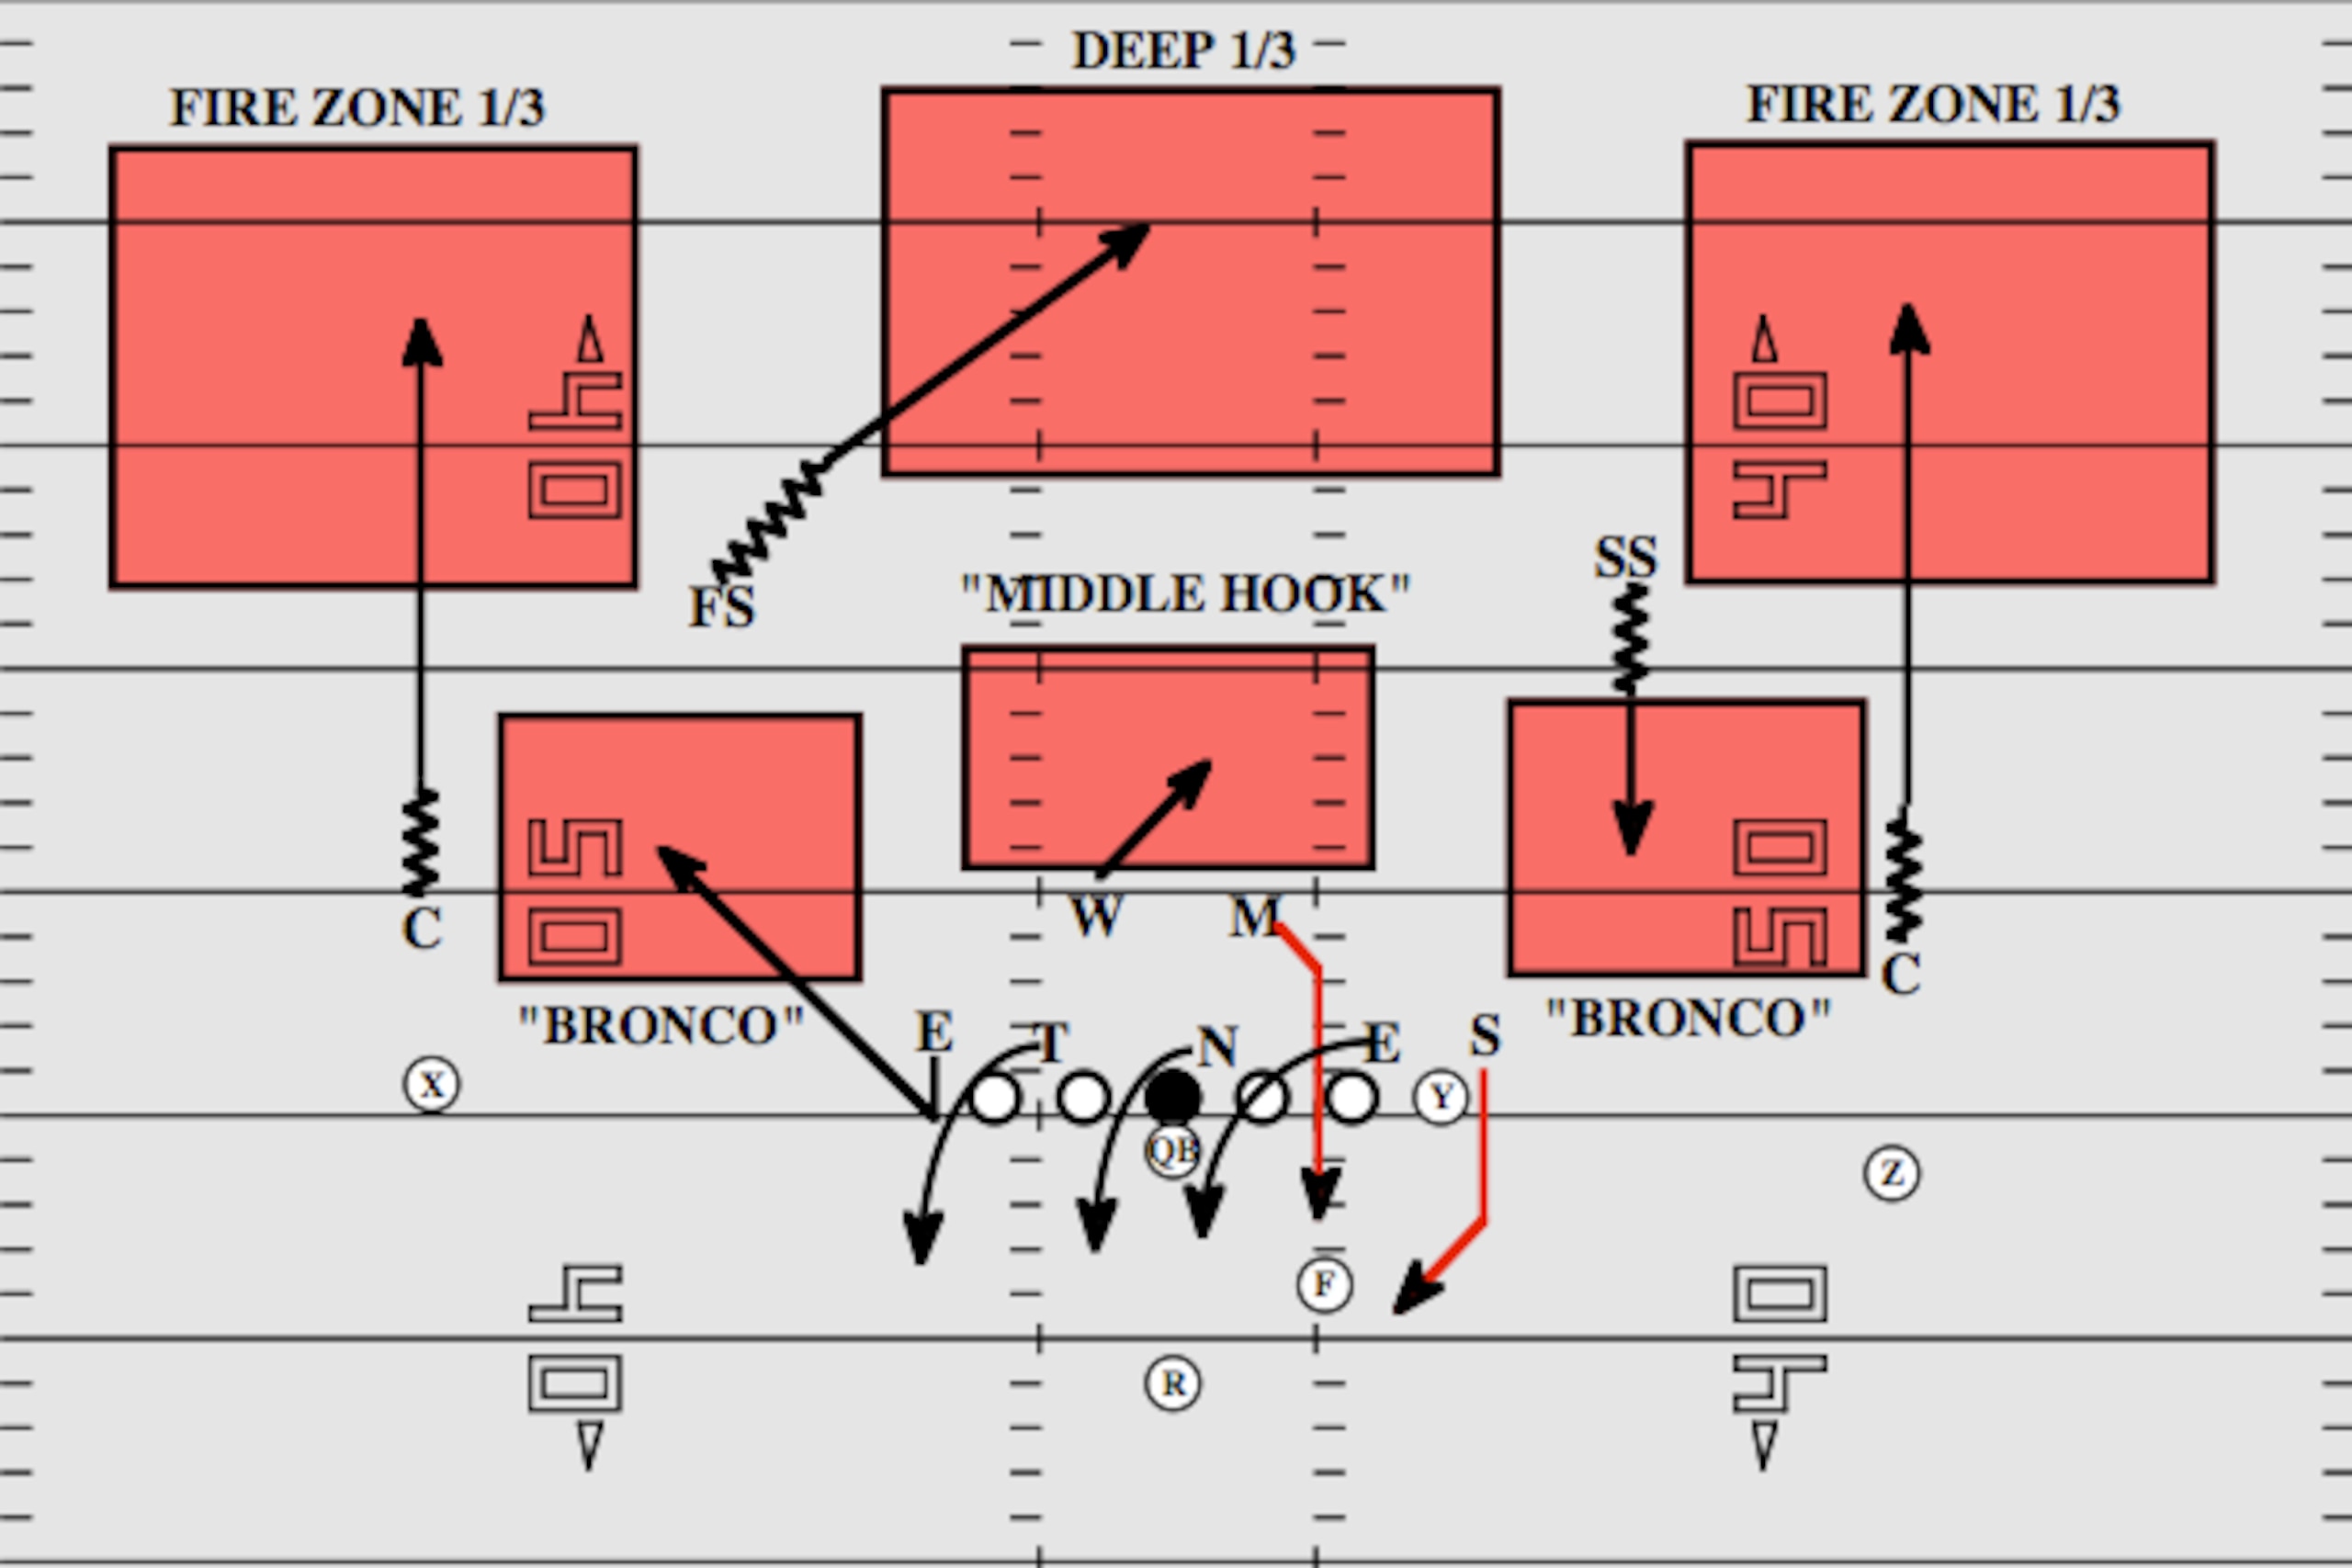
With the defense in an 4-3 “Under” front, both the Sam and Mike ‘backers (Smash = Sam and Mike) will blitz to the closed side of the formation.
Let’s break down each defensive position in this blitz:
RE: Drop to open-side seam-flat (match to No. 2)
DT: Scoop to open-side contain rush
NT: Scoop to open-side A-gap
LE: Long scoop to closed side A-gap
S: Closed-side contain blitz
M: Closed-side C-gap blitz
W: Drop to middle-hook (match to No. 3)
SS: Drop to closed-side seam-flat (match to No. 2)
FS: Deep middle 1/3
RC: Drop (“bail”) to fire zone 1/3 technique
LC: Drop (“bail”) to fire zone 1/3 technique
Here are some coaching points from the blitz scheme:
- I have the secondary showing Cover 2 in their pre-snap look (corners in press, safeties in a 2-Deep shell). At the snap, both corners will use a “bail” technique (sink, stack on top of the receiver) with the safeties rolling to their blitz alignment.
- Think of a zone blitz as a matchup scheme (similar to a matchup zone in basketball), with defenders passing off receivers to “match” to No. 1, No. 2 and No. 3 (count outside-in) based on the route concept.
- The “fire zone 1/3” technique tells the corners to “match” to No. 1 vertically down the field. Similar to Cover 1 and Cover 3, the corners play with outside leverage and “funnel” the receivers to their free safety help in the middle of the field. If there is no vertical from the No. 1 receiver (smash, shallow drive route), the cornerback will look inside to play No. 2 or No. 3 vertical.
- Both “seam-flat” defenders (strong safety and open-side end) “match” to No. 2 (also called a “bronco” technique). This means they have to cushion No. 2 vertically up the field while driving any throw to the flat (becomes the “new” No. 2) when the quarterback reads pressure (“hot” read).
- The “middle hook” defender (Will ‘backer) is responsible for No. 3. This is key versus a three-level flood concept from the offense (9-7-Flat “sail” route), as the Will has to push to the inside vertical release from No. 2 (becomes No. 3 when the offense sends a receiver to the flat).
- Below is an example of the three-level “sail” route from the Chargers. With No. 1 on the clear-out 9 route, the tight end (No. 2) releases on the 7 (corner) route. However, when the H-Back releases to the flat, he becomes the “new” No. 2—forcing the middle-hook defender (or the free safety in some schemes) to push to the “new” No. 3 (tight end):

- The Sam ‘backer has to rush with contain responsibilities and can’t allow the quarterback to get outside of the pocket.
- The “long scoop” from the closed-side defensive end is designed to occupy the right tackle (steps down versus inside stunt). This allows the Mike ‘backer to blitz once the defensive end clears.
- The three-technique defensive tackle (aligned to the open side in an “Under” front) plays the contain responsibilities to the open side of the formation with the defensive end now removed in coverage.
Now let’s check out the blitz front in “Under Smash” using an example from the Chicago Bears All-22 film versus the Minnesota Vikings:

Both the Sam and Mike ‘backers for the Bears will blitz to the closed side of the formation, with Will ‘backer Lance Briggs playing the middle-hook and open-side defensive end Julius Peppers dropping to the seam-flat technique.
With the closed-side defensive end on the “long scoop” (and the nose tackle working to the opposite A-gap), the Mike ‘backer can attack the C-gap from his base alignment.
This is a solid early down-and-distance zone blitz scheme out of base personnel versus offenses that want to run the ball or use play action.
Pre-snap Disguise
With the defense only sending five in base zone blitz schemes, the disguise (or pre-snap look) is crucial to causing some confusion in the opposition's protection schemes (slide protection, scan, etc.).
Using an example from the Ravens-Steelers matchup, let’s break down how Pittsburgh forced the “hot” read by showing overload pressure in order to produce a free runner to quarterback Joe Flacco:

Looking at the pre-snap alignment, the Steelers are showing that overload look to the open side of the formation with a linebacker as well as safety Troy Polamalu.
However, using the same blitz techniques we talked about above in the “Under Smash” scheme, the Steelers will drop both Polamalu and the open-side linebacker while sending the nickel and closed-side linebacker off the “long scoop” stunt:
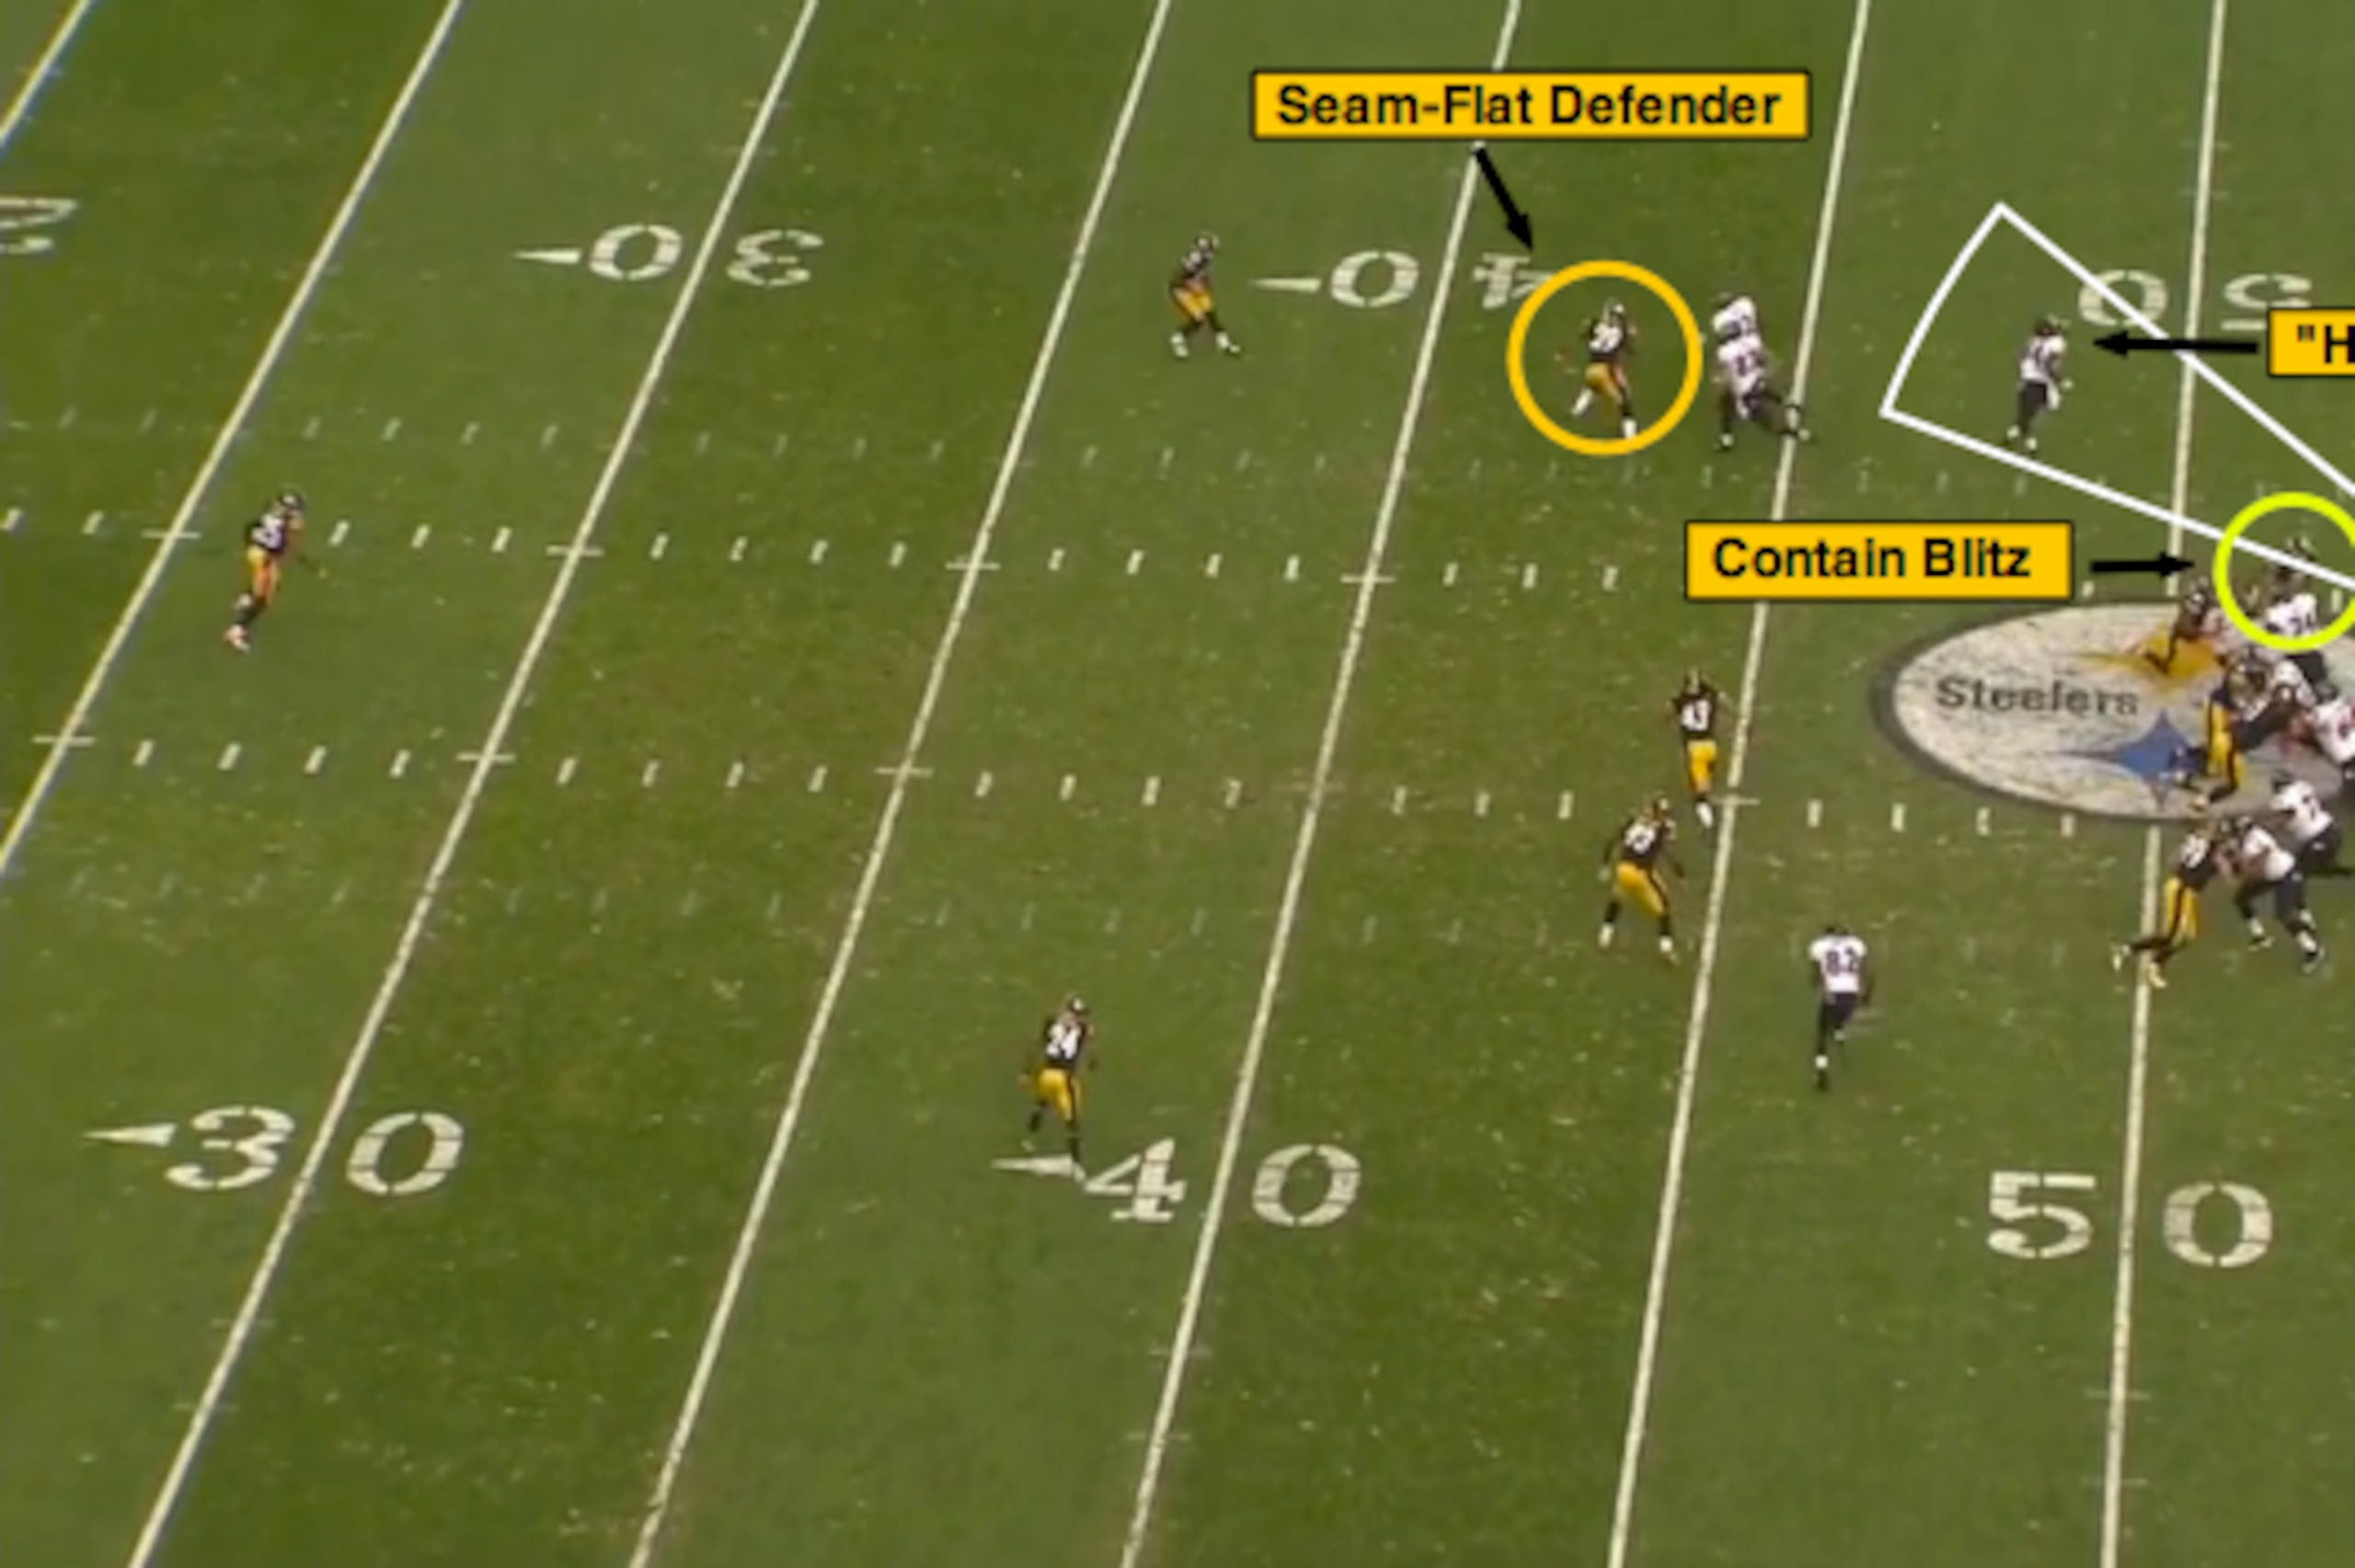
With the Ravens sliding the protection to the open side (overload look) and the running back being late to “scan” to the closed side, the Steelers get a free runner to Flacco (nickel back).
This forces Flacco to throw “hot” to the flat before the route develops, with the seam-flat defender working to the “new” No. 2 (receiver on flat release):

Flacco avoids the sack in this situation and dumps the ball “hot” to the receiver in the flat, but the result is a minimal gain for the Ravens, with the seam-flat defender making an open-field tackle.
And that’s exactly what the defense wants to see in this situation.
Base Nickel Zone Pressure
In a standard nickel package (4DL-2LB-5DB), the defense can rush the front four while adding the nickel as a contain rusher off the edge with the same three-deep, three-under zone shell in the back end.
Here’s an example of that look from the Jaguars-Titans matchup, with nickel back Will Blackmon blitzing off the edge to produce a sack—and touchdown—to close out Tennessee:

With both cornerbacks and the nickel showing press (along with the Sam ‘backer walked up to the closed side of the formation), this looks like man-pressure from the Jaguars.
However, this is a zone scheme, with Blackmon adding to the blitz front, both linebackers dropping into coverage and the safety rolling down to the play the seam-flat to the open side of the formation.
And with the Jaguars using a “TEX” stunt (end and tackle cross) on the defensive line to occupy the right tackle, the defense is trying to create a clear path for Blackmon to target the quarterback:

Check out the second-level defenders. The safety matches to No. 2 (seam-flat) with the Sam ‘backer passing off the tight end on the shallow drive route (underneath crossing route) to the Mike ‘backer (tight end becomes the “new” No. 3).
Along the front, the “TEX” stunt allows the defensive tackle to loop around and occupy the right tackle. This creates a soft edge for Blackmon, and it gives the Jaguars nickel back a free run at the quarterback to make the sack, get the ball out and take this one to the end zone for six points.
Safety Pressure
NFL defenses will send the safeties to both the closed and open side of the formation using a “trail blitz” technique (secondary blitzer). This allows the safety to “rush to daylight” (find a hole) off the stunt up front.
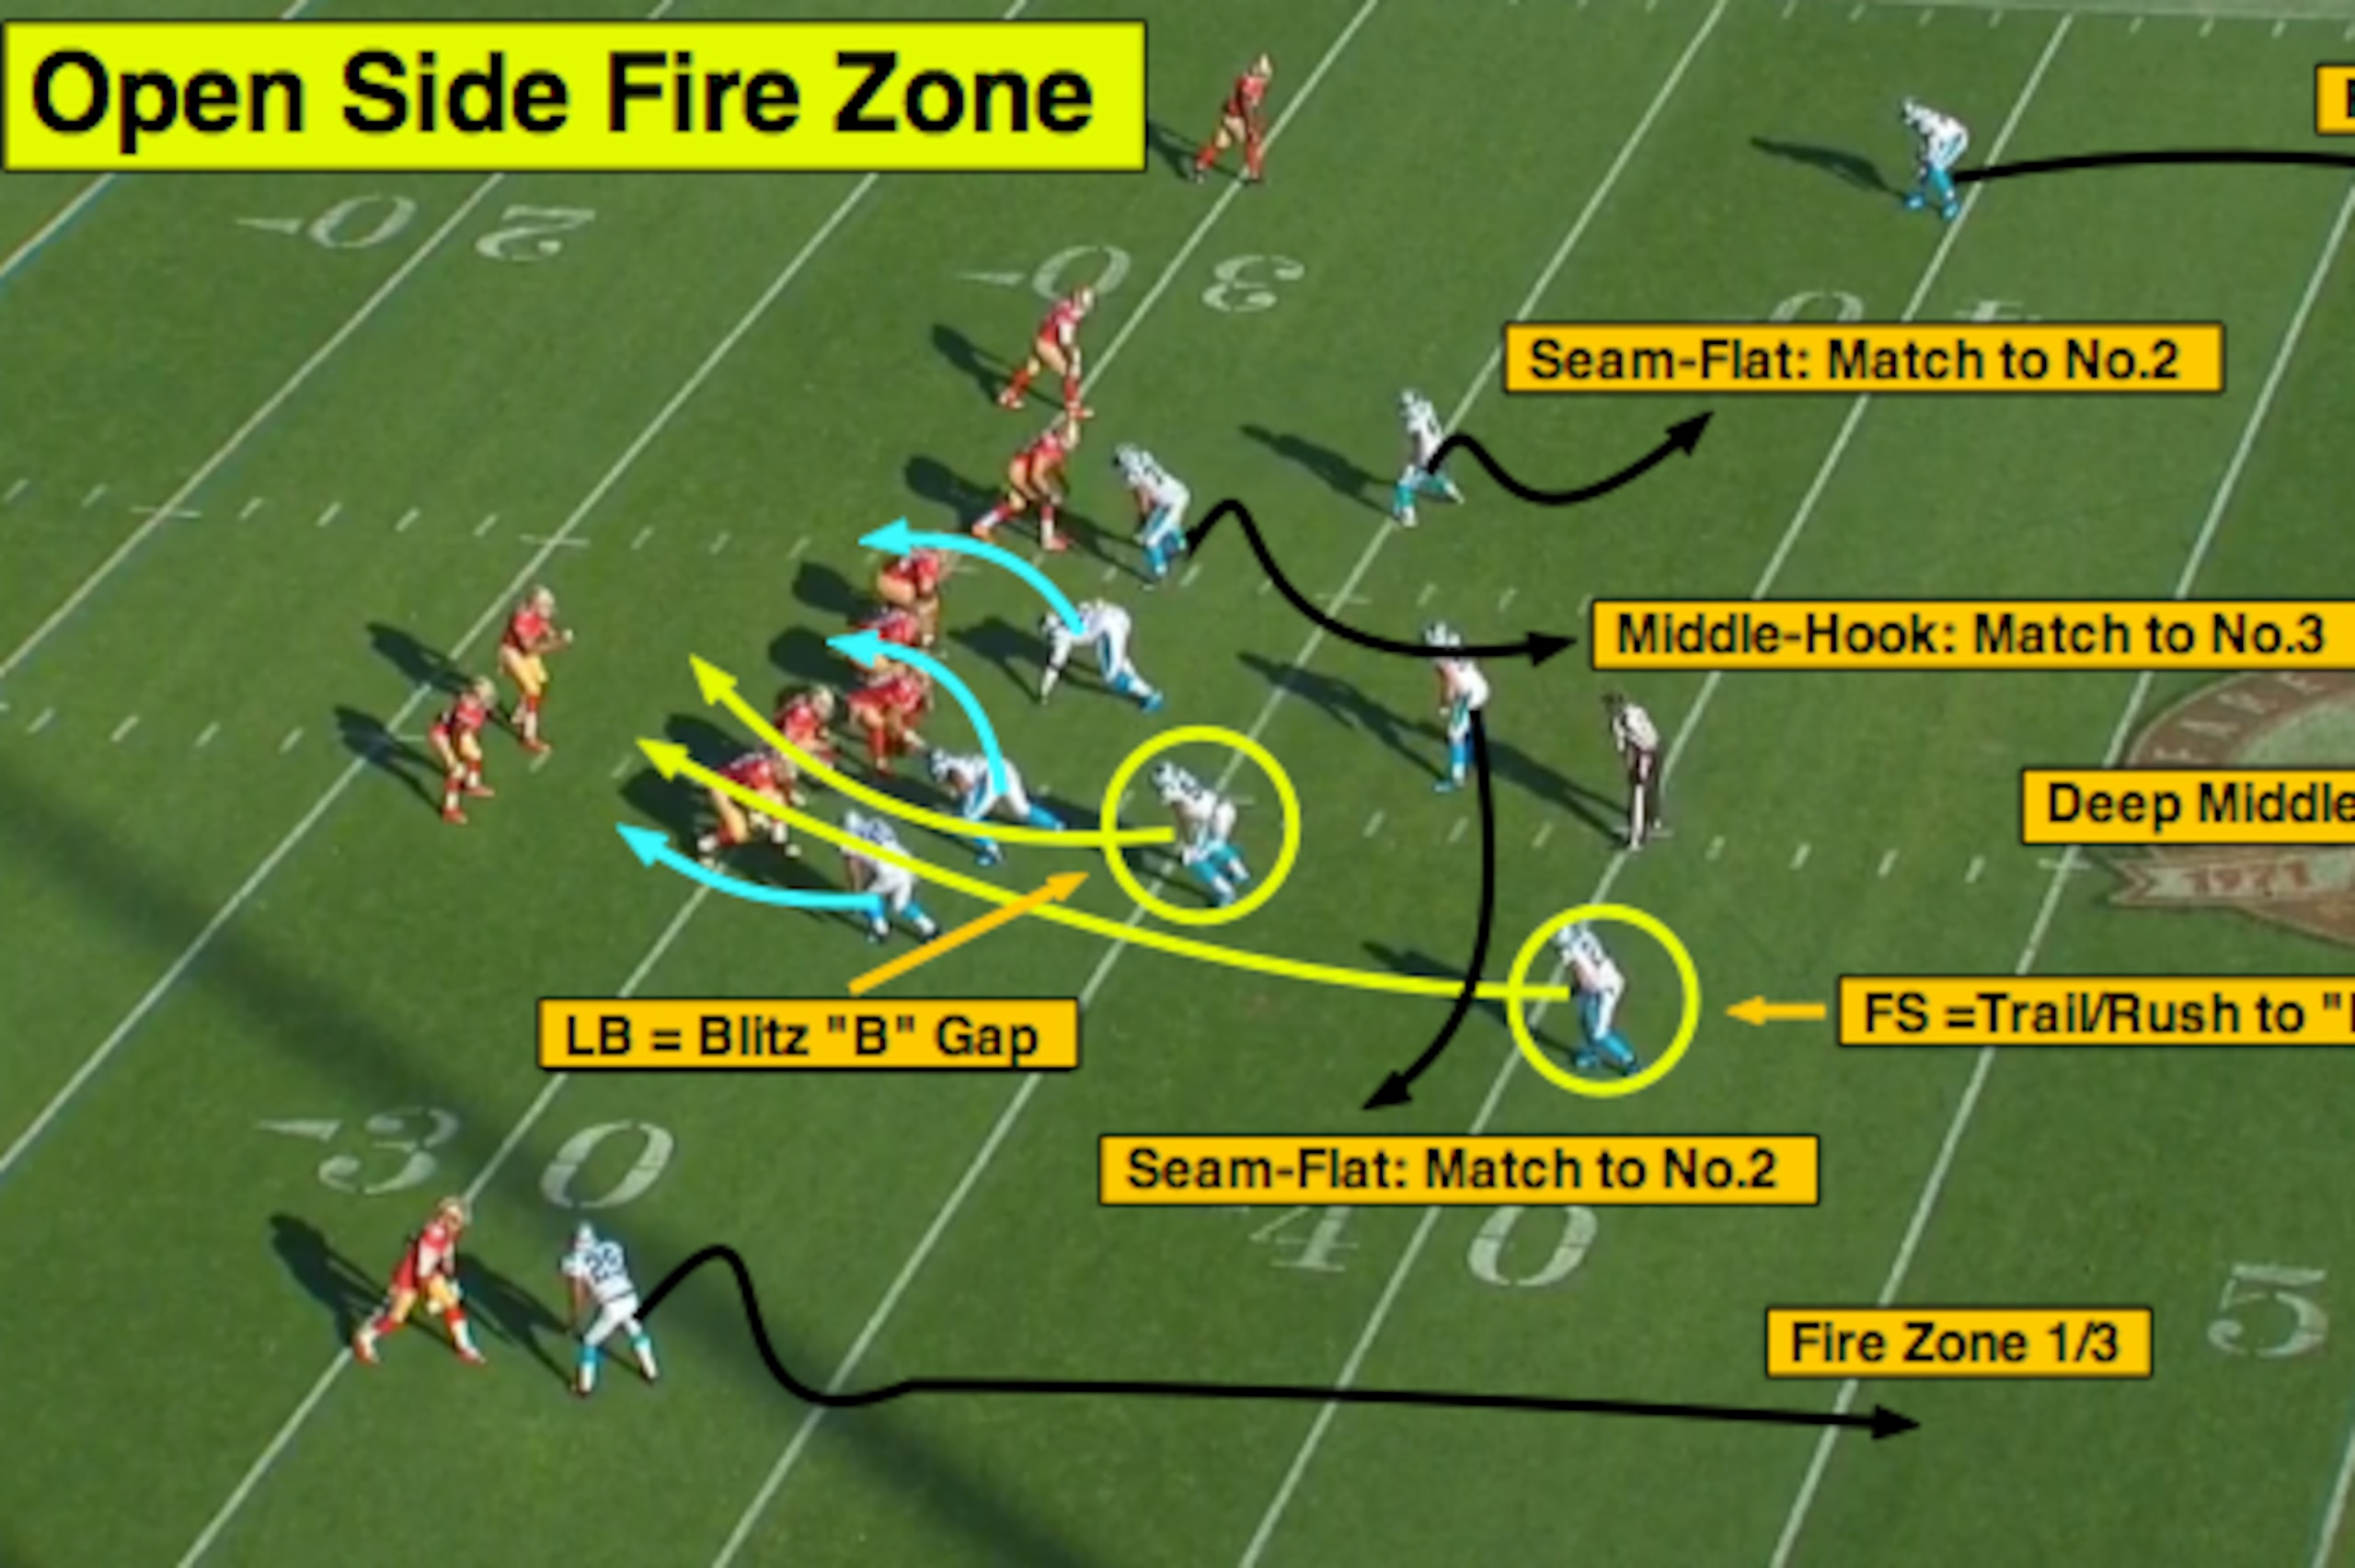
Here’s a playbook diagram of an open-side fire zone out of a base 4-3 “Over” front (defensive tackle aligned to closed side of the formation):

With the Will ‘backer “stemming” to his blitz alignment (move before the snap of the ball), the free safety starts to walk down into the front. This allows the safety to blitz the open side B-gap off the “long scoop” from the defensive end.
However, the safety can adjust his path based on the protection from the offensive line and look to find a hole to target the quarterback as a secondary blitzer.
Now let’s use the All-22 tape from the Panthers-49ers matchup to highlight a zone blitz utilizing the free safety and linebacker to the open side of a 3x1 formation:
With the Will ‘backer blitzing to the open-side B-gap, the free safety will stem to a blitz alignment and “trail” the linebacker through the hole. This allows the open-side end to rush with contain principles up the field to occupy the left tackle.
In the back end, the closed-side defensive end drops to the middle-hook, with the nickel back and Mike ‘backer playing the seam-flat technique to both sides of the formation:
The 49ers are running the “999” concept (four verticals from a 3x1 alignment) to target the tight end on the inside vertical seam.
However, with the defensive end sinking under the tight end on the inside vertical (and linebacker Luke Kuechly in a position to drive back to the closed side of the formation), quarterback Colin Kaepernick has to hold onto this ball.
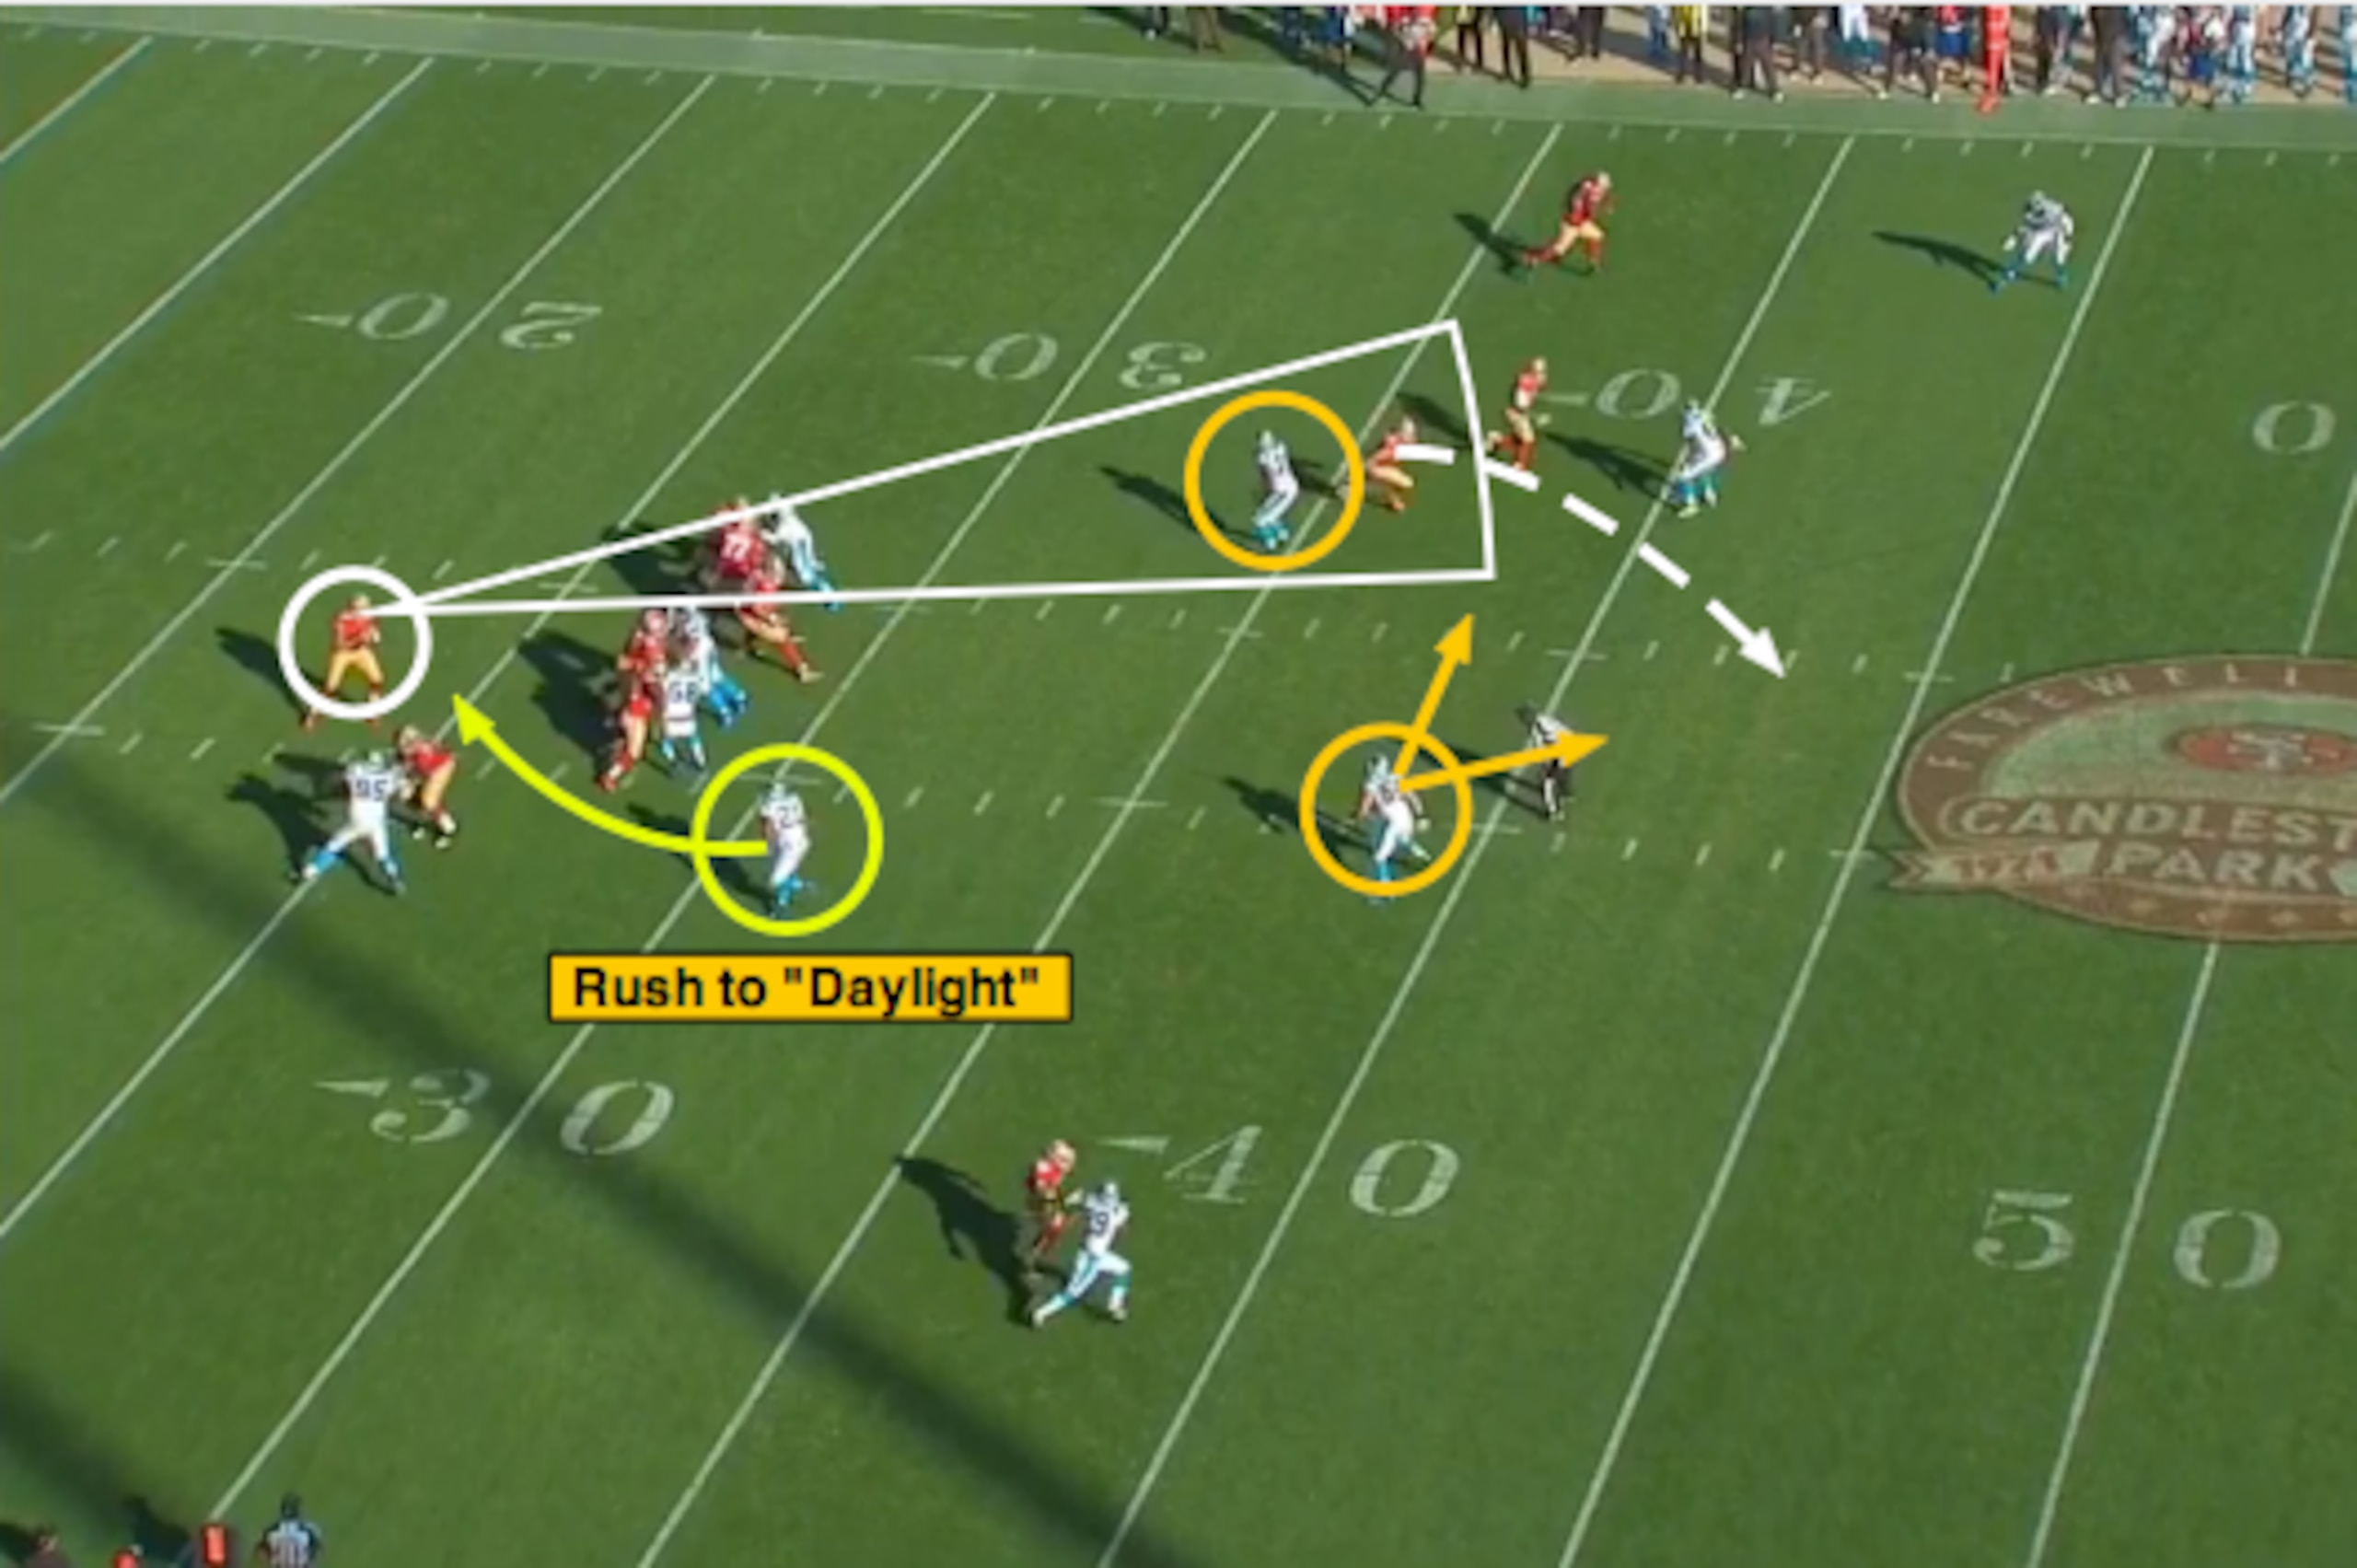
This allows the free safety to “rush to daylight” to the open side, with running back Frank Gore picking up the blitzing linebacker:

From the end-zone angle, we can see the defensive end up the field and the linebacker occupying the running back in protection. This creates a clear rush lane for safety Mike Mitchell to produce a sack versus the 49ers.
Multiple Adjustments
The zone blitz schemes we just looked at are very basic and don’t include adjustments to offensive movement (shifts, motions, etc.).
However, based on defensive game plans during the regular season, teams will use a variety of pre-snap disguises and schemes to target specific offenses.
Here’s an example of a zone blitz (Rush Viper Fire Zone) out of dime personnel from one of my old playbooks in Washington:

As you can see, the blitz responsibilities will change based on the offensive personnel grouping, formation and alignment. However, we are still looking at a five-man pressure scheme with a three-deep, three-under zone shell.
Remember, zone pressure isn’t guaranteed to produce results. And with only a five-man rush, the secondary can be exposed if they show the blitz too early.
But regardless of how basic or complex a zone blitz looks on the chalkboard, the disguise and execution remain the keys to getting home or forcing the quarterback to unload the ball.
Seven-year NFL veteran Matt Bowen is an NFL National Lead Writer for Bleacher Report.
.jpg?w=2560 "Panthers Buccaneers Football")
.jpg?w=2560 "Lions Rams Football")


